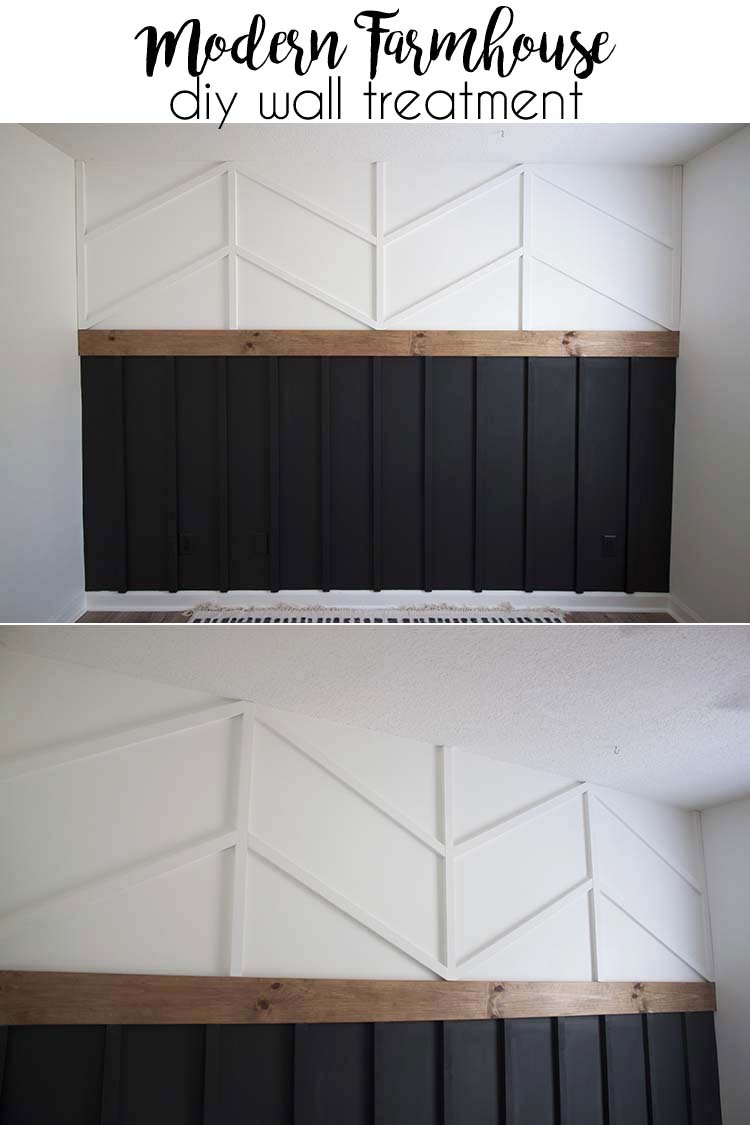
Week 2 of the 6-week One Room Challenge brings us to possibly my most favorite DIY accent wall ever! When we began planning this room back in March he basically had his mind made up that his room was going to be an exact copy of his big brother’s teen bedroom makeover from last year’s ORC.
Obviously, I had to placate him with ideas that gave him the same satisfaction without it being the exact same thing we did last year. That was easier after he spied this chevron accent wall on Pinterest from Ashley over at Our Rustic Paradise. (Since we first spied this awesome wall she’s posted a tutorial in her IG stories!)
DIY Accent Wall Tutorial
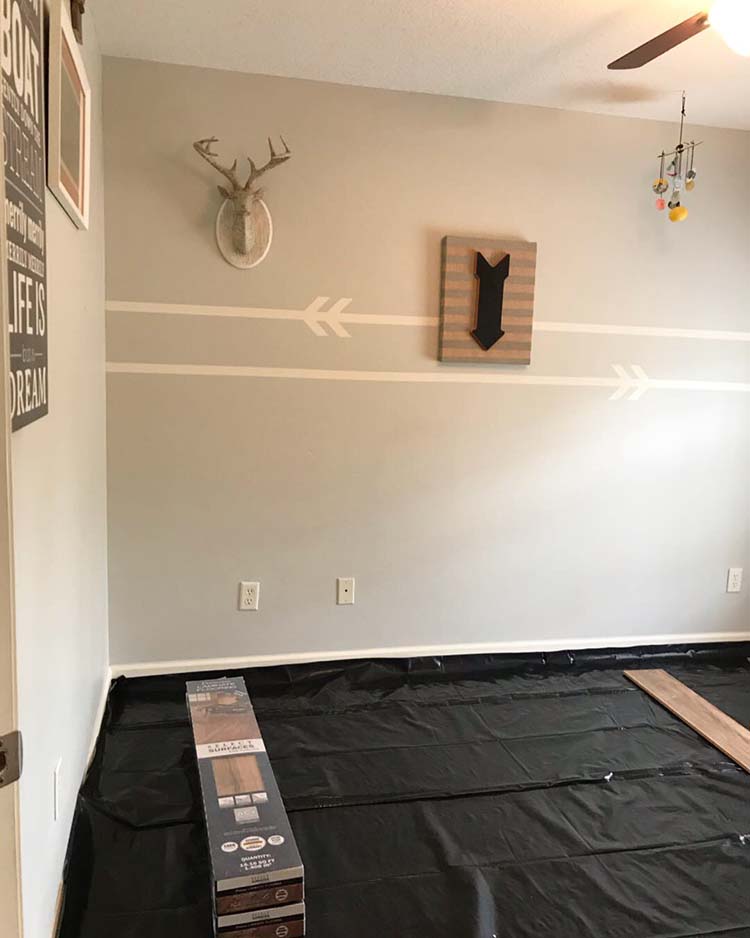
As a reminder, this is what we started with. About a month ago we finished installing our DIY laminate flooring in this room. We only have about a million more rooms to go and I would be SO happy if we could get them done before the holidays – which seem so far away but, in fact, are not – are upon us again.
I live for the day when my floors in our main living areas are normal. And they all match. It’s the little things.
Supplies:
- Paint – Benjamin Moore Matte Black & Simply White
- Stain – Early American by Minwax
- 1- 1x6x12 – stained
- 18 – 1x2x8s
- miter saw
- nail gun
- 2″ brad nails
- stud finder
- wood filler
- construction adhesive, optional
Total Cost – $61.04 (without tax)
Step #1 – Paint
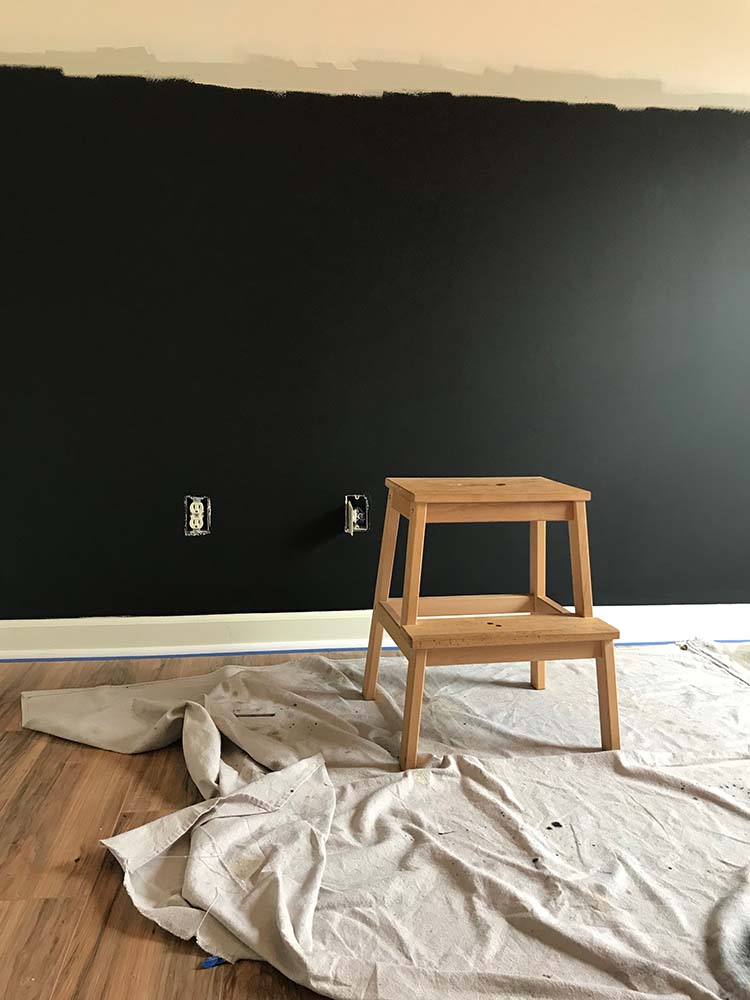
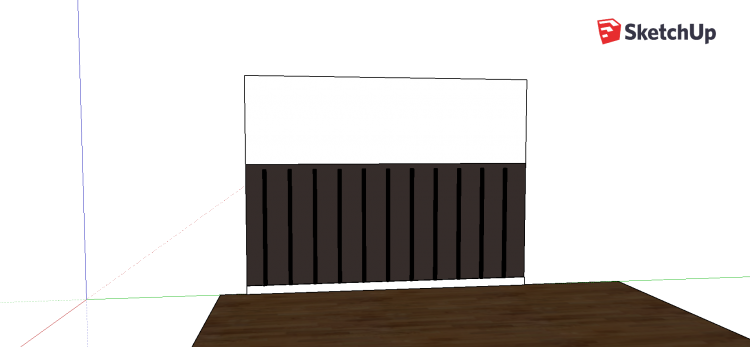
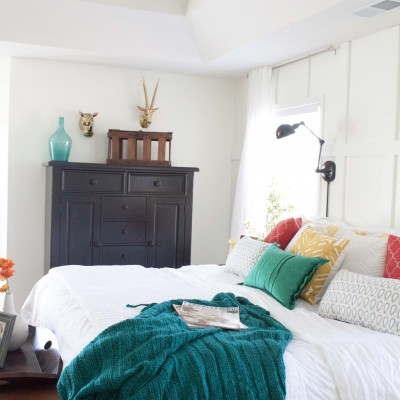
I started by deciding where I wanted the one long horizontal board to go. We knew we wanted it more than halfway up the wall, but there was no exact science to it. We used the height of the headboard in our other son’s room to help us decide how far up the wall we wanted the board.
From there, we painted the bottom half a matte black by Benjamin Moore. I started to use the same color as we did in big brother’s room but I was out and our local BM was closed on Saturdays until spring and I didn’t want to wait so I just used what I had on hand. The top half is Simply White which I’ve used in various other places throughout the house where I’ve need a just-right-white.
Step #2 – Dry Fit Horizontal Board
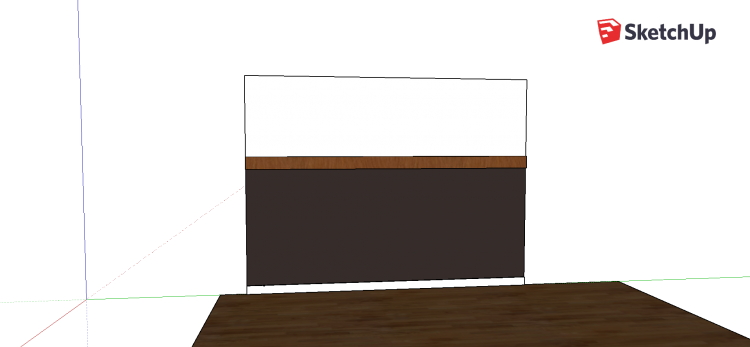
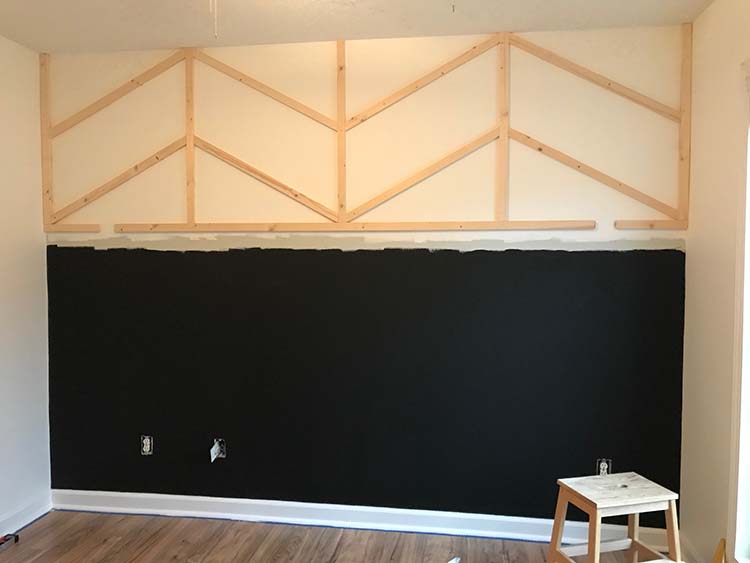
Because we did most of this work in the dark (and those daylight cell phone pics up there are atrocious enough – I’m sorry!), I’ve done the rest of the steps in SketchUp.
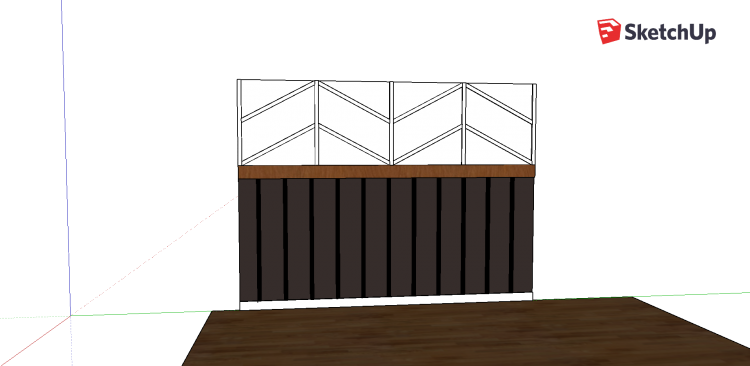
After the painting was done we did a dry-fit of the stained horizontal board to ensure the paint line was covered and to measure our 1x2s for the top and bottom. We waited to install the horizontal board last to make painting easier in those tight spaces and so we wouldn’t have to worry about getting paint on our stained board.
Step #3 – Install the Battens
I think my little guy likes this wall treatment so much because the bottom half is exactly like the DIY board and batten in brother’s room but the top half makes it all his own. Kind of like a mullet – business on the bottom, party on the top!
After using our horizontal board in step #2 to measure our battens, we cut our 1x2s to size and installed them using our brad nail gun. You can use glue or construction adhesive as well but that’s optional. We worked out the spacing for our battens based on where our outlets are on the wall to keep them from getting in the way. Our batten spacing is 11″ center to center.
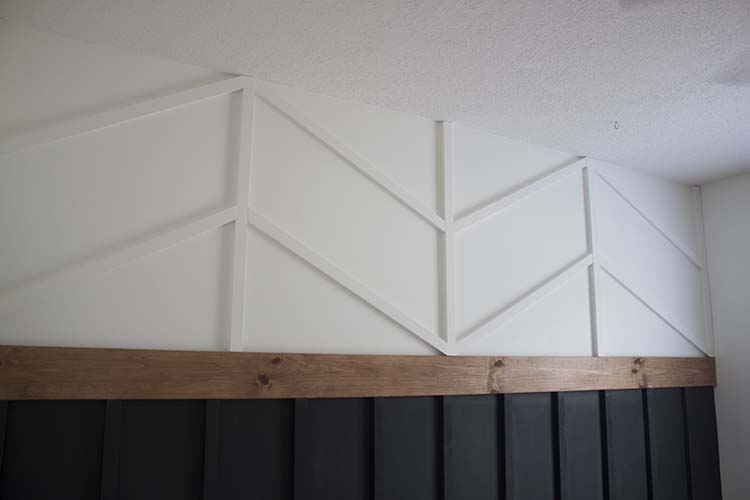
Step #4 – Install the Uprights

Next, we installed the uprights on the top wall. These are evenly spaced out starting from the center of our wall and installed using our brad nailer. We nailed the tops of each of these at an angle to grab the stud that runs along the top of the wall.
Step #5 – Install Cross Pieces

Each of the angles is 62-degrees. Cross pieces were cut and measured after the uprights were installed so we’d know just what size they needed to be. We installed them using our brad nailer and nailed these pieces into studs along the wall.
To help keep our cuts straight and even we used some scrap 1x2s as temporary placeholders.
You might notice, as evidenced by the photo above, that we did not follow the exact steps that I’ve laid out here for you today. And to that I say, do as I say – not as I do. It’s so much easier to touch up a black wall (tiny white drips) while you’re still painting those battens vs. once you’ve already finished it.
Step #6 – Fill Holes + Paint
Once all of your 1x2s are in place, fill the holes left from the brad nailer with putty, sand, and paint! It’ll take at least two coats. Once that’s done, install your horizontal board using the brad nailer, fill holes, sand, and touch-up the stain.
TIP: If you find that any of your pieces are lifting, you can use glue or construction adhesive to help hold it in place. I try to avoid this when possible because it’s less damaging to the sheetrock if we decide to take it down later. You can also go back and nail any of the upright pieces, at an angle, into the horizontal board to give them something more to hold on to. Fill holes, sand, and touch-up with paint.
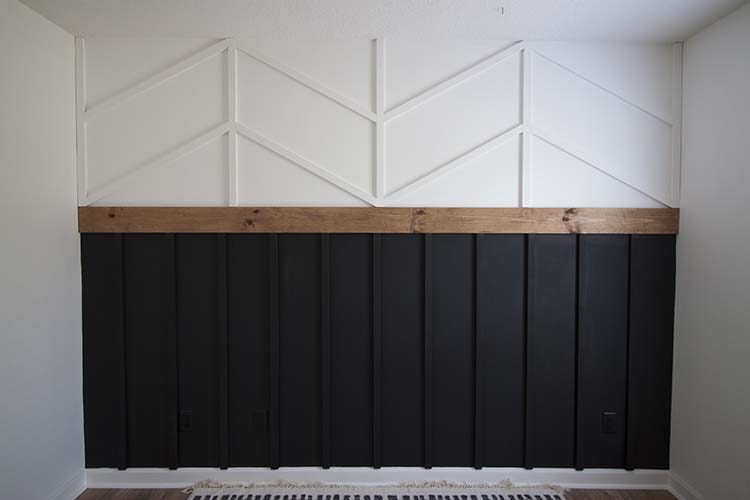
And that, my friends, is my fav wall treatment/accent wall possibly ever!
My only regret is that you have to see it while the room is still unadorned. But that all changes next week when I share our newest DIY bed. Stay tuned!
MAKEOVER TIMELINE
- Week 1 – The Plan (April 4th)
- Week 2 – The Wall Treatment (April 11th)
- Week 3 – The DIY Bed (April 18th)
- Week 4 – The DIY Dresser (April 25th)
- Week 5 – The Decor (May 2nd)
- Week 6 – The Reveal (May 9th)
Join me each Thursday from now until May 9th for each new installment to this makeover challenge! Next week, the wall treatment.
![]()


Love the woodwork. Looks so good can’t wait to the reveal.
Thank you so much!
Looks amazing! How tall are your ceilings?
Thank you! We have an 8ft ceiling in this room.
At what height did you hang the wood board?
The bottom of the wood board is 55 1/4″ from the floor.
What Sheen is the simply white ? Is it matte too?
Hi Paige,
The Simply White is either eggshell or satin. I can’t remember for sure but there’s not much difference between those two.
How far do the battens stick out passed your baseboards? I’m thinking about doing this on one of my walls that I have both crown moulding and baseboards on.
They still out about a quarter of an inch. If in doubt, just get one stick of 1×2 and see how it looks before deciding to go with it.
What was the horizontal board you used? Thank you!
It looks amazing!
Hi Debora,
It’s just a pine board. Nothing fancy!
I don’t see anywhere on here where you mention what wood board you used. Maybe I missed it. Would you mind sharing?
Thank you!!
Hi Debora,
For some of it, we used scrap wood. Some of it we purchased. It is all pine, which is our cheapest option here. That may be different for you depending upon where you live. Hope that’s helpful!
I want to replicate this but it is definitely not a 45 degree miter for the chevron pieces. Do you recall the angle?
Hi Emily,
Thank you for catching that, you are absolutely correct. I have updated the post. The correct angle is 62-degrees. But, as I’m sure you’re aware, that will change depending upon the height and width of your walls. Thank you!
This looks amazing! Can’t wait to try something similar in our bedroom. Did you paint the other walls in your room the same white as upper portion of your accent wall?
Hi Michelle,
Thank you! Yes, the white is the same around the room!
Did you do this directly into/onto the drywall? If so, did it hold not being in the studs?
Hi Matt,
When we can we try and hit a stud. If we can’t and the boards try and lift we use construction adhesive. With this particular project, we nailed directly into the drywall and we angled the nail gun so that the ends went into the other 1xs for added security. I hope this is helpful!
What is the width of the wall so I can try to figure out roughly how much supplies I need, thank you
Hi Amber,
Our wall is 10ft wide but you’d need to know the width of your own wall, spacing between bottom battens, and the angles of your pattern (based on your wall width) to get an accurate estimate. I hope this helps!