If you’re anything like me you have approximately 1.4 million digital images stored somewhere that have never seen the light of day. And it’s a shame really, isn’t it? These DIY Pallet Photo Frames will have you printing out those forlorn digital images in no time flat!
I knew exactly what I would do when I found out I got to work with Mod Podge Photo Transfer Medium. It was time to bring some of those photos out into the light.
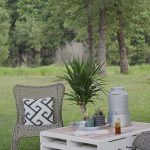
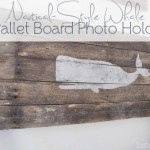
Of course, since I work with wood on a daily basis it only made sense for me to transfer these photos to wood. We made these wooden frames from pallet wood. Three boards wide with strips of pallet wood on the back to hold it all together. I left the wood natural so the aging and patina you see here occurred all by itself. Beautiful isn’t it!
I used these photos that I took at a birthday party almost a year ago. I took the digital files to Office Max and had them print me color copies on regular copy paper – MUST BE LASER PRINTS, NOT INKJET. Be sure to have them reverse (mirror-image) your photo or graphic, especially if it has words or letters. It will come out backward otherwise. I trimmed the photos down to get rid of any white edges as the medium is not transparent.
Now it’s time to get to work!
Looks a little scary at first. You apply enough medium to completely cover your photocopy until you can no longer see any of the photo through the medium.
See! It almost disappears against the white background. Once you’ve coated it completely it’s time to apply it to your surface. Make sure to press gently from the center out to remove any air bubbles.
And now, you wait! This is the absolute hardest part. From here, you must let it sit for 24 hours to cure before removing the paper.
After you’ve waited 24 hours for the medium to cure it’s time to remove the paper. Place a damp towel or sponge over the paper and let it sit for 2 minutes.
Now it’s time to gently rub the paper away from your image being careful not to press too hard and remove part of your image.
Rub in a circular motion until all of the paper has been removed.
Have a dustpan on hand!
Now. I told you before to rub gently so as not to accidentally remove any of your image. But being me, I actually want to remove some of the image. I was going for more of a rugged look so while I was careful around their faces I purposefully rubbed some of the image away, especially where the wooden slats came together. And then I went back with a sanding block and rounded off the edges of each image a bit.
I especially like the more rustic look here! I think it works nicely with the old door in the background.
And finally, I sealed each of the images with my Matte Mod Podge, which I ALWAYS have on hand and use for everything.
You can find Mod Podge Photo Transfer Medium at your local craft store you can pick it up right here: Mod Podge CS15067 8-Ounce Photo Transfer, Medium.
And there you have it! It’s as easy as that to get some of those photos out of your computer and onto your walls. Or any other place you’d like to put them since you can use this medium on fabric, glass, metal, wood and terra cots pots (I know this because I also made some lovely pots, too!).


Great post! I definitely want to try Mod Podge Photo Transfer now.
Thanks Stacy! It was a lot of fun and I love the results!
hi Jamie, I love the idea! I tied it and it looked great while it was wet but when it dried the picture was hard to see and had some white splotches. do you have any idea what I might have done wrong?
It sounds like you either didn’t get all of the paper off or, as is more likely, you rubbed a tad too hard and removed some of the transfer. The transfer medium itself dries white. So if you removed some of the image you’d be left with white blotches. That’s why I recommend soaking the paper before rubbing. You don’t really want to rub very much at all to remove the paper. Hope that helps!
Hi,
I did a quote transfer to a canvas but tue photo is small than the canvas. So now i have like a mod podge frame. How Can I remove that glue ?
I’m not sure there’s a way to remove it. I always try and keep my glue just under my image and then use a sealer over top to catch any edges that might want to curl up. Would applying a mod podge over the whole canvas mask that? If not, I might try heat or scraping it away but, honestly, on canvas, I’m not sure it’s removeable.
Great project!!
You don’t specifically say, but it looks like you position the photo image face down on the wood after coating with the transfer medium, right? So the finished product is actually the mirror image of the original photo?
Hi Wendy,
Actually you could have them print a mirror image (or reverse image) for you so that once it’s done the transfer looks exactly as the original. You would have to do this if your image contained words. Thank you!
So did you position the image face down?
That’s correct!
thanks for clarifying that …I was wondering the same thing!! can’t wait to try this!!
You’re very welcome! Glad it helped.
My picture didnt show up good can i sand it down and do it again
I haven’t tried but I don’t see why not! Just make sure you remove all the residue and you should be good to go. Good luck!
Love it Jamie! Cute models too! I want some pallet wood and terra cotta pots!
Ahh Thanks Debbie! I made the models, too! 😉
I saw your post on vinegar and steel wool stain. Can this be used before transferring the photo? Also, so i understand completely, you placed the transfer medium on the front of the photo then flipped it face down then waited 24 hours?
Thanks
Hi Beth!
Yes, you could use the steel wool vinegar stain and, once that’s dry, you could transfer over the top of that. And yes, I put the transfer onto the photo, placed the photo down onto the wood, smoothed it out and waited 24 hours. Hope that helps!
I love the rustic look; can’t wait to try it! You are absolutely right we have all of our precious photos stuck on our computers and in our phones. I love helping people combined their memories with their stories and share them in a meaningful way. www.heritagemakers.com/tracel
Thanks Tracel!
As always, I love your project. And I also love the terra-cotta pots. I think I’m going to have to make me up a batch of those. They’d make a nice addition to my deck and my booth, too.
What a cool idea! I love the frames. Whoever hosted that party sure provided the perfect setting for those photos!
Haha Laura! I was wondering if you’d notice. Yes, she was the hostess with the mostest! 😉
Awesome tutorial…I have some old barn wood, I will be trying this with. I am a new blogger and would love it if you checked out my blog and tell me what you think. I rent a space at a local Antique Mall in Northern California with a focus on painting vintage previously loved furniture. I love chalk paint and usually make my own custom chalk paint. 😉
http://charshappyplace.blogspot.com/
Thanks a ton!
Char
Where can I find wood pieces to work with? Also, another site mentioned modpodge and another ingredient
This will be my first time to try it.
Can someone help me.
Thanks,
Elayne
Hi Elanyne,
You could try your local hobby or craft stores for wooden plaques to try this one. It also works on fabric so you could choose an canvas instead and make it look like painting!
I’m not sure what the other site mentions but what I used here is Mod Podge Photo Transfer Medium to do the actual transfer. Then I used Mod Podge in Matte to seal once dry. Hope this helps!
Thank you.
Can u use inkjet or u need a color laser jet.
Thanks again,
Elayne
You must use a laser jet copy.
I have old kitchen cabinet doors and floor trim I would like to use for this. Sounds like I would need to sand off the varnish. Would this work or not be porous enough. Have you tried wood that has been sealed?
Hi Tina,
I think it could definitely work! I would absolutely recommend lightly sanding the surface just to knock down some of that shine before applying. Let us know how it goes!
This is so great – these panels are beautiful!
Love your project! Pallet wood makes the perfect rustic background for your photos.
Hi, Does the ModPodge leave the item tacky?
I used modpodge to seal a collage book cover and it remained tacky and sticks to everything, even to the point where it has damaged the carefully done collage. I am so disappointed as I had heard so much good stuff about he product. Are you able to help restore my faith in it?
HI Dee,
I am so sorry I missed your question earlier. Some Mod Podge needs a coating of clear spray sealer to prevent tackiness, it really depends on the kind of Mod Podge you are using – i.e. Matte vs Glossy, etc. If I’m decoupaging something that will come in contact with other things (for example, it’s not hanging on a wall remaining untouched) as it sounds your collage did, I would spray it with a clear sealer. The pics I did in this post were sealed with the Matte Mod Podge and did not require a spray sealer. Hope this helps!
Ok that was awesome! I’ve used the mod podge thing before but never for photos… Love the way it came out on the rusty boards…
Thanks for the tutorial!
Susan
Did you sand your pallet wood prior to applying the picture?
I did Debbie. Just a little to make them smoother.
Did you use a inkjet printer or does it have to be a laserprinter?
Hi love this idea can you use another glue like pva think its similar to mode lodge
Cheers
In terms of the glue to seal it? I haven’t heard of PVA so I can say on that. I know that it wouldn’t have quite the same look with a regular white (or school) glue as that’s too watery. So I’d say any thicker glue used for sealing paper should work. I prefer Mod Podge because of it’s trusted results and I also like Decou-Page from DecoArt. Hope that helps!
Does this only work on wood or can it work on canvas too
Yes. It works on most any porous surface!
My daughter tried but the pic was peeling off.
Did she try it on wood? If so, was it shiny? I haven’t had that happen before but I’d be glad to offer some advice if you’d like to give me some more details.
I want to try this with a map. Should I lay it face up or face down?
You should only do this with a map if you can print it in mirror image. If it’s a pre printed map and you try this it will be backwards. Does that make sense? So, be sure whatever your image is it is a mirror image. If there are words on the image the words should be backwards on the image you wish to transfer so that once they are transfered they will no longer be backwards. What you are doing here is literally transferring the ink in the image and then washing away the paper. If you already have a printed map you’d like to use your best bet would be to use original mod podge and glue it directly onto the surface. Hope this helps!
Hi,
It’s Elayne once again. Please do I need to use medium gel first, the face the pic down overnight. Then out the mod podge on top of pic after the paper is peeled off?
Or can I just use mod podge photo transfer?
Please once again help. Step by step.
Thanks and sorry.
What kind of copy did you make? Was it laser printer or an inkjet printer? I just tried this with an inkjet and the colors came out awful.
I am sorry Melissa! I have always thought I addressed this in my post but it must be a LASER PRINT as per the package directions in order for it to work. I have updated my post to include this. Thank you for making me realize I neglected a very important detail. I hope you’ll try it again!
So, failure #2. Don’t try this on a painted canvas. The paint will bubble off. 🙁 On the plus side, the laser copy worked great (well, until the it came off with the bubbling craft paint…d’oh!). On to experiment #3.
😀
Oh sorry Melissa! But I love that you too like to experiment! LOL Good luck!
Beautiful work! I would love to try it with some of my wedding photos. Can you speak a little more to how you prepared the wood? Is it sealed with anything before or after? I saw that you sanded it down but did you do anything else to it? Thanks so much!
Hi Stephanie,
Thanks! I did not prep the wood aside from sanding and I sealed it with a matte Mod Podge. Hope that helps!
Thanks! Very helpful. So you just covered the entire wood piece in Matte Modge Podge, not just over the image?
Also, one other question as I was looking at it… I noticed one of your photos, the one with the white door, obviously has white in it. Does that mean the lazer printers print white ink on paper? Otherwise, the white door wouldn’t show but instead reveal the brown wood of the pallet because there isn’t any white ink on the paper. Does this make sense?
Personally I just covered the image itself. Even though it is Matte Mod Podge you’d still see it on the wood. If you don’t want that, just cover the image and not the “frame” around it. Your second question is a great question and the answer is while this medium does transfer ink (colors), it is also not clear when it dries. It dries white. So the white door in my image is actually the medium you just can’t tell that because of the shadowing (from the black color) that gives it dimension, on top of that. Hopefully that makes sense. Long story short, you will be fine if you image has something white in it! 😉
Ok…so once you cover the copy with the midge podge, you flip it over so it sticks to the wood????
Correct!
Hi,
I thought u need to use the medium gel first, then face the photo down then let it dry over night. Then use mod podge.
Is this correct? If not, please step by step. I’m new at this.
Thank you,
Elayne
You will be using Mod Podge Photo Transfer Medium to do this project. Using regular Mod Podge in Matte is optional to seal.
Hi,
I thought u need to use the medium gel first, then face the photo down then let it dry over night. Then use mod podge.
I’m new at this.
Help.
Thank you,
Elayne
I tried doing the photo on canvas, put mod podge on the canvas. Let dry over night. Got the paper wet & started rubbing the paper off, but was unable to get all the paper off without taking the picture off with it. I let it dry & the picture came out hazy. tried with a layer of Mod Podge to make it look better. Now it look like an old painting. How do I get all the paper off without making holes in the picture?
Hi Vickie! Correct me if I’m wrong but did you put the mod podge transfer medium onto the canvas and then the pic on top of the mod podge transfer medium? If so, you would need to put the mod podge onto the photo and then the photo onto the canvas. Correct me if I am misunderstanding.
Either way it sounds like you could have rubbed too hard. I try to completely saturate my paper before rubbing so that I barely have to rub. I’ll put it like this, the other day I did a transfer onto towels (not terry cloth) and instead of rubbing myself I just tossed them in the washing machine. They’ve been washed several times now with my other towels (including bleach) which I DO NOT recommend but I mention it because this stuff really does hold up. The other thing I would say is how thickly did you apply the mod podge transfer medium? It should be around 1/4″ thick. If applied too thinly that could also cause the holes. Let me know if this was helpful and good luck!
Will it survive in rain or better yet outdoors? Im definitely doing this anyway.
Mod Podge makes an outdoor sealer! You could always seal your piece with that for outdoors after you got done with the transfer. Have fun!
I adore this project, what size of photo and pallet framing are you using? I have tried this but I was having issues with rubbing the photo off, I did place mine in the oven on the lowest temperature to speed up the drying process, so that might have been the cause of the issue.
My frames are 10 1/2″ x 14 which is basically the width of three pallet boards. I based my photo size on the frame size and chose to go with 6 1/2 x 10″ photos to keep the look proportionate. I definitely wouldn’t try speeding up the drying process. That could definitely have been the issue. Be sure to to give them the full 24 hrs to cure. Also, make sure your medium is 1/4″ thick and that you don’t rub too hard when removing the paper. Good luck!
Sweet! Love this!
Thank You for sharing your tutorial!
Absolutely! Thank you!
I am so glad to have found your terrific tutorial on photo transfer!! I have a project that involves doing a photo transfer on the back of a terrarium and on the outside. This will create a background image when viewing the terrarium from the front. The terrarium is actually a round glass canister. I have been concerned about the photo transfer holding up being on the outside and possibly subject to being handled if the terrarium is moved around. It seemed to me that the photo transfer should be sealed after it is complete to better protect it. Unfortunately, I haven’t found any tutorials that address using a sealant as the final step until finding yours. The others just take you through removing the paper backing and that’s that.
Would you recommend using Mod Podge or a spray sealant for my project? Whatever sealant you recommend, should it be applied while the transfer is still wet from removing the paper backing or allowed to dry first? Thank you in advance!
Honestly I wouldn’t seal it at all. I’m not sure how it will work on glass, it may work great. I would test it on something less important first. If it is successful there’s really no need to seal it. I did a transfer on bathroom towels and launder them normally (with bleach!) and they hold up just fine. For future reference though, when you do seal a transfer it is best to wait for it to dry and I typically use mod podge in matte to seal.
Hi,
This is great and will be doing on some wood pieces. You said you are not sure about glass, would the same go for metal? – ie non porous compared to wood, canvas or pottery.
My first encounter with mod podge – bottles ordered….
Thanks for the tutorial
I’m almost certain you could use it on glass and metal. I would just definitely suggest doing a test first. Have fun!
Hey Love this tutorial and would love to try but they don’t sell mod podge where i live. Is there another alternative you could suggest?
Thanks in advance
Gee I’m not sure! I would say look for any other photo transfer medium available in your area. You can also achieve this with a gel medium. I would definitely do a trial run first before starting on your main project. Good luck!
Absolutely love this idea and your frames look gorgeous!
Have you tried other medium brands such as Liquitex and Golden? If so, which of the 3 did you like the best? All are found in our local craft store and I’m a bit confused as to which I should purchase.
Thanks so much for sharing. Can’t wait to try it!
I have tried other brands. I definitely prefer the Mod Podge to Liquitex or Golden. As an artist I have used them both and while they have their merits I would not suggest them for this project. Hope that helps!
Would you use the same products and method if doing this project on tile coasters? (i.e.stone backsplash)?
thanks
That would depend on the porosity of the stone. I would definitely do a test run first!
HELP!! so after rubbing the paper off, which isnt working very well but practice makes perfect< do i seal it with mod podge right away or do i need to let it dry first then seal it?
Yes, let you project dry. Be sure that you’ve gotten off all of the paper and then seal with your general purpose Mod Podge.
How amazing is this! I’m always giving photos as gifts and this is an awesome way to change it up a bit! I can’t wait to try :)! Two questions, though- it looks in your picture as if you had it completely covered with the towel before you started removing the paper. Did you do that just for the tutorial or is that a something that needs to be done? And 2nd, does your towel need to be damp when removing the paper? Thanks so much!
I saturated the towel, not too wet but damp, and placed it over each picture to let it thoroughly soak through the paper. Then I used the same damp towel to gently rub away the paper. I find this is the easiest method. Hope that helps! Thanks!
Love this!! Can I stain the wood when I’m done or will that mess up the picture?
You could stain around the picture after it’s all dried and sealed. Or you could stain and allow that to dry completely and then do the transfer. I think that’d look great!
Hi there,
This a brilliant idea, thank you for posting this tutorial.
However, I have a doubt. You said that you cover the picture with mod podge. On your first pics I see Mod Podge (which type?) and then, when you cover the pic after removing the paper with the wet towel, you sealed it with Matte Mod Podge.
So, basically, to “glue” it to the canvas, which mod podge type do you use? And then, after, to seal it, you use the Matte? You use two types? Or can you simply use Matte mod podge on both processes.
Thanks!
For the transfer you will use: Mod Podge Photo Transfer Medium
For sealing the piece once it’s dry, if desired, you will use: regular Mod Podge in any sheen of your choice.
Hi Jamie,
beautiful work!
Could you please tell me why the background color of the wood doesn’t show? I’ve done a lot of transferring, but usually in the end the areas that are white on the print are rubbed off completely (no color) and the background can be seen. Not so in your transfers. Why???
Thank you so much,
Lou
Ok, sorry, concentrated reading helps. Medium ist not transparent…
That is absolutely correct! 😉
Does this also work on stained wood? Making these for a Christmas present!
It will indeed! A word of caution, I always do a test piece when I’m working with something for the first time.
Hi Jamie,
I found it was a good idea for a gift for my father. I did all the step of this project except the final one (add Matte Medium for a nice finish and protection). The reason why I have not finish is because I’m not satisfy right now, because after removing almost of the paper, there is a paper residue remaining on the image (into small wood cavities) and If I scratch too hard it start to peel of, so I’m wandering what is possible to do to recover my project. Cause when its wet, everything is more contrast and detailed, but when it dry it become white like paper. Do you have an idea of what I should do now ?
Thank you for your help !
It needs a sealer to give it a finished looked. That’s why you notice that the contrast and detail stands out when wet. Once you seal it (and you could use matte or glossy, up to you) it look more finished. It’ll have kind of a “fuzzy” look until you seal it.
OMG!! I absolutely love this!! Think anyone would notice if I disappeared from work right now and headed to Michael’s?
Hi Kim!
Ahh thanks! I’m always a fan of dashing out of work to craft. I’ll cover for ya!
Hi Jamie, This is the post that drew me to your site today. Thank you for the great tutorial! I am excited to try this project and your step by step info will help, as well as your very patient, detailed responses to the many comments. I have wanted to do some pallet projects but haven’t found a good place to get pallets because I have been under the impression that the pallets behind stores and other businesses belong to the business. If you addressed this in the post, I missed it and apologize. Suggestions?
Thank you again.
Cindi
www.seeminglyordinary.com
Hi Cindi!
I’m glad you found my blog and stopped for a visit. I always ask prior to taking pallets because, as you mentioned, they do belong to the store and many stores reuse their pallets. I typically get mine from a paint store next to my husband’s business. They dump them out in the trash and were fair game. Of course before taking them I asked first. From there I was welcome to take them any time I liked. These pallets work particularly well because they are used for transporting paint (because it’s so heavy) but not perishables so it isn’t treated. Therefore I can rely on the safety of using this wood. Many businesses do toss their pallets and are happy for you take them once you ask permission. Some may require you purchase them but they’re usually only around $1 or $2 so totally worth it. Hope that helps! Look forward to you visiting again soon!
Hi why does it have to be laser print and not inkjet
Its a Brill idea would love to try it but my printer I inkjet
Hi Ann,
It has to be a laser print. Something about how the ink from the toner and the transfer medium work together. It will not work with an inkjet print. Sorry. That’s true of most, if not all, transfer mediums not just this one. If you have a local print shop with a laser printer it shouldn’t cost much to have them printed there and well worth it.
So cute.
However – so many advertisements popping up while reading your page I was annoyed and quit reading. Is this my computer’s problem or is there something you can do??
I’m sorry to hear that but it’s hard to say without more information. If you wouldn’t mind, it would help me if you were to tell me how you were browsing (mobile or PC) and what kind of pop ups you are seeing. I don’t have any advertisements on my site that should effect the readability of a post. Thanks!
Will this work with actual (ordered photo processing) photograph? I ordered versus having it printed as I only have B/W ink in our inkjet and wasn’t sure photo paper would work in it. Wondering why it wouldn’t work with an inkjet, smearing the ink maybe? I’m anxious to try this since I up-cycle pallet wood and have some serving trays to make. The wax paper image transfer hasn’t worked well.
Hi Lori,
You definitely don’t want to use photos or photo paper. Just a laser jet (NOT INKJET) image on regular printer paper. In other words, you could go by your local copiers, take the digital image file with you on a USB drive or mail it to them, and have them print you a colored copy of the image on plain (regular) copy paper. I would also suggest practicing the technique prior to applying it to something important. Hope this helps!
Bummer! Luckily I only paid $5+ for the order. I’ll need to find someone who can print this for me as I’m pretty sure our office Laser printer only prints in B/W…ugh. I tried the wax paper method, and it’s normally pretty successful for me, but, as you know, pallet wood comes in all varieties, colors and textures. The latest attempts haven’t been good enough for my sales pieces. Back to the drawing board! Appreciate the reply!
You are very welcome!
Ordered copies from UPS here locally. Now having problems finding the gel medium. Supposed to have it at Wal-Mart, but tried to find it and wasn’t successful. Hobby Lobby probably has it, but it’s a two-hour drive. Ugh…always something!
You can always order from Amazon!
I found some Liquitex Super Heavy Matt Gel Medium….I assume this will work? Checking both Amazon and Hobby Lobby on-line too. Thanks for the help! I’m making three pallet serving trays for a woman and couldn’t get the wax paper transfer to look good enough. So, figured this was the way to go!
It’s been a long time since I’ve worked with the Liquitex for that so I can’t speak to that. Good luck!
Jamie, thank you for this tutorial. I love it! I have made this as a birthday gift for my aunt and am at the stage where I have removed all the paper. But my colors are a little muted and I would like to know if there is a sealer (or the matte mod podge) that will brighten the colors. I have the matte mod podge to put on it but definitely do not want to dull the colors any more. What is your opinion on my next step? Thank you…..
Hi Debbie
I think anytime you’re doing a transfer you use a little color. You’re basically making a copy of a copy. The muted tones worked well for my project since I was putting it on worn wood. That’s why I chose to use the Matte Mod Podge. I would suggest for your project to use the Gloss Mod Podge. It won’t “add color”, per se, but it will give you extra light and dimension and that may give the illusion of depth of color. Hope this helps!
How smooth does the wood need to be? if it has ridges, will it still work? Thanks!
Mine wasn’t extremely smooth. I liked it a little bumpy as it gave the photo some texture. As long as you’re sure to press down evenly and gently once you apply the photo to the wood you should get great results. However, if you’re going for super smooth I would suggest using something other than pallet wood any other wood with texture.
Jamie,
Thank you for all of your wonderful information. People that have this knowledge and are willing to share it with others like myself are awesome people! Thank you again…. you start a fire in my dull imagination. 🙂
I only have one question…. Would this also work on a painted surface? It will a plain latex paint and or chalk paint? I know to seal it of course but I didn’t know if you have tried it yet or not.
Aww thank you! You definitely don’t have a dull imagination. Yes, this works on many surfaces including fabric!
Hi! when you are sealing the photo should the matte mat mod podge be applied on the entire photo or the edges? I made a mistake by not waiting until the photo dries and applied the sealer all over and now the photo is all white :/ its my first attempt so i know its a learning process. Thanks!
I apply it all over the photo, at least. It is always best to wait until all layers are dry before applying additional coats but it sounds like once your mod podge is dry it should become clear. It just make take more drying time before you see that happen. Otherwise, lesson learned.
I’m totally new to transferring. So if I ask dumb questions please forgive me. You didn’t where you can get Laserjet printed photos. How large can I get a photo printed? Also, do you turn the photo over after you coat it with the medium? And what is “medium” exactly? Are you speaking of textile medium? Thanks…sorry if these are dumb.
Happy to answer your questions! Laserjet prints can be obtained at your nearest office supply store or pro printer’s. The size will depend on what they can offer but you can get post size if you want! You will have the photo printed in mirror-image (in other words, backwards – especially important if there are words in your image) so that in the end it will be right-sided again. So, you will place the transfer medium (Mod Podge Photo Transfer Medium) onto the photo and THEN place the photo face down onto the surface you want to transfer it to. Smooth it out and let it sit for 24 hrs before following the rest of the instructions!
Do you do anything to the wood first?
I sand it to give it a smoother finish to work with. That’s it really.
I have rough pallet wood, should I sand it first?
I sanded mine. If you don’t just be sure to take the rough surface into account when pressing the image down on to your wood.
Hi! Very cool…would this work with a photo on regular photo paper or does it need to be on regular paper? Have you ever tried this on an oversized project? I’m thinking about transferring our family photo on to a very large wooden pallet frame to hang over the fireplace. But, I’m wondering what kind of paper I should get the picture printed on (for a poster size).
THANKS!
You want it on regular paper because you are actually going to “wipe” that paper away in the end process. At some commercial printers (Kinkos, Office Depot) they will actually print photos as engineer prints which would work for what you want to do. Big job, though. You’ll want to practice the technique beforehand!
Wow! You are a VERY patient woman!!! So many questions – and many repeated ones!
One more quick one: I’m thinking of making a wood trivet. Assuming that the wood used can tolerate heat, do you think a transferred photo (made according to above directions) could withstand the heat (without damaging the picture/words/whatever)? Thanks so much for sharing your imagination!
Hmm… After the transfer what you’re really left with isn’t the photo, or the paper it’s printed on, but rather the ink (toner) and a dried glue-like substance. I’m thinking that could get gummy with extreme heat, i.e. a casserole dish fresh from the oven. What about doing it as planned but then placing a piece of acrylic over the top to protect it from heat?
Have you tried this method on wood that has been stained?
I have not but it would definitely work so long as the stain is set or cured for a bit prior to the transfer.
Love this!! I was wondering what are the dimensions of the frame and also the size of the photos on the pallet? Thank you, Michelle
Sorry, just noticed the post with the measurements! Thank you again for sharing your awesome idea!
No problem! Thank you!
Hi Jamie! What an awesome project that I Have to try!! Can you tell me the best place to buy the pallet wood? Also do you have to secure the three pallets yourself and if so how, or can you buy it three pallets together (hope that makes sense)! Also, once you put the extra little pallet pieces on the back for hanging do you just attach regular picture hanging hardware? What is the approximate cost of the wood for one photo? Sorry for all the questions, I am just so excited to try this! Thanks in advance!!
Hi Sharon! Thank you! I actually don’t buy pallets (I just scavenge for free ones, always ask first!) but I do believe you can buy them and I don’t think they are costly. To make these I cut a pallet up and just used the planks to create these frames. On a regular pallet these planks have spaces in between and aren’t close together like they are on these frames. I use regular picture hanging hardware on the back (d-hooks specifically).
Recently I did see some similar premade frames at Hobby Lobby in the unfinished wood section if you’d like to try there instead of making your own. Good luck!
Would Wal-Mart be able to print the pictures like that for me? Also, you’ve probably already answered this, but I have an inkjet printer, would I be able to copy the picture from that and do it that way? I read another post about something similar and it said you could, so I was wondering your opinion on it? Thanks in advance!!
Hi Whitney
If your Walmart has a color copy machine they could print the pics for you. Our Walmart does not offer copy service, only photo printing. You don’t want a regular photo for this project. You’ll need a photo copy from a laser copier for this project. Most transfer mediums require a laser copy. I’m not sure about other mediums where you can use an ink jet print but to use this product you’ll need a laser copy.
Hi, would this work on old tin also? The same steps?
My guess is probably not since it needs something porous to adhere to. But, you could always transfer the image onto fabric, like muslin or canvas, and then glue it onto the tin!
You know, I was on Pinterest, just trying to find a fun way to make a gift for my mom when I somehow stumbled across your post. I really loved the idea and I’ve given it a go (currently waiting the 24-hours for my piece to dry) but I also read your story. It’s beautiful. I just wanted to let you know that you are inspiring and I love that you are taking that second chance at life. I may have never known your mom, but I can’t imagine her not being proud of you where she is. Thank you for being courageous and sharing your story with us. I hope you always continue to write and create. I think each piece you revive gives us a little reminder that there is still hope in this world. 🙂 Thank you for being you!
With Admiration,
Katya
Katya, what a beautiful comment! You made my day. Thank you so much! I hope your gift making went well. I’d love to know how it turned out if you get the chance. Thanks again. So glad you found me and dropped by. Take care!
So did you position the image face down? the same side of the picture that you apply the photo transfer?
That is correct!
Thank you for the reply!!! i’m from Dominican Republic!! I love your blog! i want to suscribe, but i don’t know how to do it
Hi! Thanks so much for visiting! You can find my email list sign up, here: http://eepurl.com/0Rs5D
Let me know if you have any trouble signing up!
Thanks!
This is a great idea. I’m wondering if it will work with pages from a magazine? I have a feeling it won’t but was hoping you’d know before I get all the stuff and get excited and find it’s a disaster
thanks for posting and hoping you know the answer and have time to respond
I don’t think so since the printing method is likely very different, although I’m not familiar with the magazine printing process so I can’t be sure. But…it might be fun to try it on a throw away piece! If you try it be sure to let us know how it went.
Yes! Thank you so much for this detailed description. I can’t wait to do some of these!!!!
You’re very welcome! Thanks for stopping by!
Jamie, I’m trying to recreate the sign from The Hog’s Head at Universal Studios. I think this would be a perfect way to do that. Any suggestions on making it look aged?
What an amazing idea! Definitely some sanding with a fine grit paper, this will also help make it appear as though it was painted onto the wood. And then, either an antiquing medium, a dark wax or glaze. Even a slightly watered down paint, strategically placed, will do the trick. I’d love to see it once you’re done!
Hi Jamie,
I tried this and the transfer worked really well. I got a great image on my wood. The only problem I had was that I tore my photo when I was smoothing out the air bubbles. I may have used a little too much transfer medium. I tried to sand the tear out, but that only created an uglier place and the tear still showed.
I think I can do a much better job the second time around.
Is there an easy way to get the photo OFF the wood once you have transferred it?
Sanding is taking forever. It doesn’t peel off easily and scraping would ruin the wood.
That’s a good question! I’ll be completely honest and tell you that I have no idea. If it were me I’d try paint remover or mineral spirits. I’ll look into it and see if I can find out what one should use in this kind of situation.
If you want the wood grain to show through, use regular Mod Podge Matte. If you want a white background with no wood grain showing through, then use Mod Podge Photo Transfer Medium.
I sealed my photo using a water-based polyurethane. You should do anywhere between 3 and 5 coats, sanding lightly between coats using 220-240 grit sandpaper.
Hi! Where did you find these wood pallets??
The pallets or the frames? I made the frames with some pallets we picked up on the roadside. I’ve seen some like them at hobby stores though.
can you use a photo already printed on photo paper?
I’m not sure how well photo paper would work. It’s a lot heavier than copy paper. You could always try it, just be prepared for mixed results. If you do try it, please let us know how it went!
Would it work on a framed canvas , like you purchase at an art place or even dollar stores ?
Yes, it would! 🙂
This is the best explained in a nutshell tutorial. Thank you, testing out to with the kids I nanny for Mothers Day. I know, I’m years late on trends.
Definitely also gonna do a more rustic look/rub softer edged on pics.
What a thoughtful gift to do with the kids for their mom! Let me know how it goes!
Hi Jamie,
I cannot find a print shop that will print laser. I need 24 by 36 inch. Would you be able to let me know where you go to get photo laser printed on copy paper. The ones that can do laser will only do photo paper.
I really need help fast as our anniversary is on Monday and I am down to the wire on this surprise gift to my husband.
Thanks.
Linda
Hi Linda,
I know we spoke via email but I wanted to reply here in case someone else had the same question. I printed mine at Office Max on their self-service colored printers.
I haven’t done the technique with photo paper (or the paper they use for posters) but my guess is that as long as it’s matte, and not glossy, it might work. The paper is thicker and you’d probably have to soak it a little longer before removing it, but it should work. I would definitely try it out on something else first just to be sure. Hope that’s helpful!
Good luck,
Jamie
I can’t wait to try this! Just wondering wether black and white photos would work on wood? Or would canvas be better? What are your thoughts? Thanks for sharing your ideas!!
I think black and white photos would be amazing!
I would like to transfer my laser jet copied photo onto very smooth non porous place mats. I think that they are made of compressed wood.
do you think it would work on such a shiny smooth surface.
Thankyou
Liesje
I think the surface could work since the image essentially sits on the surface anyway, but I’m not certain a laser jet print will work. Be sure to check the directions of whatever transfer medium you use.
Will a heat gun make the waiting time less or do i have to wait the full 24 hrs? 24 hrs is just so long to have to wait!
I don’t know if that would work or not, Erica. I certainly wouldn’t try it on anything important.