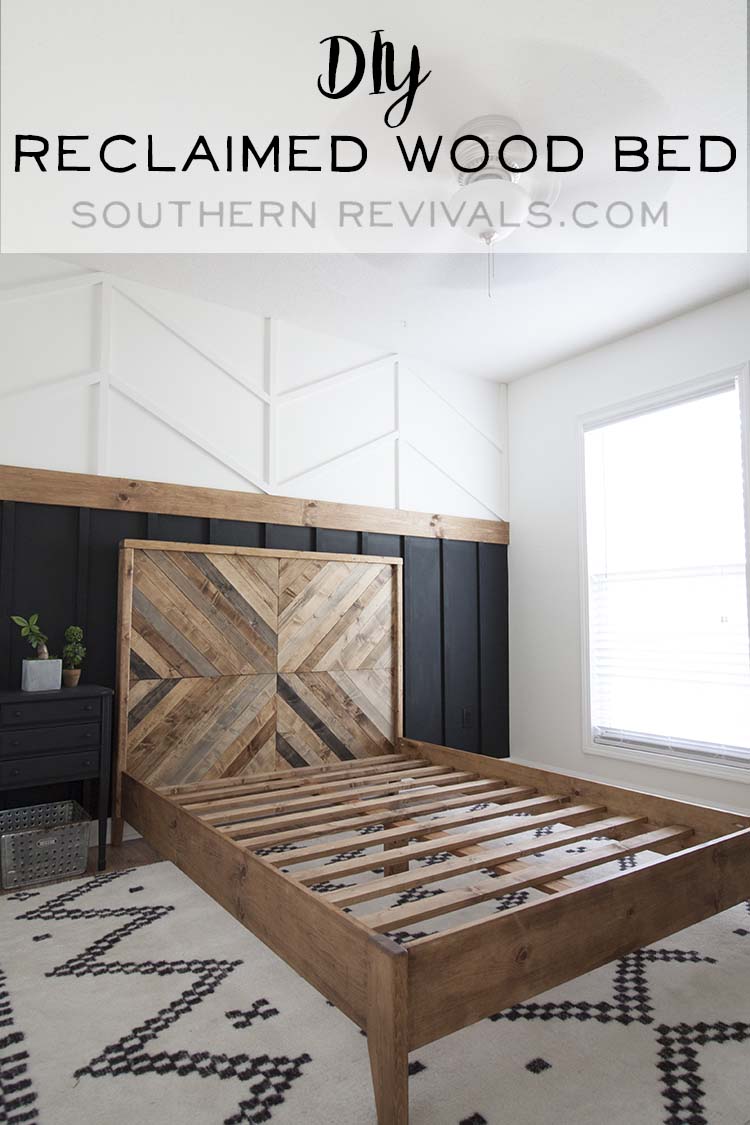
It’s week 3 of the One Room Challenge and our project for this week is our West Elm-inspired DIY reclaimed wood bed and even though it doesn’t have a single stick of reclaimed wood, it’s still a stunner. Plus, it’s a stunner for not a lot of money! And also, this challenge is halfway over and I. Am. On. Track.
Sing it with me…
Woah, we’re half way there
Woah, livin’ on a prayer
Take my hand, we’ll make it I swear
It’s easy to be on track when you’ve got an extra designer helping you with all of the decision making. In my case, it’s a cute little 8-year-old who knows what he likes.
He wanted a bed just like big brother’s DIY midcentury modern platform bed but I assured him we’d come up with some just as awesome and all his own. It took about 2.3 seconds on Pinterest searching for wood beds before he knew exactly what he wanted.
It’s hard to believe just eight regular pine boards can become an awesome bed frame.
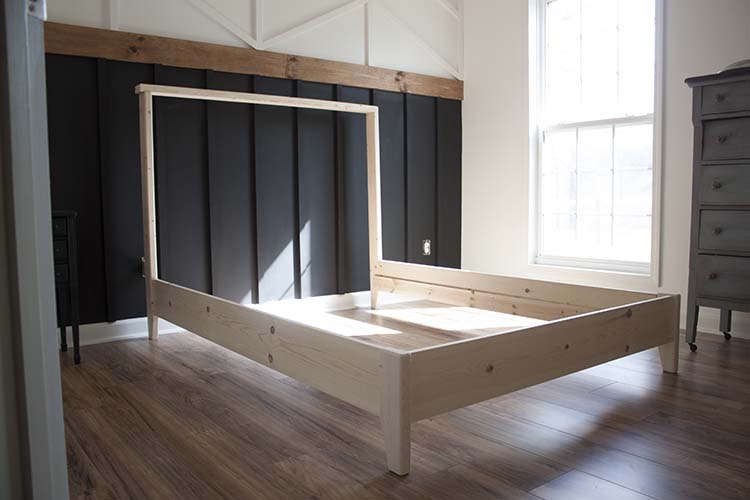
Of course, we’ve still got to add the headboard but the bulk of our work was done pretty quickly.
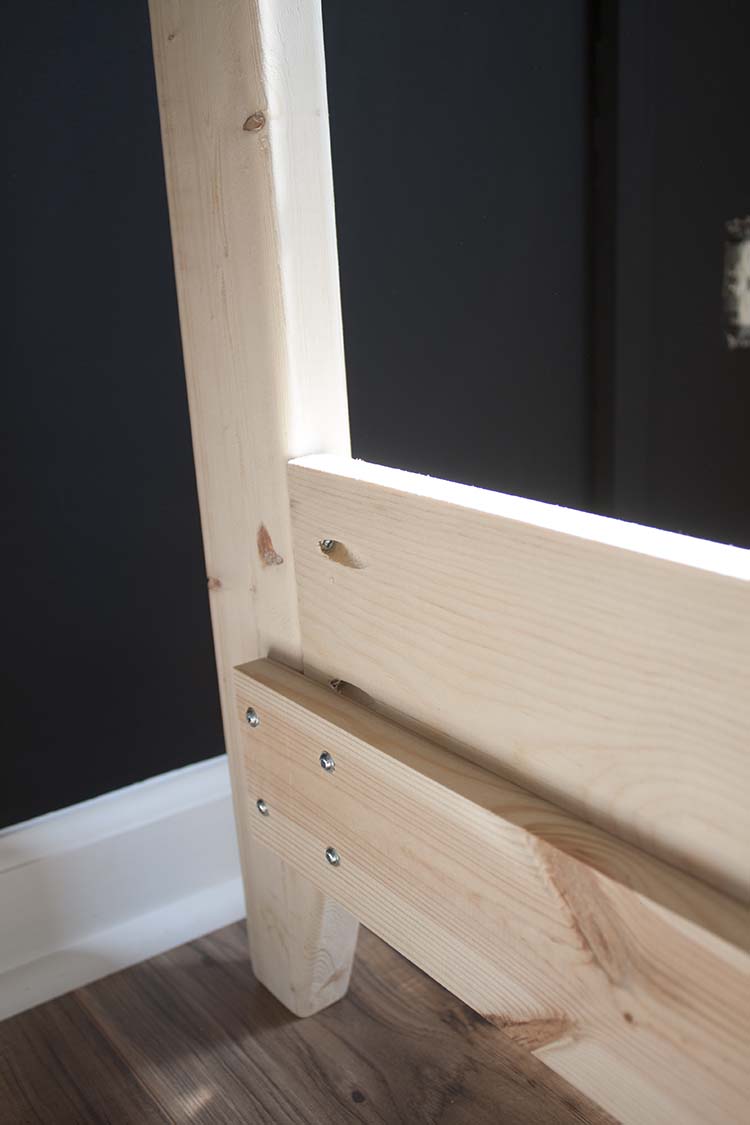
As usual, pocket holes save the day and make our job so much easier. This is at the head of our bed where the headboard will attach.
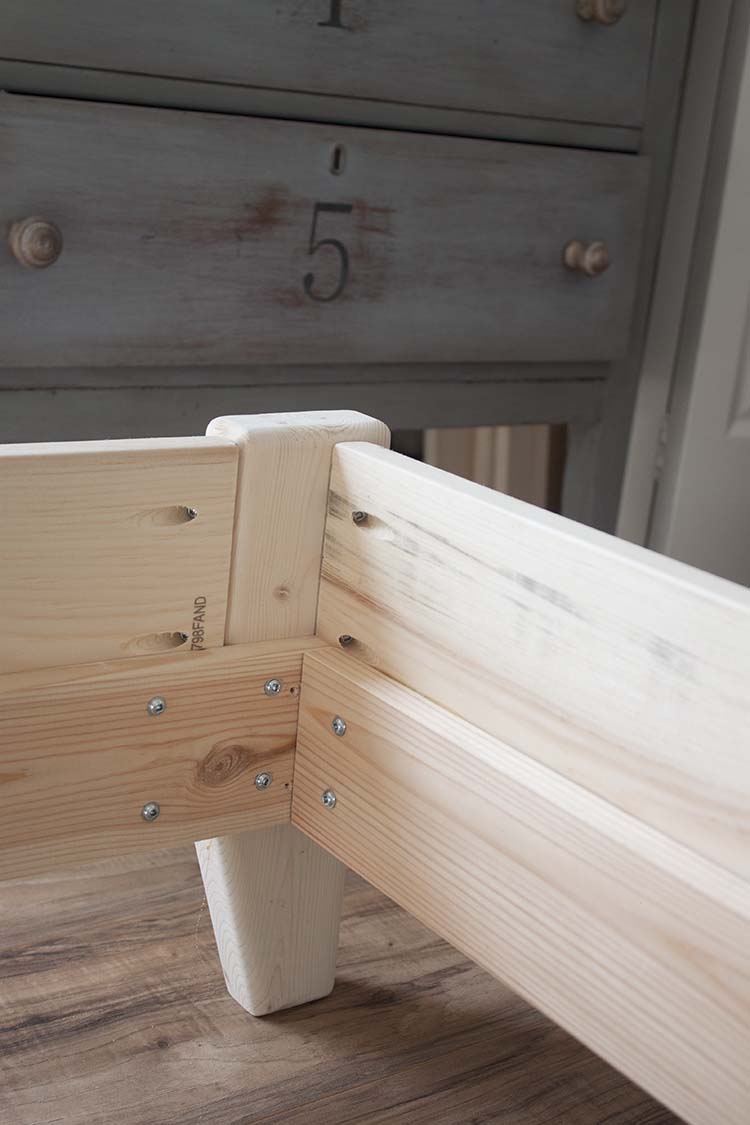
And this is at the foot of our bed. The board on the inside of the frame is where the bed slats will sit.
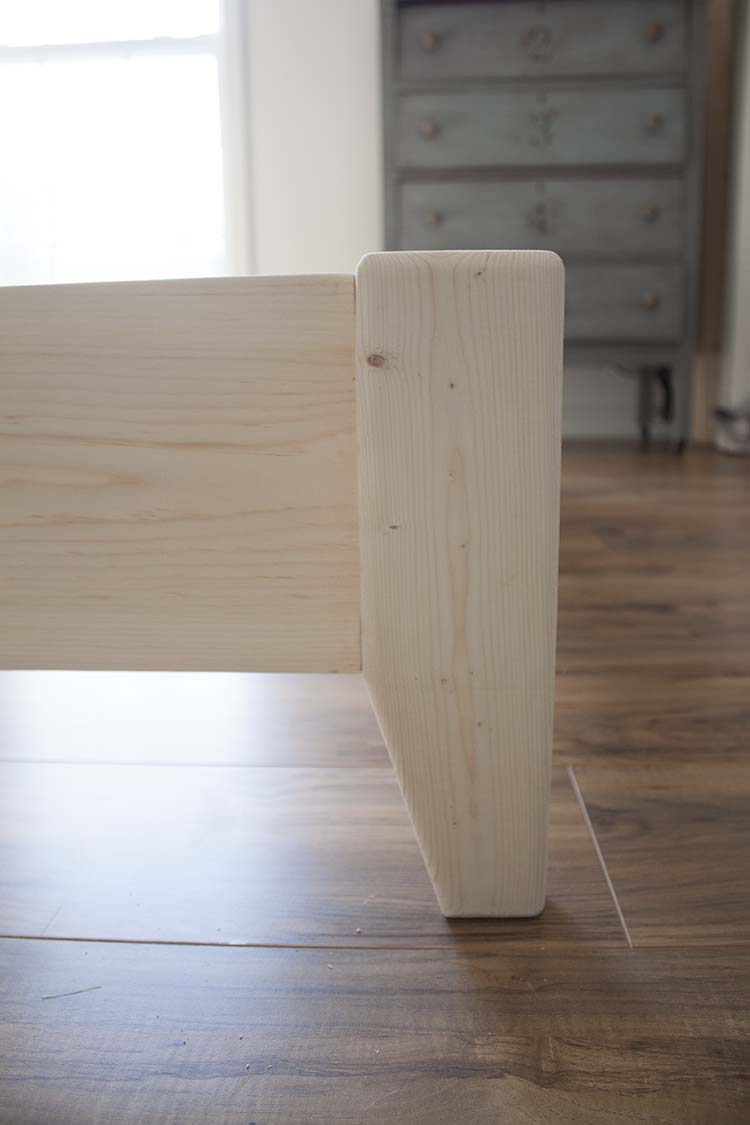
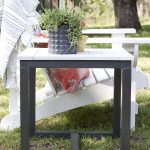
We chose to add a little clip to our bed legs to give it some extra style.
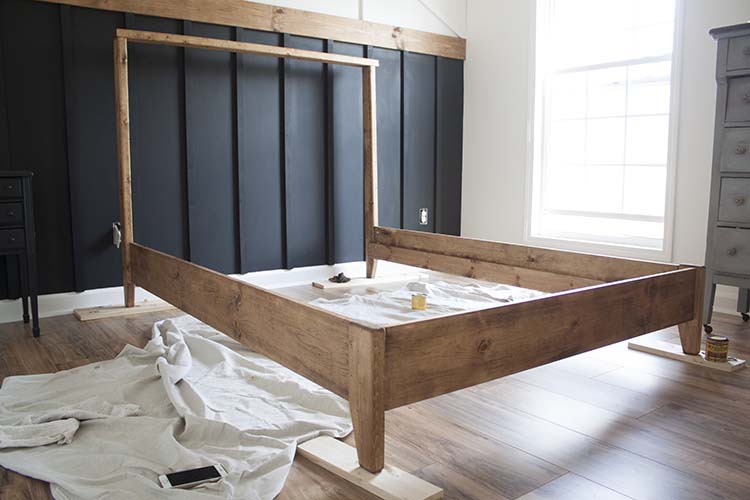
Once the glue dried on the frame I applied just one coat of stain. I wanted it to have a bit of a washed out, or bleached, look to give it the appearance of reclaimed wood.
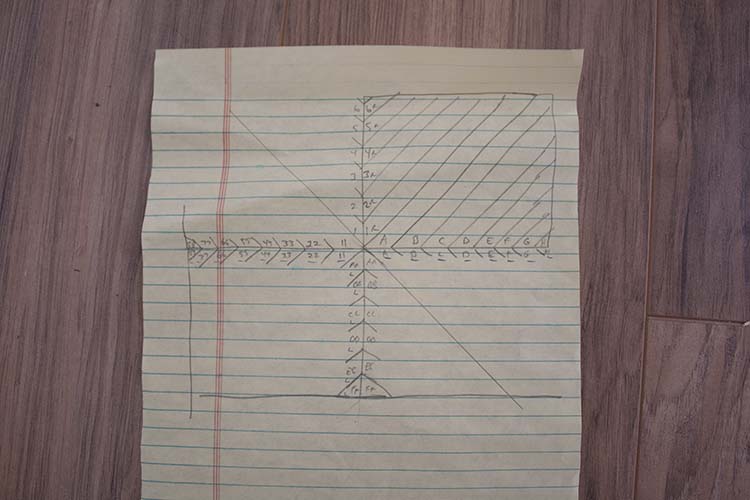
We cut a piece of plywood to fit into the headboard section of our bed frame and then drew out the angles for each of the wood pieces making up the herringbone pattern.
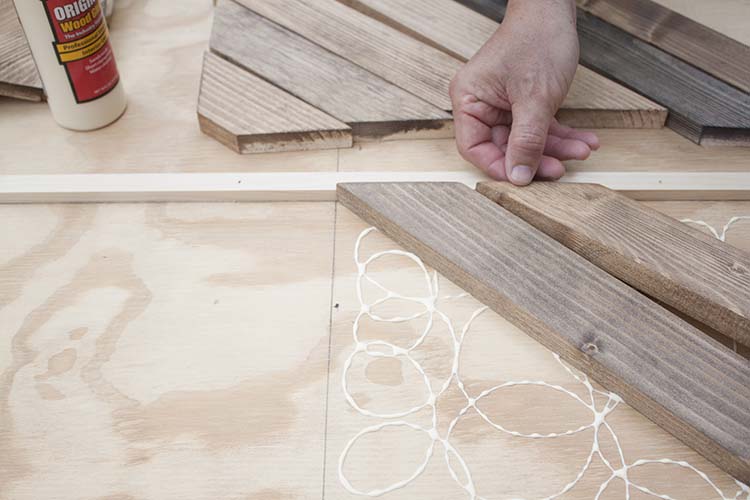
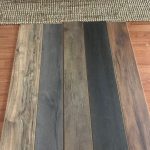
We cut each piece to length, leaving some excess on the longer pieces to cut off later. I stained all of the pieces using various stain colors, some straight from the can – some mixed, to mimic that aged patina old wood gets.
As soon as the stain dried we glued each piece in place.
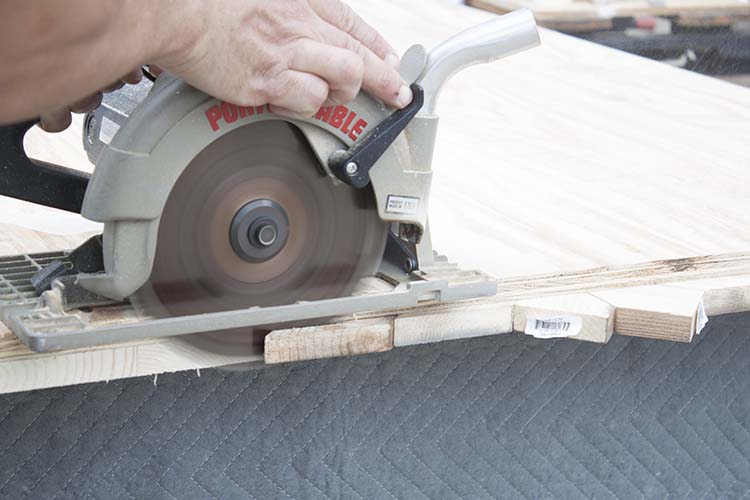
After the glue dried thoroughly, we trimmed off the excess. The raw edges will be hidden by the headboard frame.
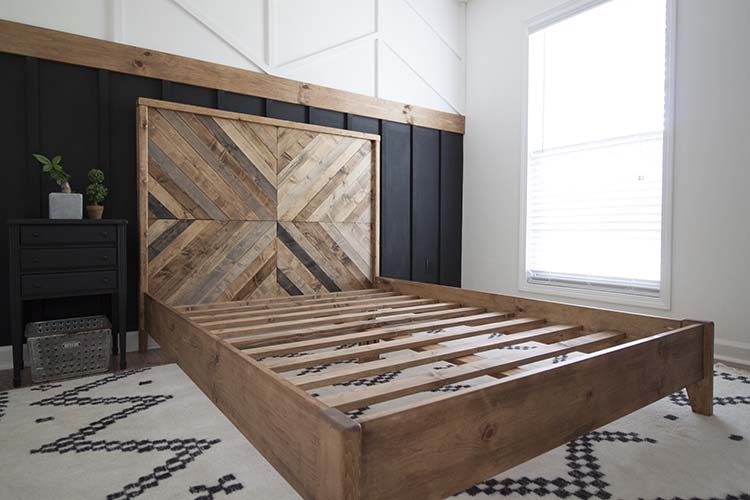
We attached the headboard to the frame, added slat supports, a center leg, and the slats. And we were done!
![]()
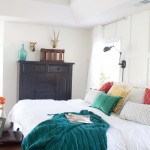
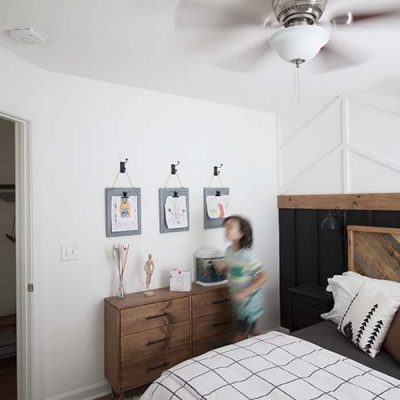
And we have one happy little boy! He has completely forgotten that he ever wanted an exact copy of big brother’s bed. Next week I’ll be sharing our DIY dresser for his room so I hope you’ll join me for that. And if you’ve come here looking for the plans for this bed, those will be available soon!
MAKEOVER TIMELINE
- Week 1 – The Plan (April 4th)
- Week 2 – The Wall Treatment (April 11th)
- Week 3 – The DIY Bed (April 18th)
- Week 4 – The DIY Dresser (April 25th)
- Week 5 – The Decor (May 2nd)
- Week 6 – The Reveal (May 9th)
Join me each Thursday from now until May 9th for each new installment to this makeover challenge! Next week, the wall treatment.
![]()


Wow! I love the entire makeover! Awesome job! I was wondering–what thickness is the plywood you used for the back of the headboard?
Thanks, Maria! The plywood is 3/4″.
What a beauty !!!!
How did you attach the inside of the headboard to the frame? Did you just put pocket holes into the plywood and screwed it into the 2X4 frame from the backside?
Thank you, Ayse! Yes, that exactly what we did. The pocket holes are on the backside of the plywood.
What is the thickness of the side boards that you used?
Hi Amanda,
Those are 1xs. Hope this helps!
How did you attach the headboard to the frame? This is the part I’m struggling to understand but LOVE your plans and design! Thanks!
Hi John,
The angled pieces are attached to a 3/4″ plywood. There are pocket holes in the back of that plywood which screw straight into the 2×4 frame. Does that make sense? Hopefully, this is helpful!
Could you provide a better picture of the plans. I LOVE this bed. It is sooo beautiful and I must make for myself!!!
Hi Sherri,
These aren’t the plans. Just pics as I went along. I haven’t posted the plans yet because when I did I wanted to offer them in various sizes to accommodate different size beds. What I came to realize is that once I change the width of the bed I will also change the angle of the headboard pieces. At the moment, I am working on the plans for the full size only with the other sizes to follow in the future. I hope you’ll check back with me soon. Thank you!
Hello,
Is there any way to get a material list and cuts?
Thanks,
michael
I haven’t posted the plans yet because when I did I wanted to offer them in various sizes to accommodate different size beds. What I came to realize is that once I change the width of the bed I will also change the angle of the headboard pieces. At the moment, I am working on the plans for the full size only with the other sizes to follow in the future. I hope you’ll check back with me soon. Thank you!
Hi there! Do you know an estimate on when the plans will be posted? Thanks!
I haven’t posted the plans yet because when I did I wanted to offer them in various sizes to accommodate different size beds. What I came to realize is that once I change the width of the bed I will also change the angle of the headboard pieces. At the moment, I am working on the plans for the full size only with the other sizes to follow in the future. I hope you’ll check back with me soon. Thank you!
Can’t wait for the plans for this bed! I would love to make this for my guest room!!
Thank you, Meghan!
I haven’t posted the plans yet because when I did I wanted to offer them in various sizes to accommodate different size beds. What I came to realize is that once I change the width of the bed I will also change the angle of the headboard pieces. At the moment, I am working on the plans for the full size only with the other sizes to follow in the future. I hope you’ll check back with me soon. Thank you!
What stain color did you use for the main body?
I believe I used Early American but don’t hold me to that! When it comes to stain I do a lot of playing around because I almost never like the straight-out-of-the-can color.
Where did you find the rug??! ❤️❤️❤️
Rugs USA online!
Do you remember which stains you used? I know you said you mixed some, but still curious!
Thanks!
Gosh, I’m not sure I remember exactly but I’m almost positive I used Minwax brand in a gray, black, Provincial, and Early American. I might also have used Special Walnut but I mixed a lot of them as I went along. Layering some colors and wiping back down others until I liked it. Sorry I can’t be more helpful that regard.
Love this bed, can I get the plans?!
I haven’t posted the plans yet because when I did I wanted to offer them in various sizes to accommodate different size beds. What I came to realize is that once I change the width of the bed I will also change the angle of the headboard pieces. At the moment, I am working on the plans for the full size only with the other sizes to follow in the future. I hope you’ll check back with me soon. Thank you!
Love this bed! Any chance you can post the plans for it?
Marie
I haven’t posted the plans yet because when I did I wanted to offer them in various sizes to accommodate different size beds. What I came to realize is that once I change the width of the bed it will also change the angle of the headboard pieces. At the moment, I am working on the plans for the full size only with the other sizes to follow in the future. I hope you’ll check back with me soon. Thank you!
Hi Jamie, where can I find the plans for this bed? Am I completely missing it? Thanks!
That’s my fault. I haven’t posted the plans yet because when I did I wanted to offer them in various sizes to accommodate different size beds. What I came to realize is that once I change the width of the bed I will also change the angle of the headboard pieces. At the moment, I am working on the plans for the full size only with the other sizes to follow in the future. I hope you’ll check back with me soon. Thank you!
There are no dates on your website so I’m not certain whether these are old posts or current. Are you planning to post the plan for this bed? It is exactly what I am wanting to create for my son’s room.
Hi Jennifer,
That’s my fault. I haven’t posted the plans yet because when I did I wanted to offer them in various sizes to accommodate different size beds. What I came to realize is that once I change the width of the bed I will also change the angle of the headboard pieces. At the moment, I am working on the plans for the full size only with the other sizes to follow in the future. I hope you’ll check back with me soon. Thank you!
Hi! Did you ever get around to posting he plans for this bed? Thanks!!
We are working on the remainder of several plans right now and hope to make those available in the very near future. Thanks so much for your interest!
How do you stain the wood pieces without the stain leaking into the other pieces??
Hi Ashley,
They were all stained individually and then installed after they dried! 😉
Love this bed, just what we are looking for. For the meantime, can you post plans for a queen sized frame with the headboard but without the herringbone cuts? The decorative boards can be added later? Would love to get the frame started!
Hi there!
That’s part of what we’re working on, getting measurements for additional bed sizes. Since this is a full-size bed we need to make sure we adjust all the measurements accordingly, not just the angled cuts. We look to have those completed soon!
Where did you get the rug? Beautiful job!
Thank you! It’s from Rugs USA online.
Did you coat the herringbone design with anything after staining it?
Yes! It’s sealed. You can use a poly, wax, or sealant of your choice.
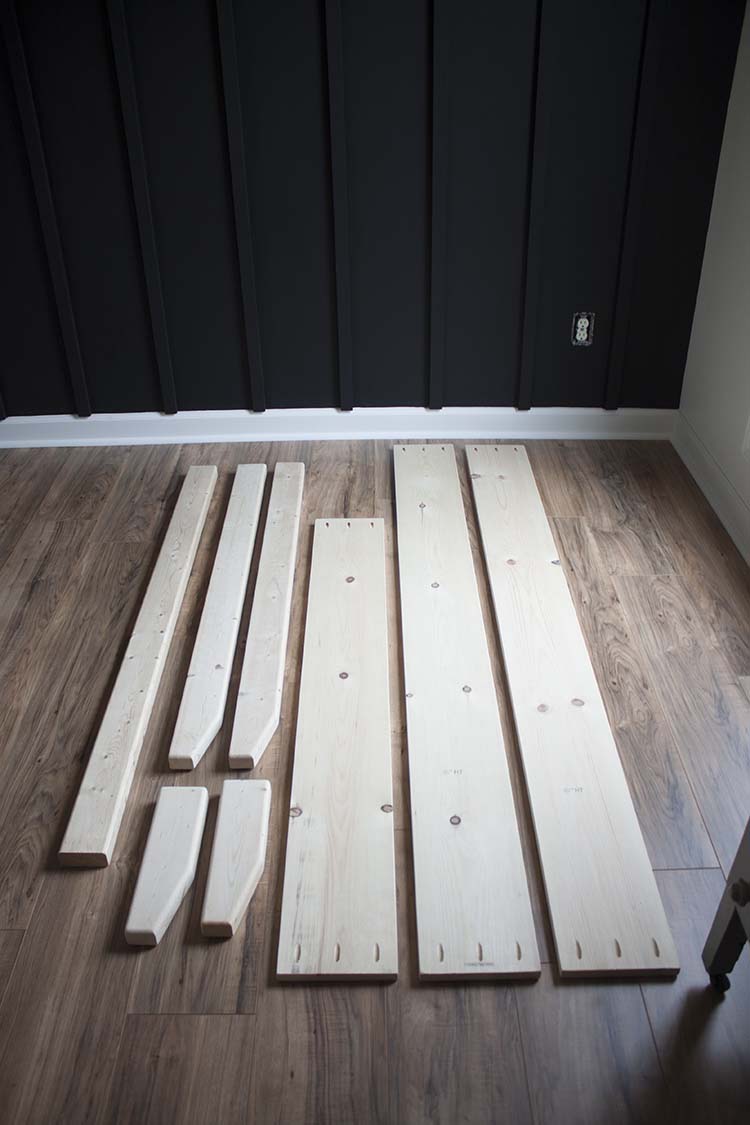
Can you just tell me what size of material you used for the bed frame? Are the legs 2×4’s and the outside is 1x?? Thanks
Hi Tiffany,
Yes, we used 2x4s and 1s. There’s a great pic in the post where the wood is all side by side that illustrates this well. Hope this is helpful!
What is the paint color on the bottom wall?!
Hi Sam,
More info on the wall treatment can be found in this post: https://www.southernrevivals.com/diy-accent-wall/ The color is Black by Benjamin Moore.
Looks amazing! I know you mentioned using only one coat of stain for the frame, what color did you use I’m having the toughest time finding a brown that isn’t too yellow!! Thanks!!
Thank you! I have the HARDEST time finding a stain color I like! My top three Minwax colors are Early American, Provincial, and Special Walnut. I used Special Walnut on the frame of this bed. But I always test out the color before deciding and I almost always wipe on and immediately wipe down when applying. Hope that’s helpful!
Did you cut and sand the legs of the bed with the clip in them? Or were you able to buy them that way?
We clipped and sanded them ourselves!