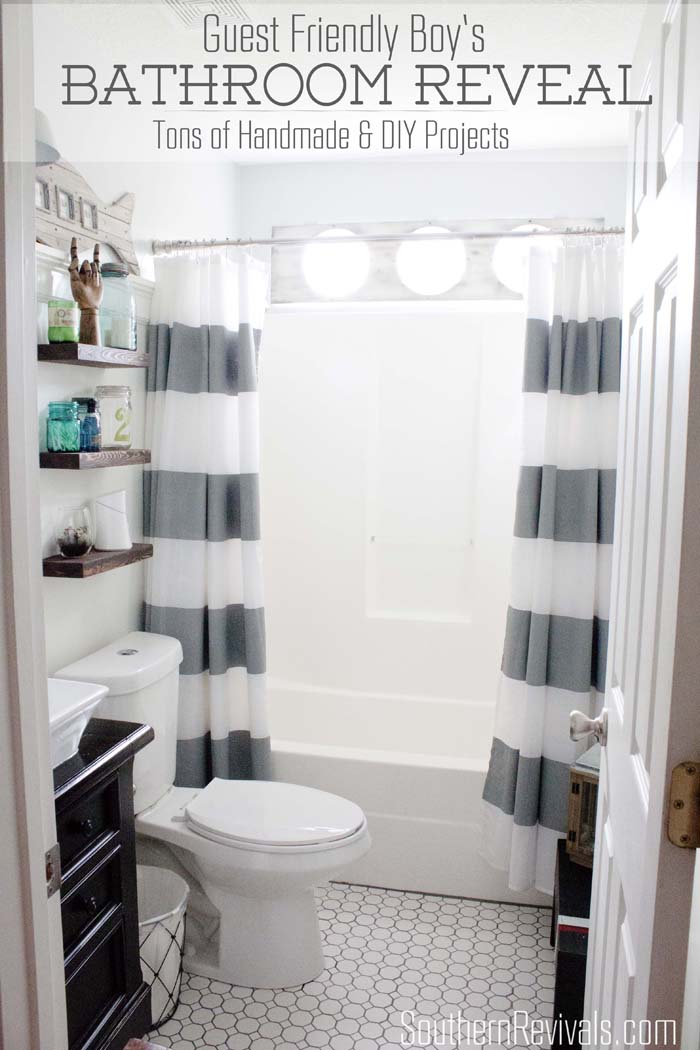
The trick to this particular bathroom makeover was that it was not only for our boys but for our guests, too. That meant it needed to be classy but still fun. Plus, we were working with such a small space that we wanted to make sure things weren’t any bigger than they needed to be. This nautical bathroom makeover is DIYed from top to bottom. Essentially we redid everything except the ceiling and the shower insert. This post is chock full of handmade elements and DIY projects that you can do, too and save yourself hundreds, even thousands, on your next bathroom remodel. Here’s what we were working with before.

See. Mostly builder grade everything, including wall color. I adored the cute little whale print on the wall and the fun shower curtain seemed like a good idea at the time. The toilet was perfect for the boys but way too small for any average sized adult. And the vanity took up too much space in the room without offering any real benefits. To see more before and during photos, see my Current State of Affairs: Bathroom Renovation post.
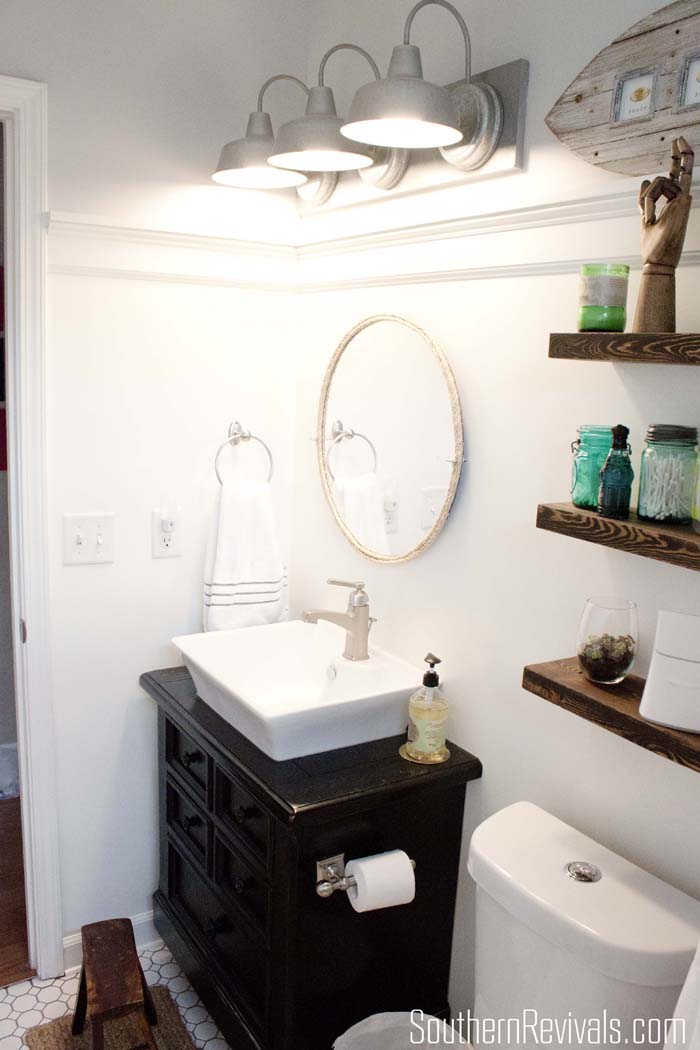
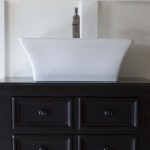
The thing that started this bathroom makeover ball rolling was this faucet that I received from Moen and showed you how to install, here. Then we turned an old nightstand that we no longer needed into a vanity for this bathroom. You can see how we modified the cabinet to make it work in the Nightstand to Bathroom Vanity post. It offers about the same amount of storage while taking up half the space. If you’re interested in the sink, how I decided on the perfect one and how I wound up buying the same one – TWICE! – you can check out my Sink Saga: The Tale of Three Sinks post.
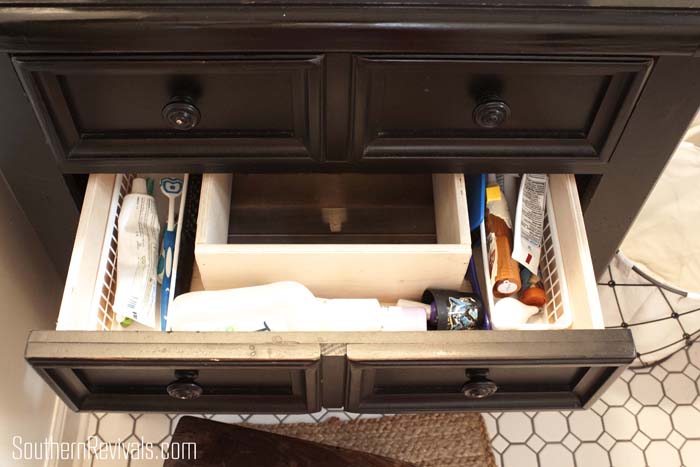
The top drawer of the vanity is unusable, to accommodate the plumbing. The second drawer also had to be modified. It works perfectly to house the boys’ toothbrushes and a few other toiletry items. The bottom drawer is a full drawer and we use it to store extra toilet paper, trash bags, toilet wipes, etc.
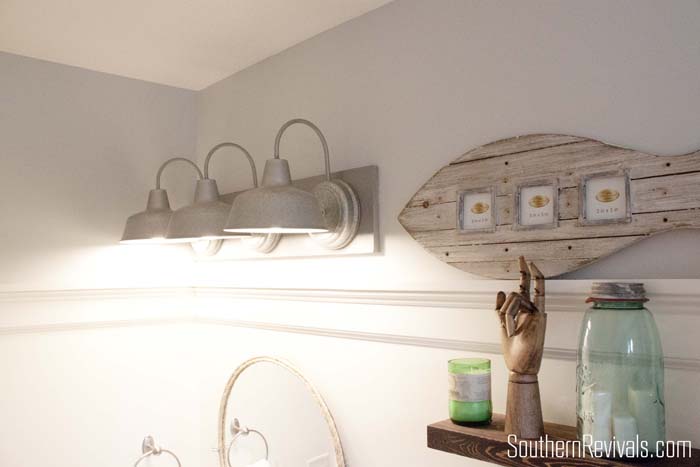
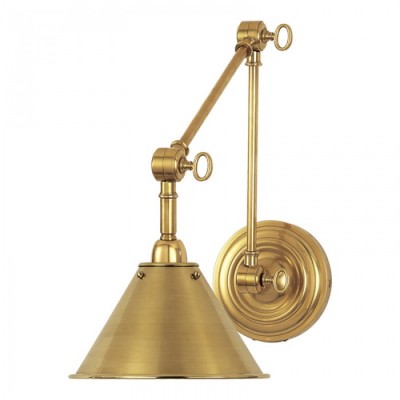
The first thing we did for this bathroom, well over a year ago, was this DIY Triple Gooseneck Galvanized Light Fixture. I love the look of this fixture but what I love more is that we saved hundreds doing it ourselves.
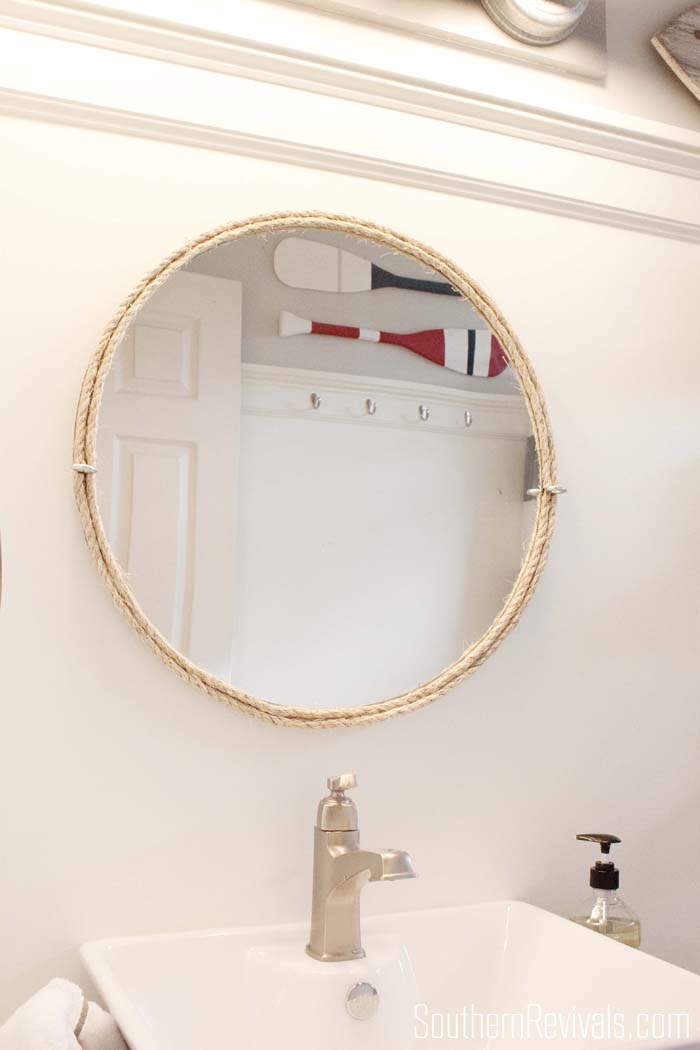
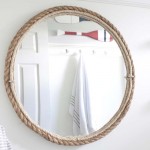
I found a $5 mirror at a thrift store and turned it into a nautically inspired rope mirror. I haven’t decided if I’m done with it yet. I’m living with it for now but thinking I may go back and add a rope for it to “hang” from. {Rope Mirror Tutorial coming soon!}
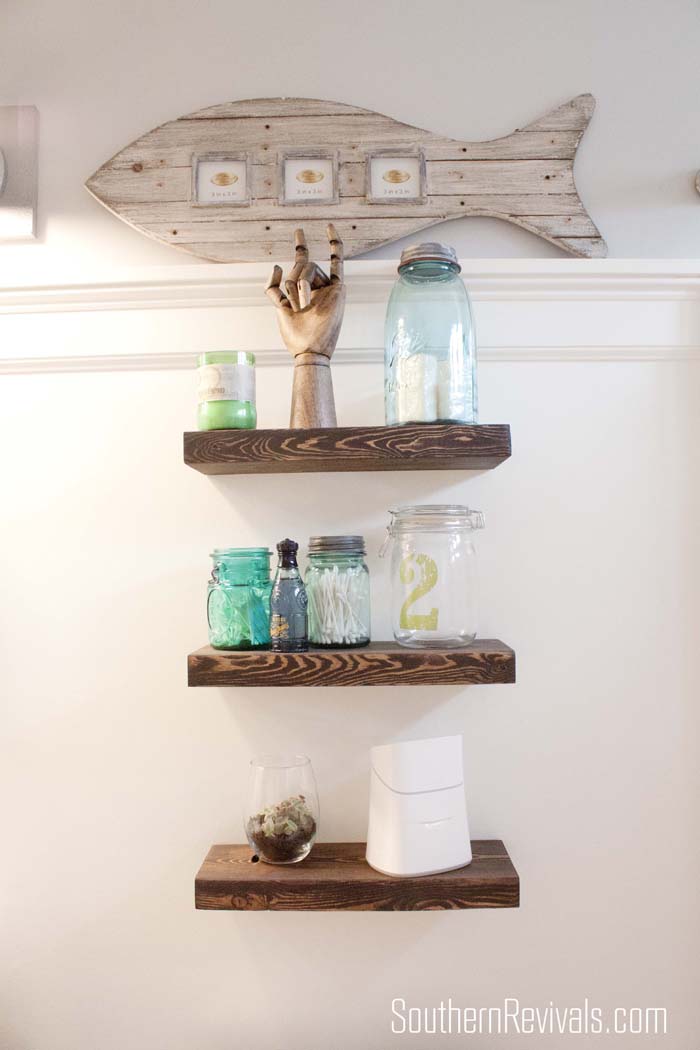
Here’s another of my current favorite DIY projects. This one costs you about $3 for each shelf! See my tutorial on DIY Floating Shelves – no building required. Also, I’m in love with this driftwood fish photo holder – 9.99 at TJ Maxx. {Yes, I realize there are no photos in it yet. What can I say, I got a new photo printer and the beast got the best of me!}. Anyway, it inspired the finish for my next project.

Like I said, a kid’s bath has to be fun no matter what! We had one of those rectangular-just-above-your-shower kind of windows like everyone else. And rather than squander an opportunity for fun, I decided to create a porthole window cover! {link to tutorial at the bottom of this post}
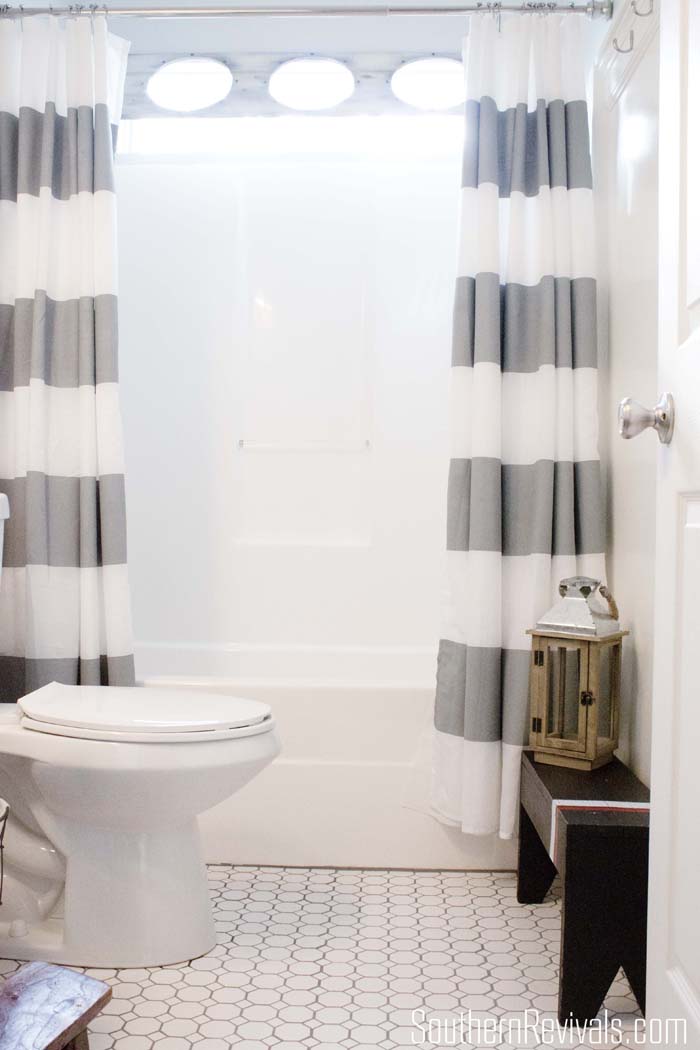
Since I decided on two shower curtains, instead of one, to frame out our shower and tub, I felt like there needed to be a fun focal point.
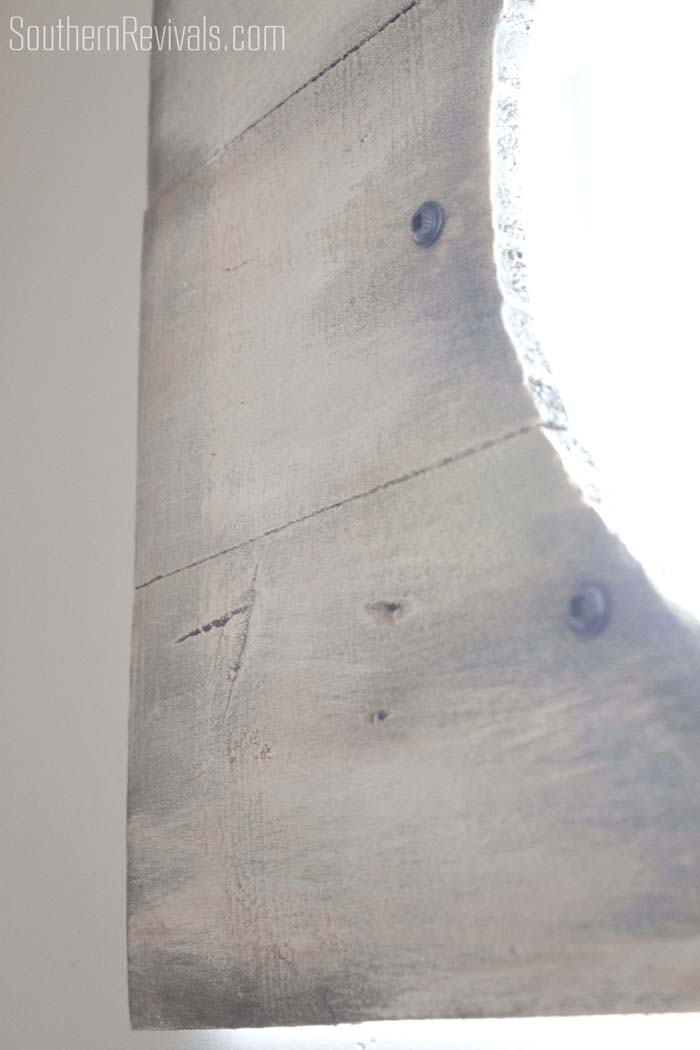
These boards were free, taken from a pallet I already had on hand. I added some screws around the cutouts to give it a riveted look. I painted it in layers to match the fish photo frame. {Driftwood Paint Finish Tutorial here}
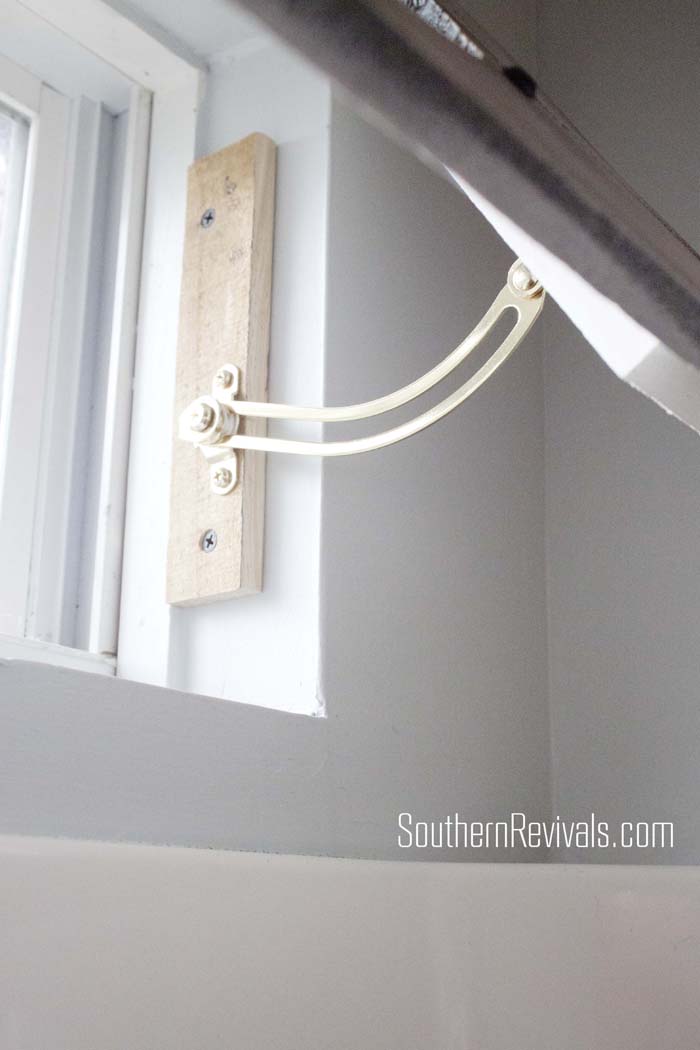
Initially, I was worried placing anything over the window would cut out too much of the natural light. A good thing during the hot summer months maybe but not so much for the darker winter months. In the end, it doesn’t block out as much light as I was worried it would. But just in case we added an arm-hinge that allows us to prop it open if we like – just like opening a real porthole!
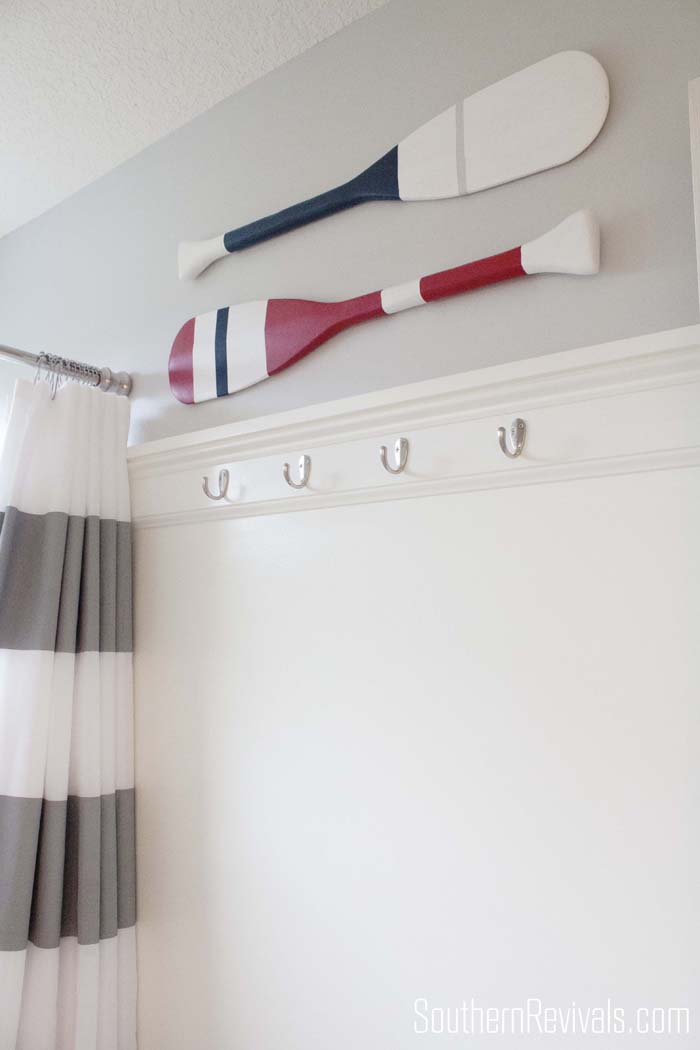
What’s a nautical makeover without oars? I show you how I created these Pottery Barn Knock off Oar Decorations here.
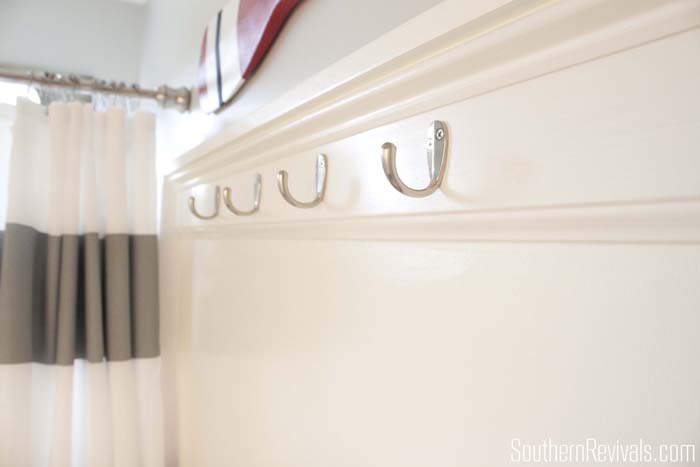
Instead of going with a standard towel bar, I decided to add hooks on the wall. This way we can hang towels and clothes at the same time.
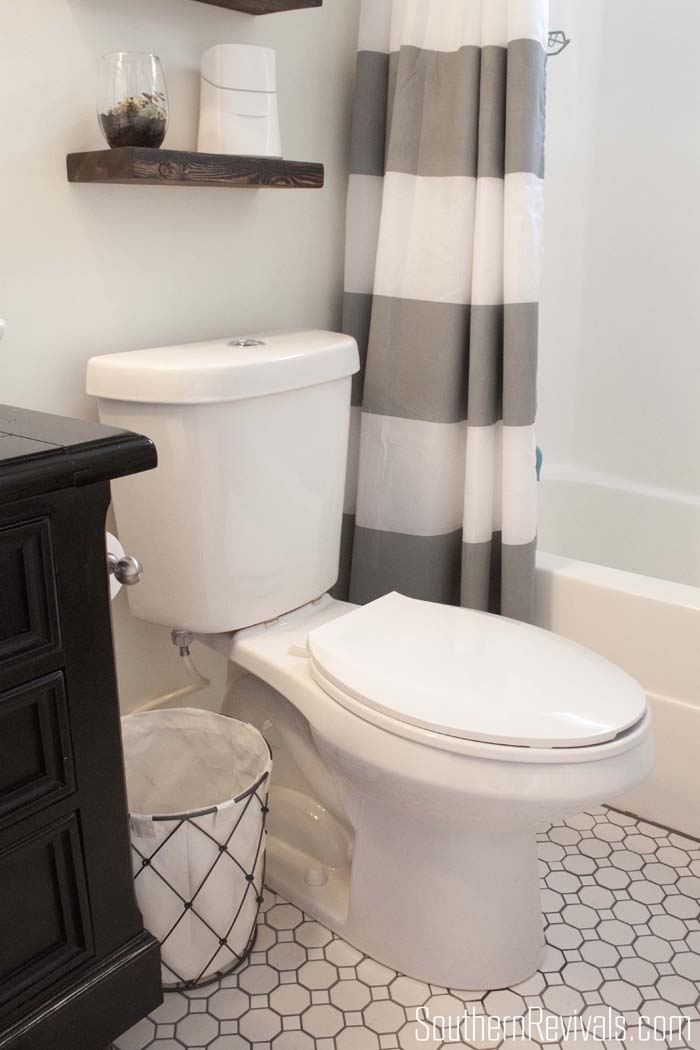
We got a new grown up toilet, the kind with flush buttons for no 1 and no 2! And I am obsessed with these tiles on the floor.
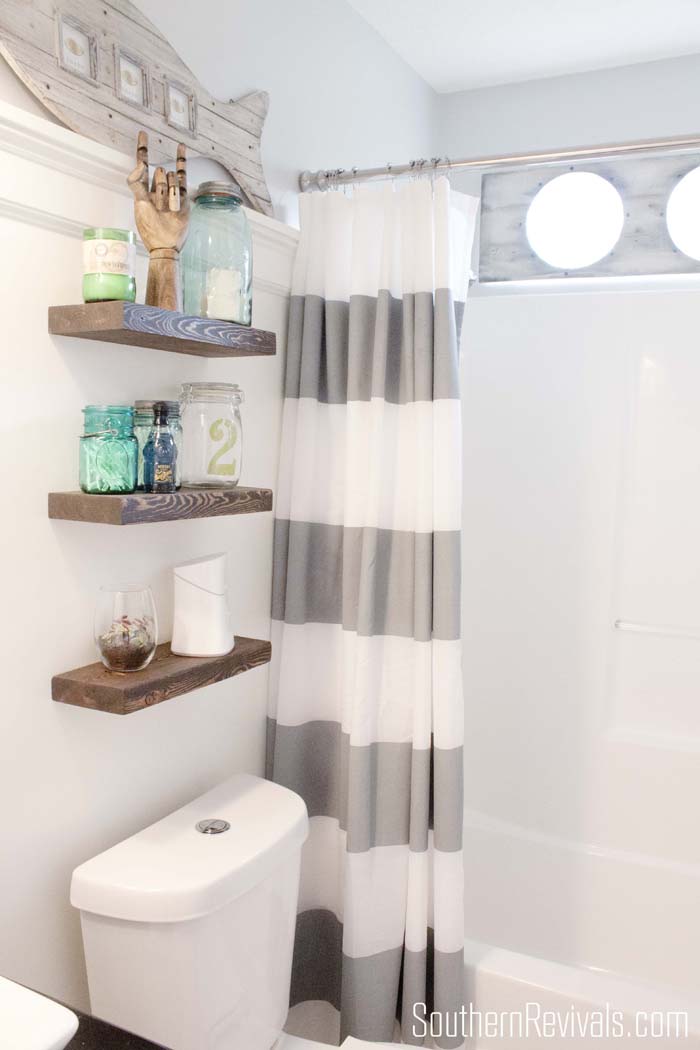
And those shelves above the toilet aren’t just beautiful they’re functional, too. They provide us with extra storage but since they float on the wall they don’t feel like they take up too much room. Giving a very small bathroom an open and airy feel.
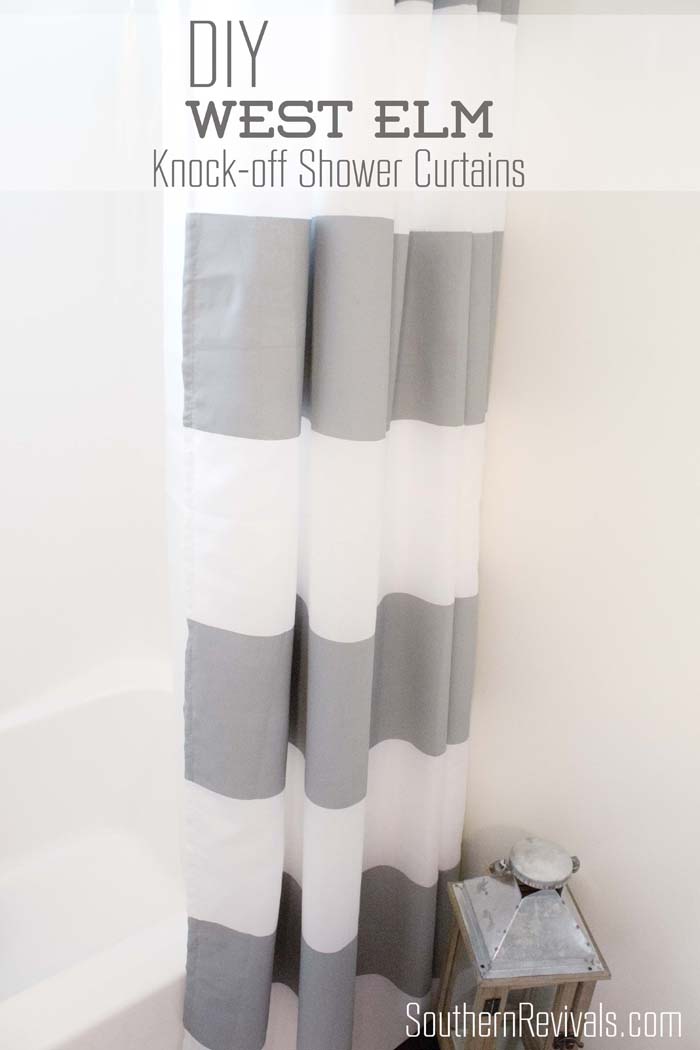
Can we talk about these thick stripe shower curtains for a minute? I’ve been drooling over the West Elm version of them for many, many months now and while at $39 ea they aren’t astronomical, I couldn’t justify spending $80 just so I could have a pretty “frame” for our tub insert. Because truth be told, that tub insert is the only part of the bathroom we didn’t change but I would’ve loved to! I’ll be sharing my tips and tricks to creating your own West Elm Knock off Shower Curtains soon.
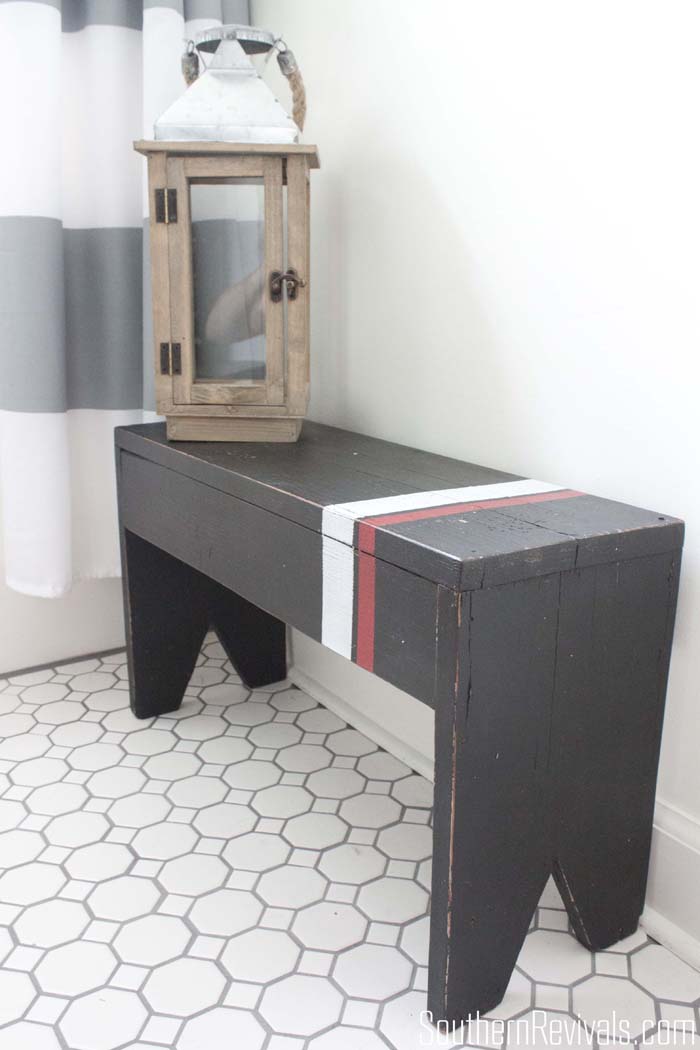
Back in 2007, when my great aunt and uncle passed away, I was out in their old shed one day when I spied this old stool. Of course, it wasn’t painted like this when I found it. It was crude at best but it wears this black paint and stripes very well. Plus, I love having it in my home to remind me of them. That and it’s such an adorable focal point to boot.
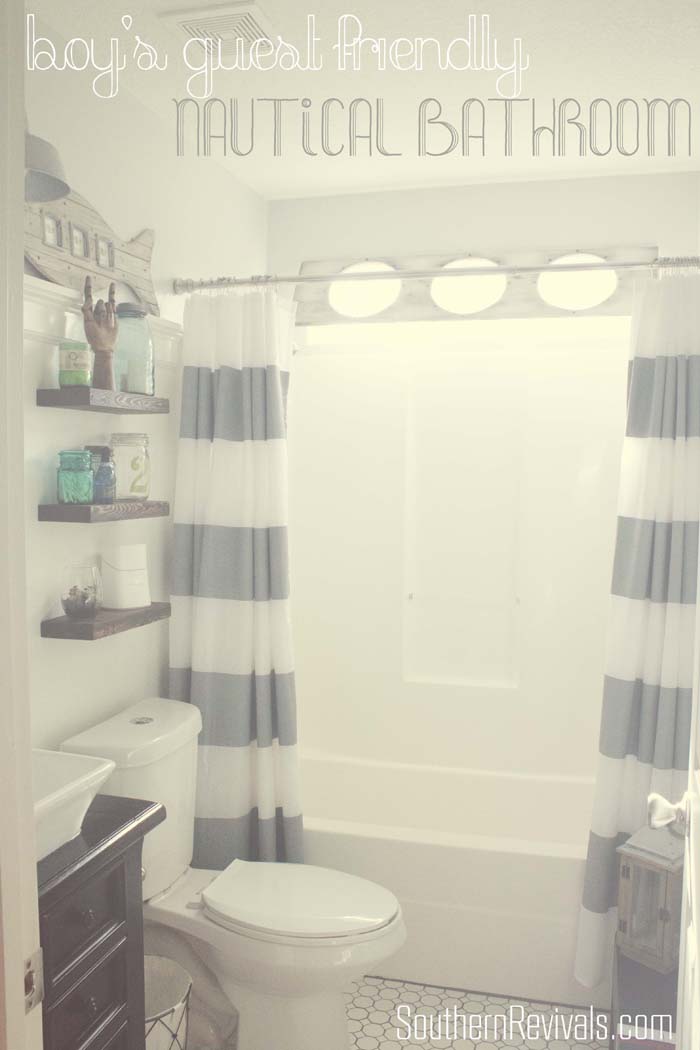
I am thrilled with how it turned out. It’s still fun enough for our boys but classy enough for our guests. It’s nautical style without being too ‘in your face’ and I can’t believe how much we saved doing it ourselves and using things we already had on hand. I’ll admit, pulling out that old toilet and ripping up the linoleum that was in here before seemed daunting at first but it was so worth it!
Paint Colors:
Top Wall – Valspar’s Bay Waves
Bottom Wall – Valspar’s Fresh Cotton
Supplies:
Tile – Home Depot
Toilet – Home Depot
Sink – Overstock.com
Tutorials:
Triple Gooseneck Galvanized Light Fixture
Pottery Barn Oar Decor Knock-offs
Turning Our Nightstand into a Sink Vanity
Driftwood Paint Finish Tutorial


Girl, we have like minds!
Awesome job on the porthole cover!! And I love hooks on the wall( something I have been back and forth about doing in our bathroom). And that bench- always wanted one of those!
Thank you! We love the hooks. So much more versatile than a towel bar.
I had to come over and see that window in the shower!!!! WOW! The whole bathroom is awesome, but that window = so brilliant! Nice job, adore it!
Oh thank you so much! I was pretty excited about the porthole. The boys are like, yeah mom. It’s cool. LOL
Totally magazine worthy! I re-did my boys bath with the nautical theme too and LOVE IT! Thank you so much for your inspiring projects. I still need to paint the oars…seasons changed and focus had to go along with it. Almost time to get back to it. Can’t wait to see the tutorial. Love the TJ Maxx frame and floor tiles. AMAZING!!
There’s just something about Spring isn’t there? It’s like the time of year where you pick up where you left off. I’m pretty sure I get more done during the spring than any time of year! Thank you Michele!
Your bathroom turned out amazing! I love it all, but the porthole took it to a whole new level! Great job!
There is so much to love in this bathroom! You did an amazing job!
Thank you so much Megan and thanks for taking the time to comment!
Very cute. Lots of ideas. Like it all, except the gang sign.
LOL Thanks. That’s actually “I Love You” in sign language.
Seriously Jamie that’s awesome!
What a fun functional space. You crushed it with the striped shower curtains framing that wonderful window!
Thank you so much for your sweet comment!
This turned out great! I LOVE the shower curtain and the floating shelves. It definitely has a boy-ish touch but looks clean and classy for guests.
Thank you so much! And thank you for taking the time comment!
What a great bathroom transformation! Love the bench! Pinned. xoxo
Thanks so much! I really appreciate it!
Wow! Your bathroom looks amazing! So many great ideas; I’ll be checking back soon for your tutorials…
Oh good! I hope you do! Thank you!
This bathroom is absolutely gorgeous. I LOVE it – pinning, like, every image…and going to share on my G+ and Facebook page!! Awesome job!!
How sweet of you! Thank you so much!
Jamie this bathroom is amazing! Love the shower curtains!
Thank you so much!
I am super excited to revisit your bathroom redo. We are on the end stages of our total gut remodel with 3 (4 when totally finished) bathrooms to decor. Talk about budget busting! I just emailed the Mr your floating sheves for our bath above the tiolet. I so agree shower curtains are ridiculously priced, I am looking forward to seeing your tutorial. I have a feeling we will use that in my daughters since she wanted lime green and saddle brown there. I cant imagine ever finding anything to suit. Thanks for sharing your projects.
Oh Thank you! I am so glad the post is coming in handy! I’ll have that tutorial up (for painted curtains) May 11th. And lime green and saddle brown is the perfect reason for DIYing your own curtains, not to mention cost. Hopefully the shelves work for you. They will definitely save you some money! 😉
Absolutely love everything about this bathroom! Did you do the west elm knock off shower curtains like you painted your drop cloth curtains? I’m in the process of redoing my kids bathroom, and I would love to do these.
I did! I painted these as well. I’m working on a tutorial post on painting both drop cloth curtains and shower curtains. I’ll be posting that soon.
Love it! You did a terrific job. I really wish we had a window above the shower. It is so dark in there with no natural light. I have been thinking about doing portholes in the same location, but I have three round mirrors I’m planning to hang up there for (hopefully) a similar effect. The natural light would be SO nice, though. I’ve often wondered how much it would cost to add one of those rectangle over-the-shower windows. Probably lots… Anyway, thanks for the inspiration! 🙂
Ahhh we have two rooms in our home with zero natural light, another half bath and our laundry room. I know just how you feel. I love the idea of using mirrors to bounce the light around the room. Genius!
I love the 2 shower curtains, but am I the only wondering if the water will come through the middle?
That depends on your shower head I would think. But since this bathroom is for my boys, 4 and 11, they simply pull the shower curtain closest to the shower head completely shut, end to end, they way you would if you only had one shower curtain. Make sense? No more mess that is normally made by an 11 yr old boy! 🙂
Ah! Thank you so much! It’s amazing how sometimes we (I) can miss the obvious! But, I know the “I am not alone.” 🙂 MC
I totally get it! 🙂
You did a beautiful job!! Did you happen to do the shower curtain tutorial or can I just not find it?
Thanks!
Sarah
I’m embarrassed to say that it’s because I haven’t published it yet. I had planned to do a series of curtain painting tutorials (different fabrics, diff mediums) all rolled into one. I should have just done this one! I still plan on publishing it and hope to get to it soon. Thank you!
Where did you get the shower curtains?
Hi Pamela,
I got plain white ones from IKEA and painted the gray stripes. They did have a some that look just like these at West Elm though.
Where did you get the shower curtains?
Hi Tina,
I made those with white shower curtains and fabric paint!