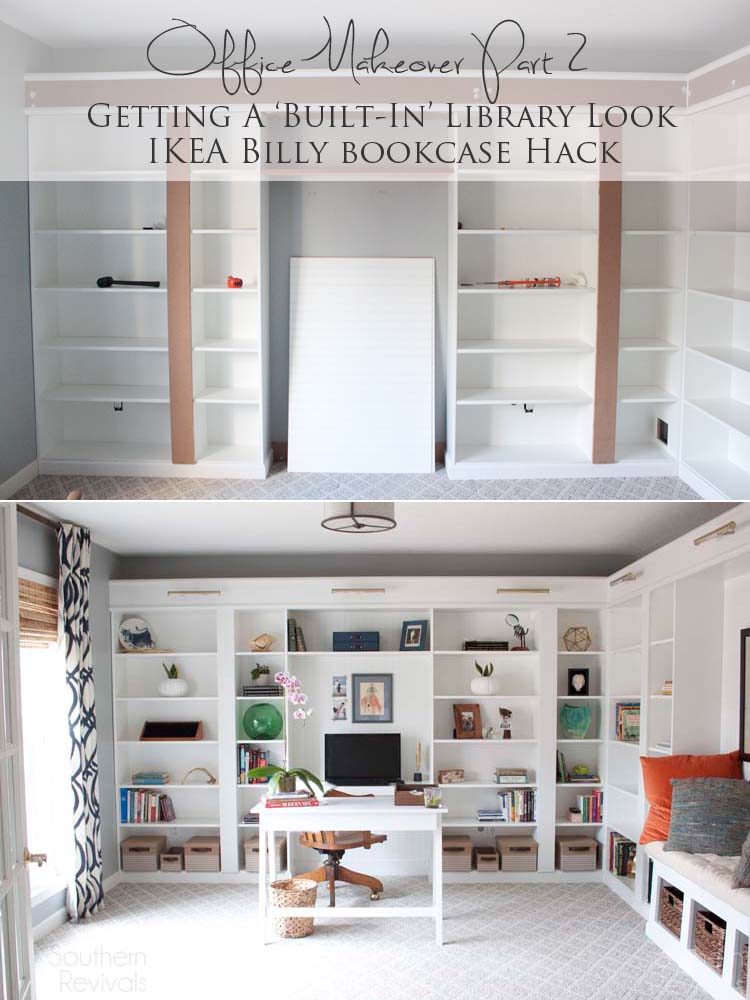
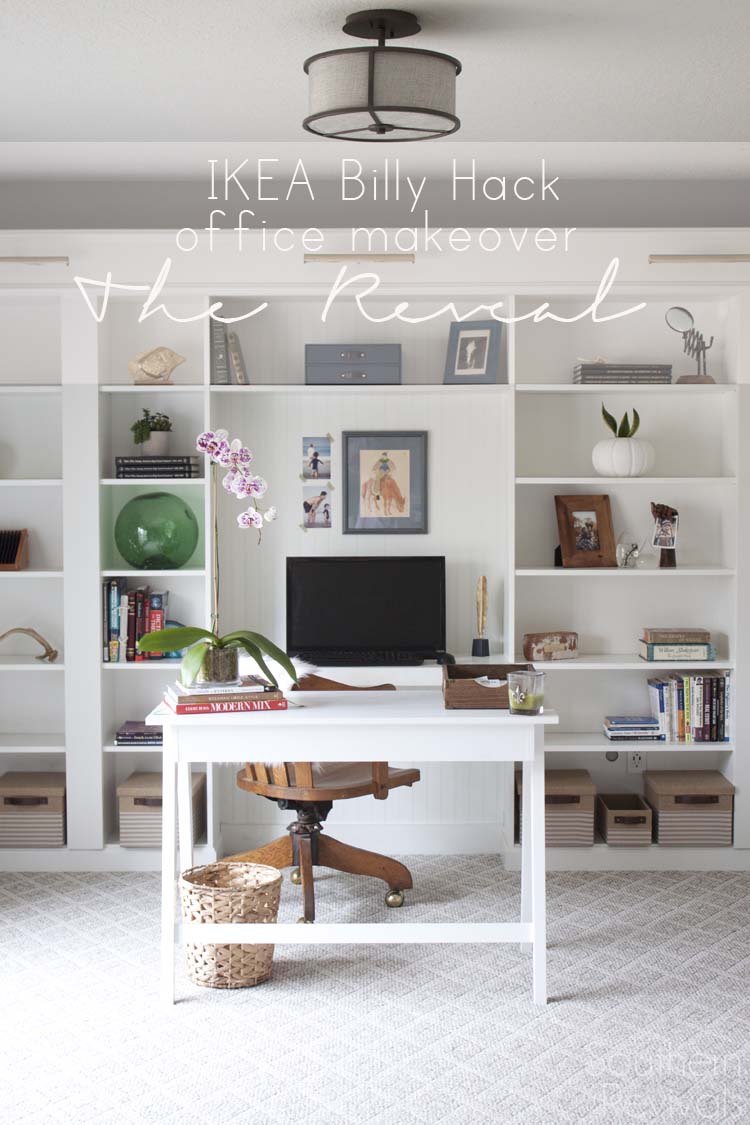
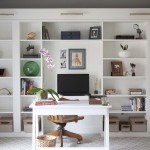
A couple of weeks ago I posted the reveal of our Billy IKEA Hack Office Makeover reveal and prior to that I posted Part 1 – getting a built-in library home office look using the billy bookcase. This is part 2 and today I’m sharing with you everything you need to get that built-in look with these prefab bookcases. Part 3 – the remote control lights, outlets, etc. has been and the final installment, Part 4 – an itemized cost breakdown and where to get the look, are upcoming. I’ll link to those here once they’re live.
Here’s what you’ll need:
*This post contains Amazon affiliate links for your convenience and to support the cost of operating this blog. Thank you!
Supplies:
- L-brackets (1 for each bookcase, 2 additional smaller brackets for floating desk)
- 2×4’s (bookcase braces and bench form)
- 1x3s (desk only)
- wood screws
- wood glue
- liquid nails (beadboard panels)
- MDF panel (panels on top and in between bookcases and also for bench)
- small plywood panel (desk only)
- molding
- baseboards
- caulk
- paint
- spackling
- sanding block
Tools:
- Drill (with bits for holes and screws)
- Jig saw (for cutting backs of bookcases for outlets)
- Miter saw (for molding and baseboards)
- Skil or table saw (for cutting MDF)
- Rockwell SoniCrafter with saw blade (for cutting sheetrock and hole in side of bookcase)
- Ryobi AirStrike nail gun (for attaching MDF panels)
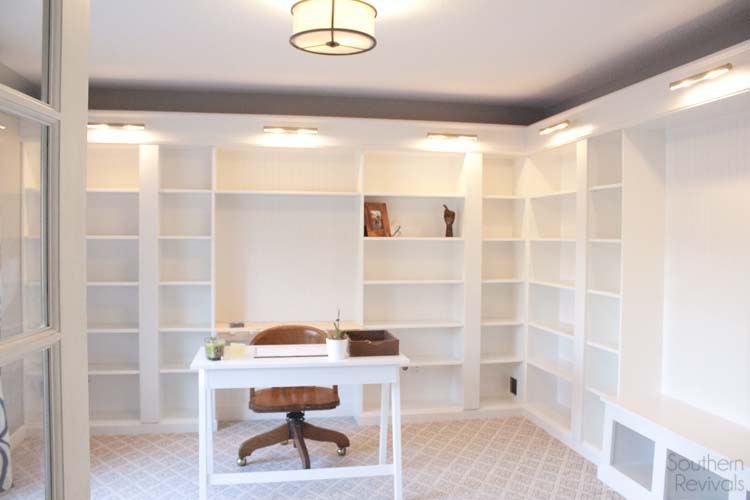
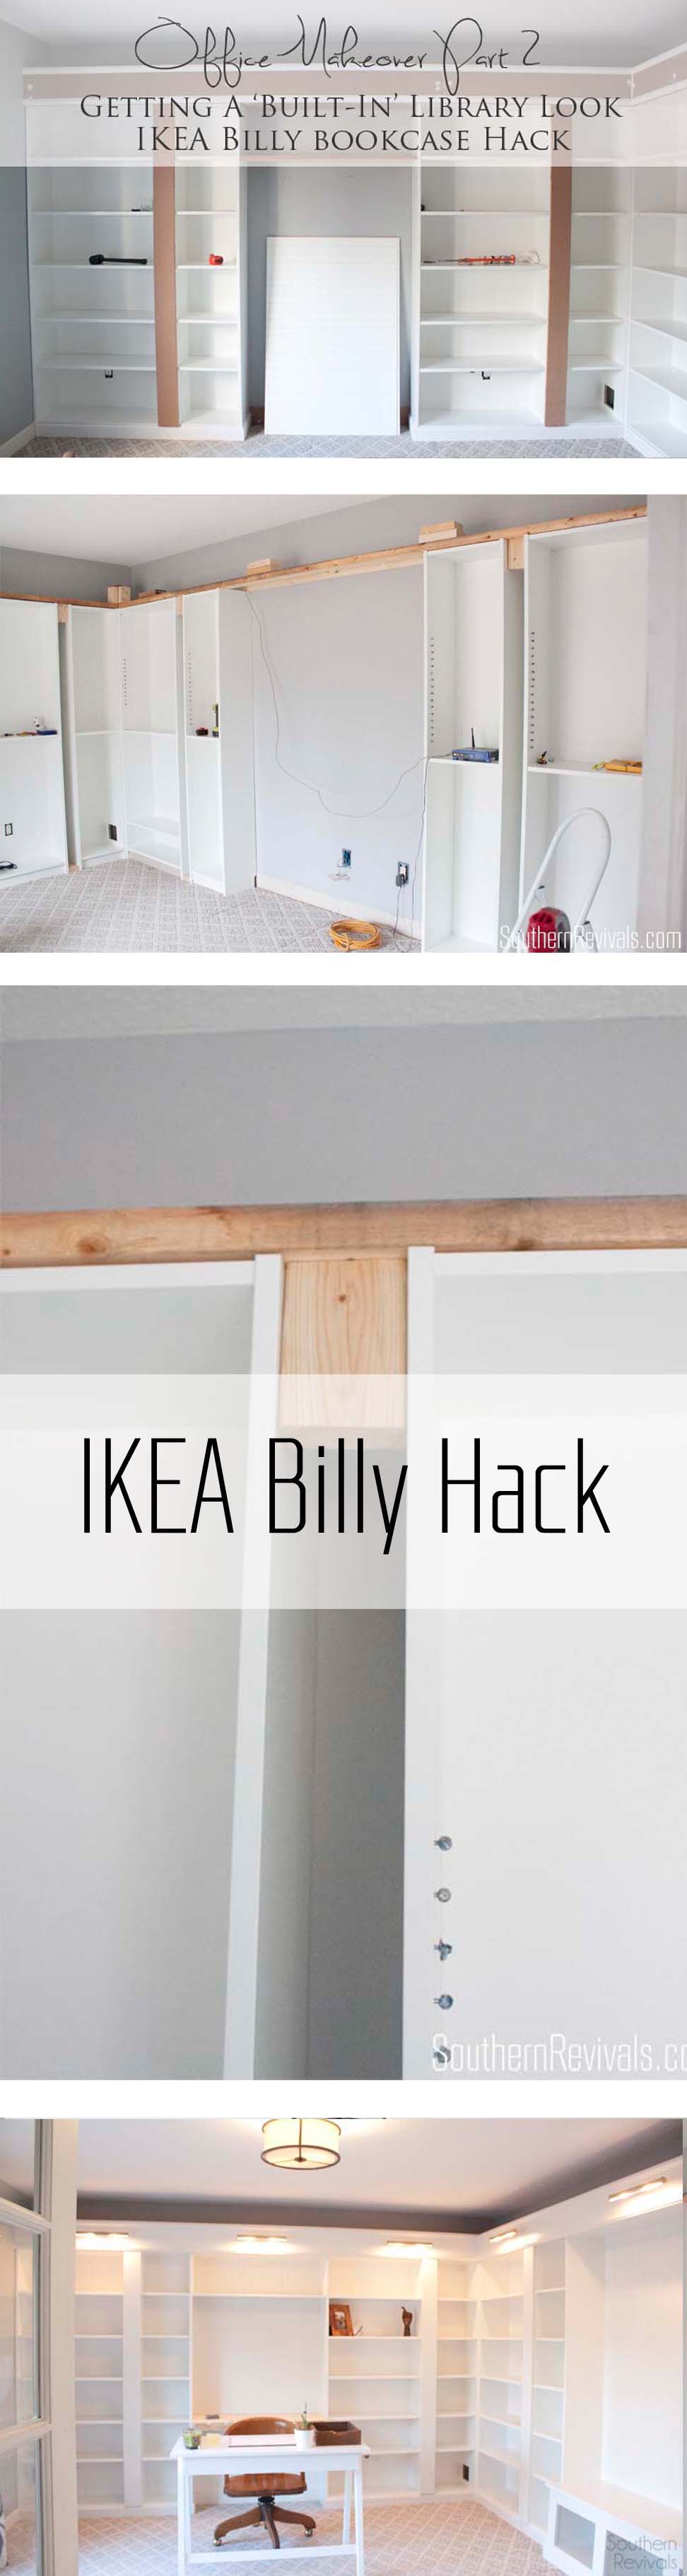
If you missed Part 1 of our Office Makeover or you don’t want to go back and check it out because you’re just too anxious to get started, here’s what you need to know: First, we removed the baseboards on the walls where we would be placing the bookcases. Then we lined up the bookcases on the wall where we wanted them to go and anchored them to the wall with L-brackets.
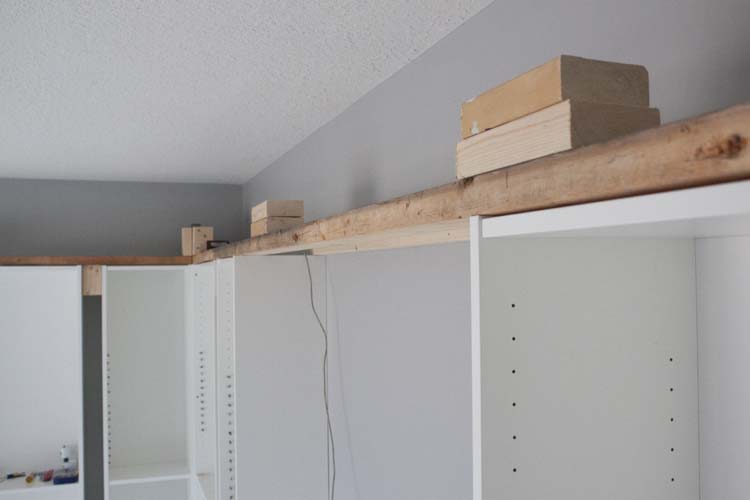
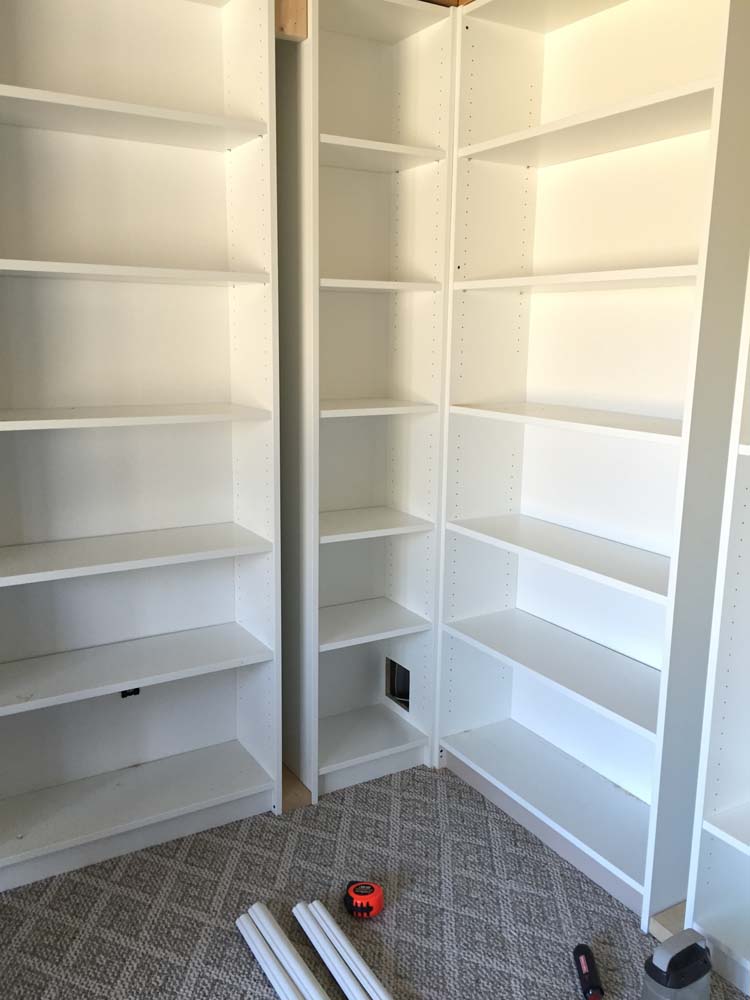
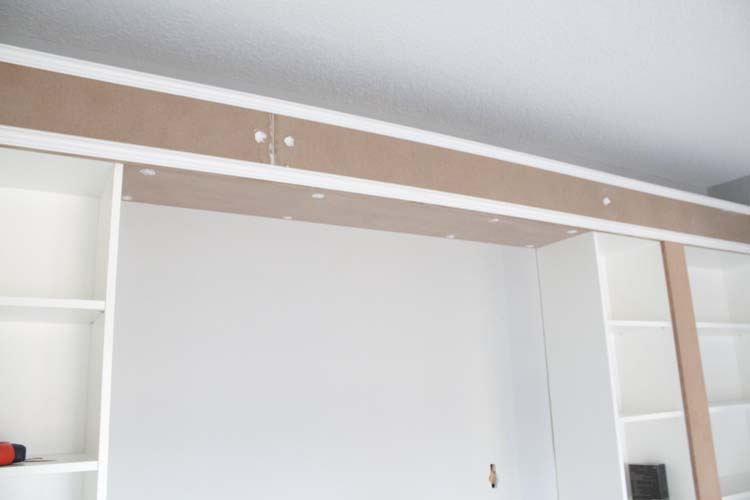
Then we connected the bookcases with scrap 2×4’s and also bridged the spaces between the bookcases where the bench and desk would go. We screwed these directly into the tops of the bookcases. We also used short scrap pieces stacked on top of one another and screwed down to have a place to attach out MDF later. We also placed scrap 2×4 pieces in between on the cases at the bottom, too. All caught up?

For our particular situation, we needed to have wall access to where our fiber optic internet cable comes into the house so we cut a hole into the side of one of the bookcases using my Rockwell SoniCrafter oscillating tool with saw blade attachment. We started by drilling a hole in the center to give a starting point for cutting.
This corner hole is now hidden by a basket so we have quick and easy access to it.
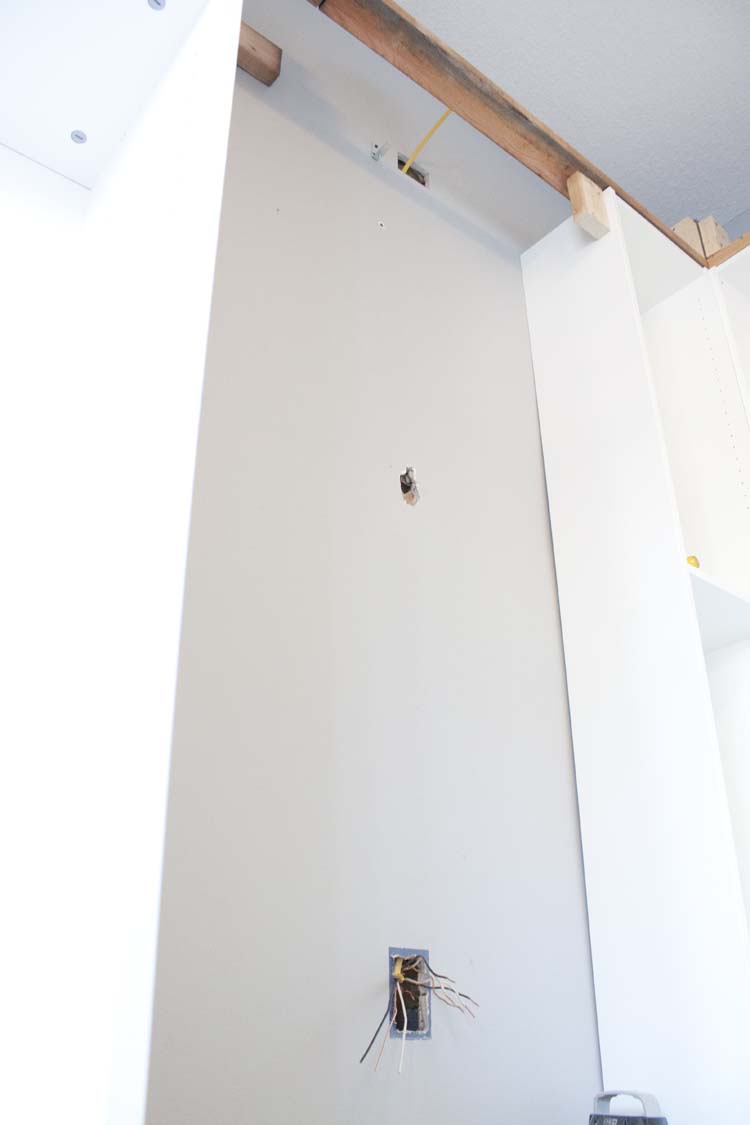
We knew we wanted to add lighting to the bookcases but because this office is on the ground floor we had no attic access to it in order put lights on a switch. So we decided to add two new outlets above the bookcases over the bench and desk areas. To do that we followed our existing outlets near the bottom of the wall all the way up to the top, above the bookshelves, and cut a hole for our new outlet box.
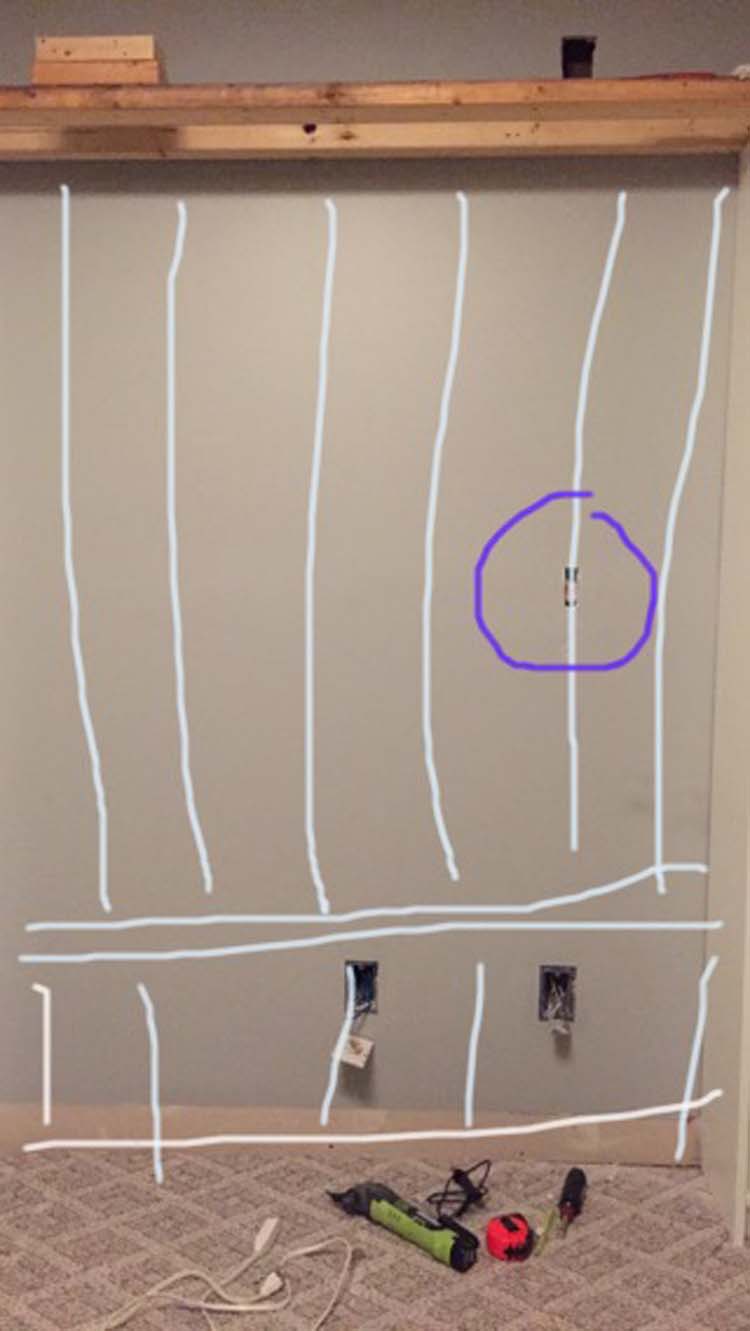
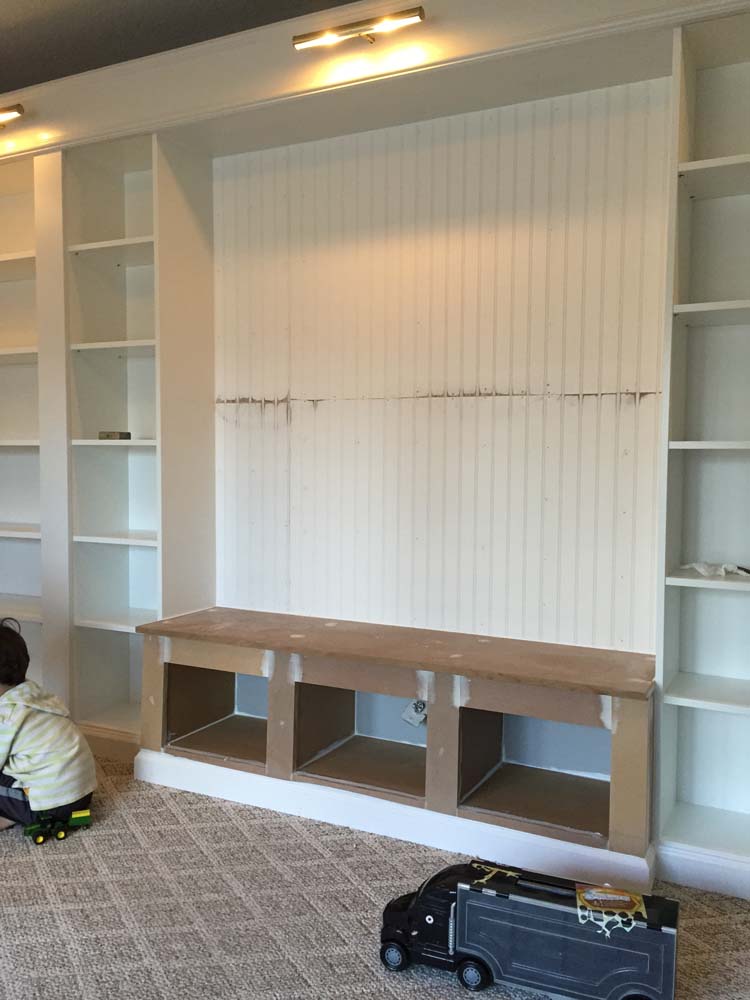
We were hoping there wouldn’t be a joist between our studs so our new electric cable would just drop down to the existing outlet and we could quickly tie it in. But, of course, things are never that easy and lo and behold there were indeed joists in our walls. So instead of ripping out sheetrock we just decided to make a small hole in the wall in front of the joist so that we could access it and make a groove for electric cable. Here to illustrate that point is this ridiculously crappy cell phone photo where I have, with my finger, drawn out the bench, the beadboard and circled the hole we had to make in purple. Got it?
This of course meant that we now had a hole in the wall which I had to decide how to cover up. In a way, I am thankful this issue presented itself because it is what made me think of using the beadboard in the first place. I had been unsure what to do in these blank spaces because I felt like leaving the walls gray behind the desk and bench made the look less cohesive but I felt like just painting these areas white to match the bookshelves wasn’t the answer either. Enter the beadboard painted white and now we have cohesiveness with texture and that’s a win win!
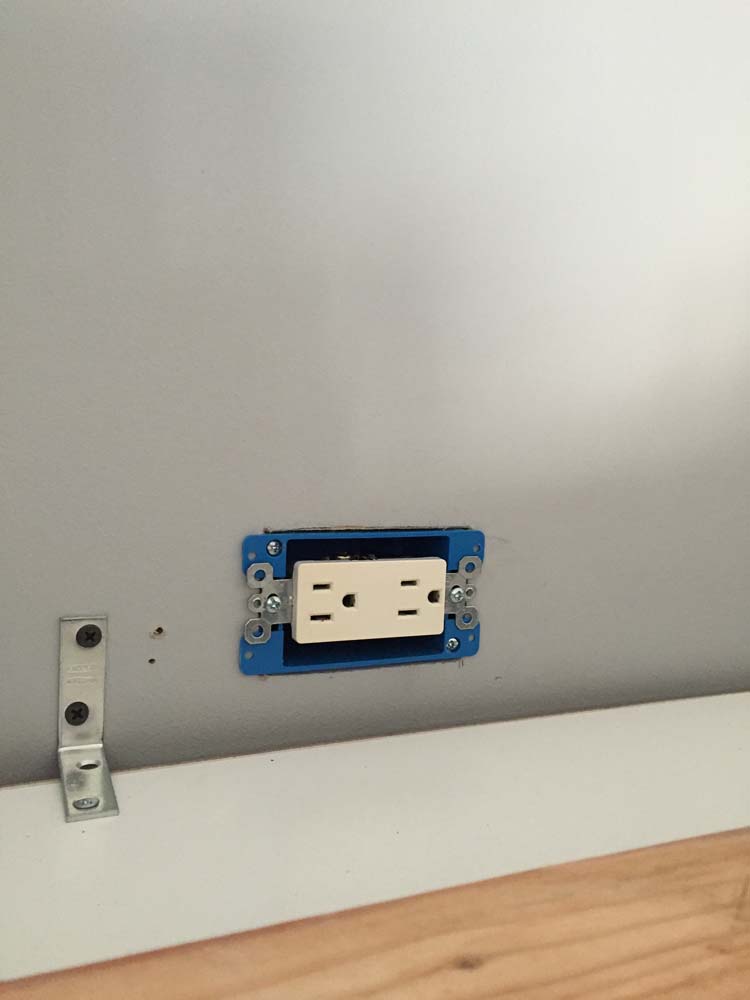
In the end, it wasn’t too difficult to pull these two extra outlets. Here’s a pic of one them and the L-brackets we used to attach the tops of the bookcases to the wall.
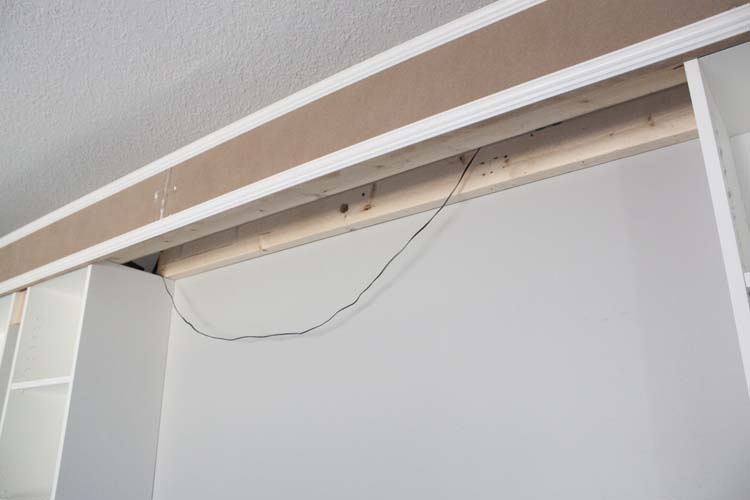
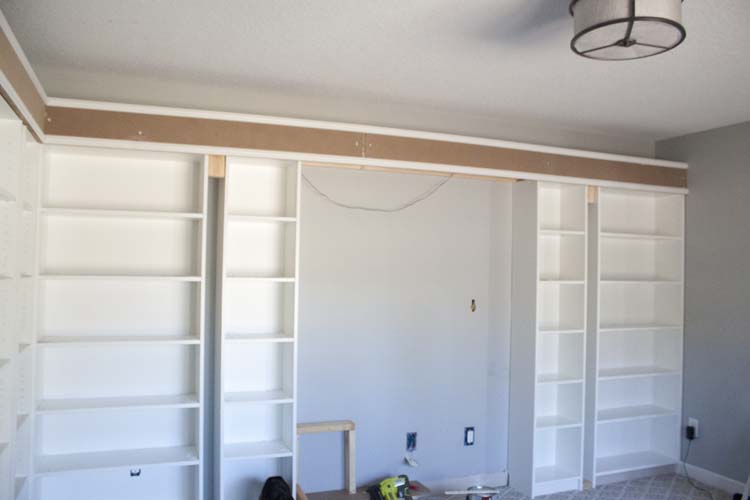
Once the bookcases were secure and the new outlets ready to use we started the process of adding the MDF panels to give the bookcase that built-in look. We cut panels in sections for the tops of the bookcases all around the room and secured them with screws to the 2×4 stacks behind them. Spackling screw holes as we went. Then we added the molding with a nail gun. We made these panels 9″. We left the top of the room exposed for a couple of reasons: 1) I thought it looked better that way and 2) good thing I had already decided that because it was necessary to accommodate our router and lighting – but more on that next week.
We also cut panels for the undersides for the bench and desk sections.
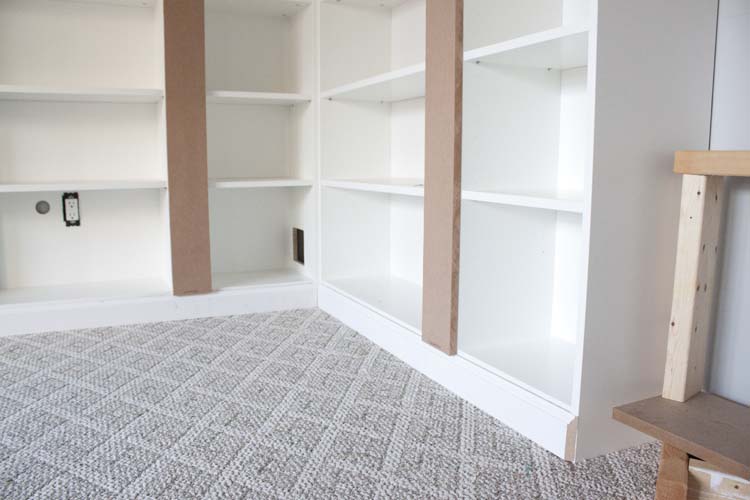
Then we placed panels in between the cases and then baseboards to the bottoms. We exclusively used a nail gun for these sections. The spaces between the bookcases are important because they keep it from looking like it’s just two bookcases sitting next to one another. Our between the bookcase sections are 5 1/8″ wide for no other reason than when we were planning the project we knew how many bookcases we could use in the room and the approx amount of space we’d need for desk and bench and then we simply divided the left over room evenly to form these sections. Takes a little planning but saves you some headaches in the end.
All you need to know to know is: 1) the size of your room 2) the size of the bookcases – height and width in particular and 3) anything else you need space for in the room such as a desk and/or bench.
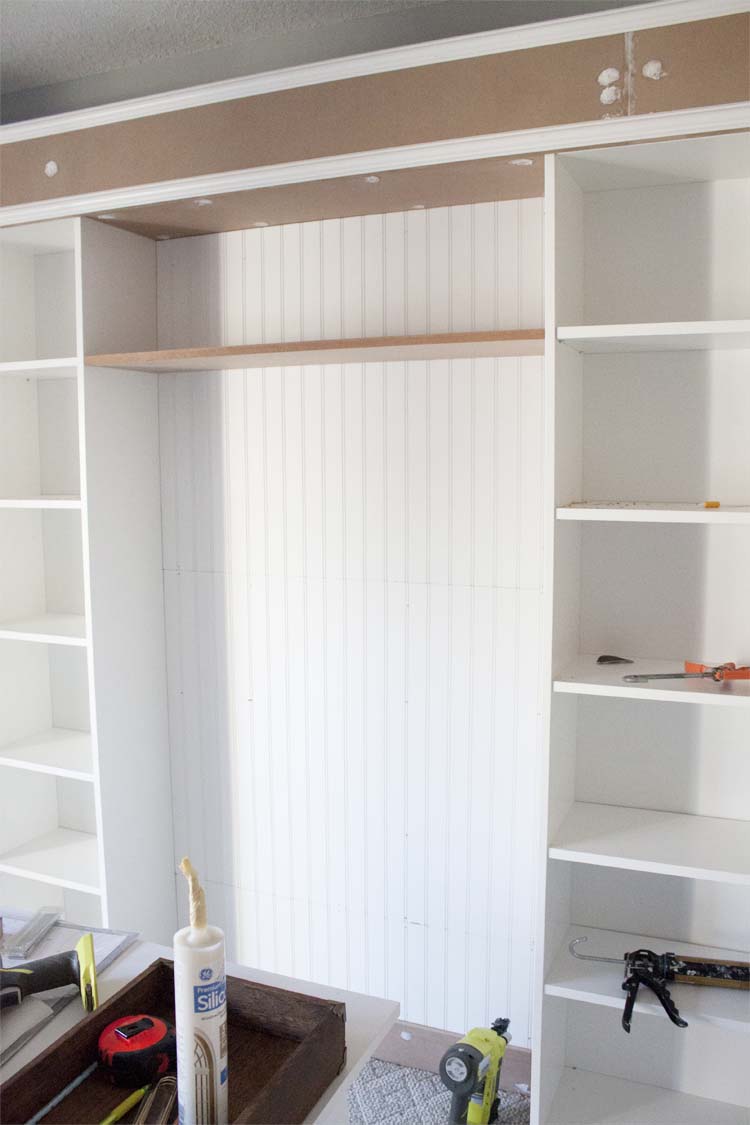
We also used an MDF panel for a shelf above the desk to help tie it into the bookshelves and we also placed an MDF panel at the bottom of this wall which we met with baseboards on either side.
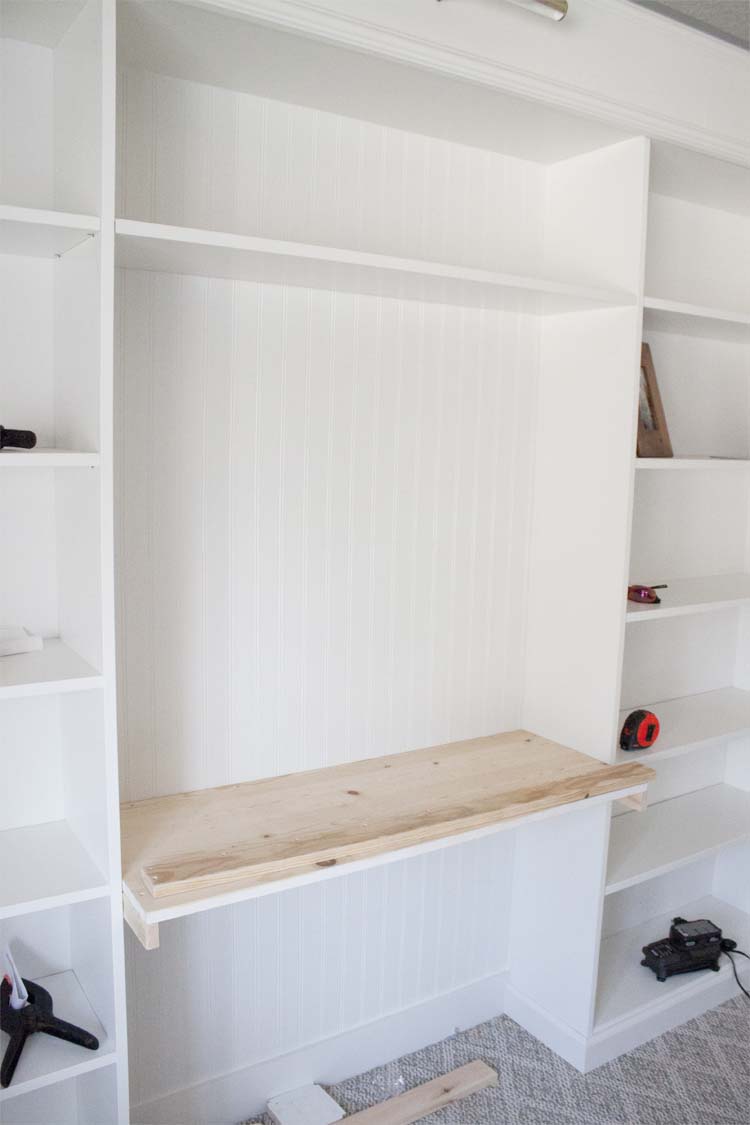
From there we built the floating desk for the computer. For this we used a nice plywood panel and 1×3’s on the sides supported with smaller L-brackets, which we screwed directly into the bookcases and another 1×3 in the back attached to the wall. To finish the look we placed another 1×3 panel on the front of the plywood piece.
The desk measures 15 3/4″ deep and 40 1/2″. Keep in mind these numbers are unique to our situation; perimeter of our room and the setup of our computer. Be sure to take these things into consideration when planning.
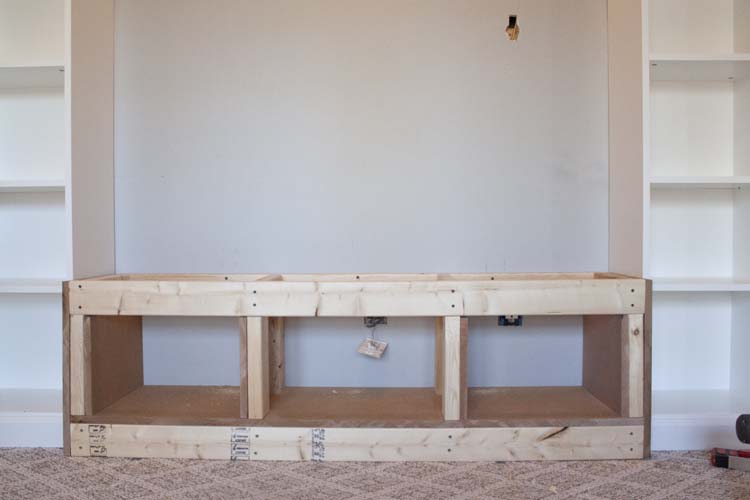
Then we moved on to building out the bench form using 2x4s. First we created the top and bottom rectangle sections leaving width room on the sides for two MDF panels and height room at the top for the MDF panel between the two rectangles (at the bottom) and the MDF panel we’d be using as a seat. I used the standard measurements for bench height and depth, which I Googled, and also by measuring another bench we had on hand. Our bench measures 15 3/4″ deep by 18 3/4″ tall by 59 3/4″ wide.
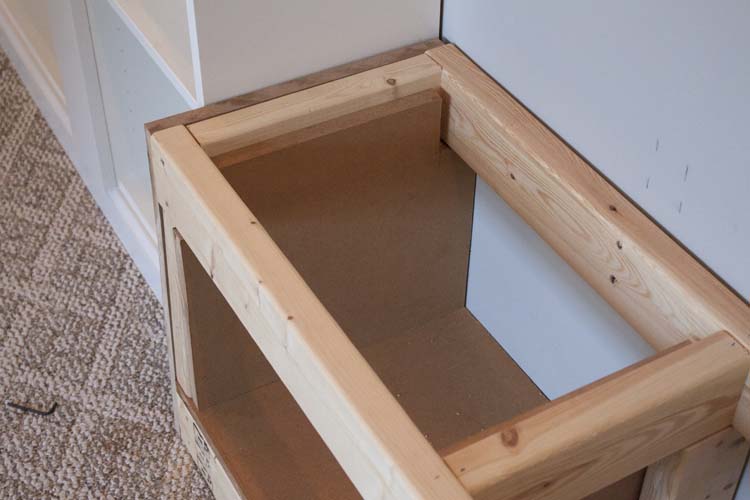
Then we added MDF panels to the outside sides and to the inside to cover up the 2×4 supports. Hopefully you get some kind of idea how we did this from the pics. Honestly, we were winging it and playing around with how to do this while we were building it out. There’s probably a much easier to put this together which is why I didn’t take the time to make proper plans for how we did it.
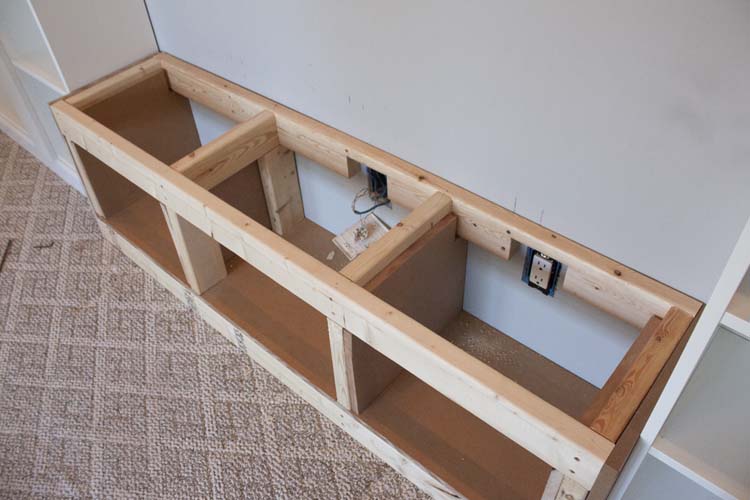
We had to cut out sections of the back 2×4 to accommodate outlets. We attached the bench to the wall by screwing the 2x4s into the wall studs and the sides into the bookcases.
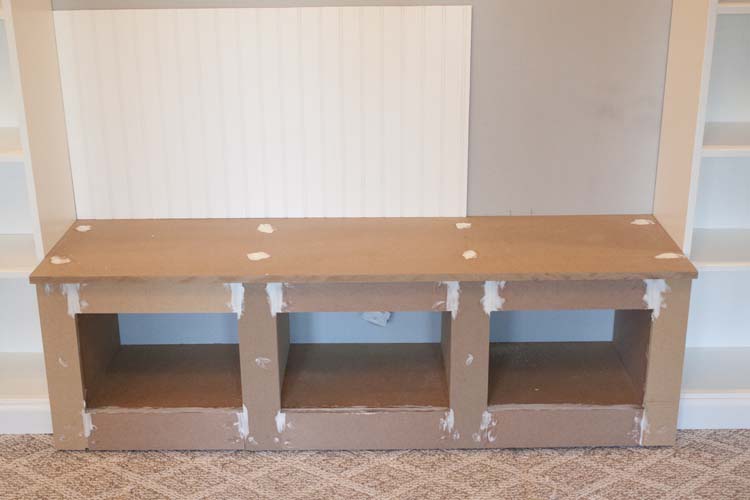
Once we had it secured to the wall we added MDF panels to the facing to cover up the 2×4 and a panel to the top for seating. Then….LOTS of spackling!
We had to use two sections of beadboard and making that match up is tricky. We used Liquid Nails to attach the panels to the wall and the nail gun to hold the panels in place while that set. Then there was lots of sanding at the joint. We also added the baseboard to the front of the bench at this point.
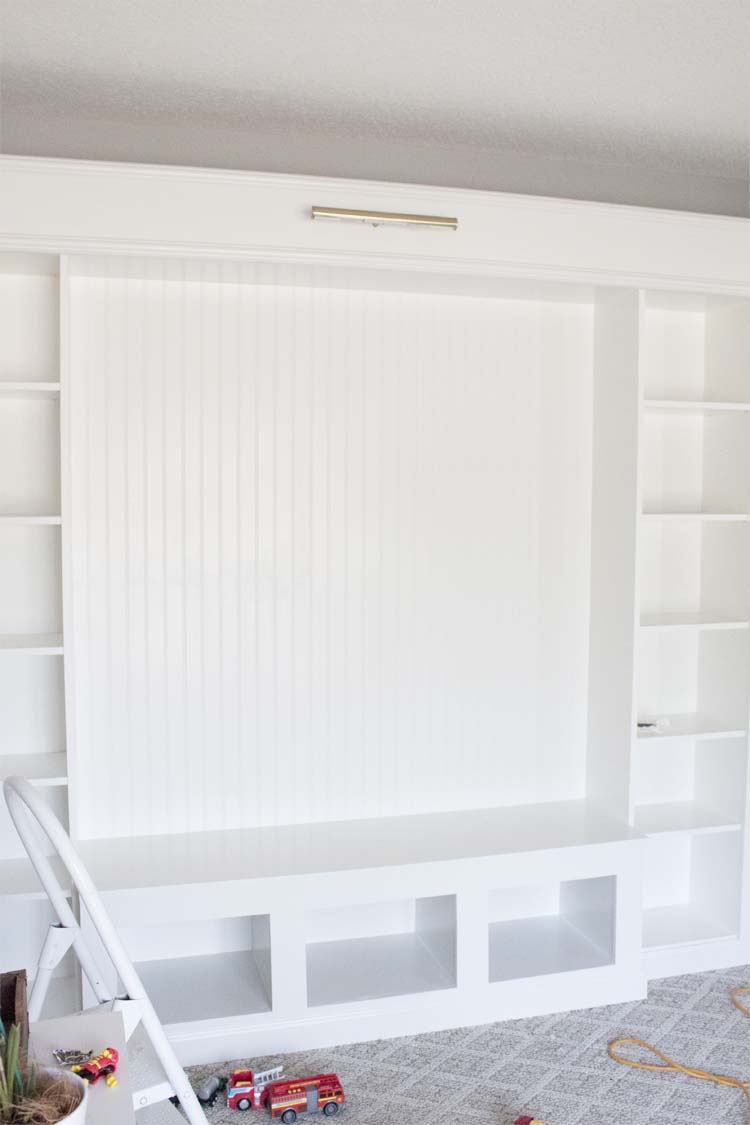
As long as I live I think I will never get over what wonders and miracles white paint can preform. I took a shelf from one of the bookcases with me to Lowe’s and had them color match it. I used Olympic One in Semi-gloss to paint all the panels, sections, molding and baseboards.
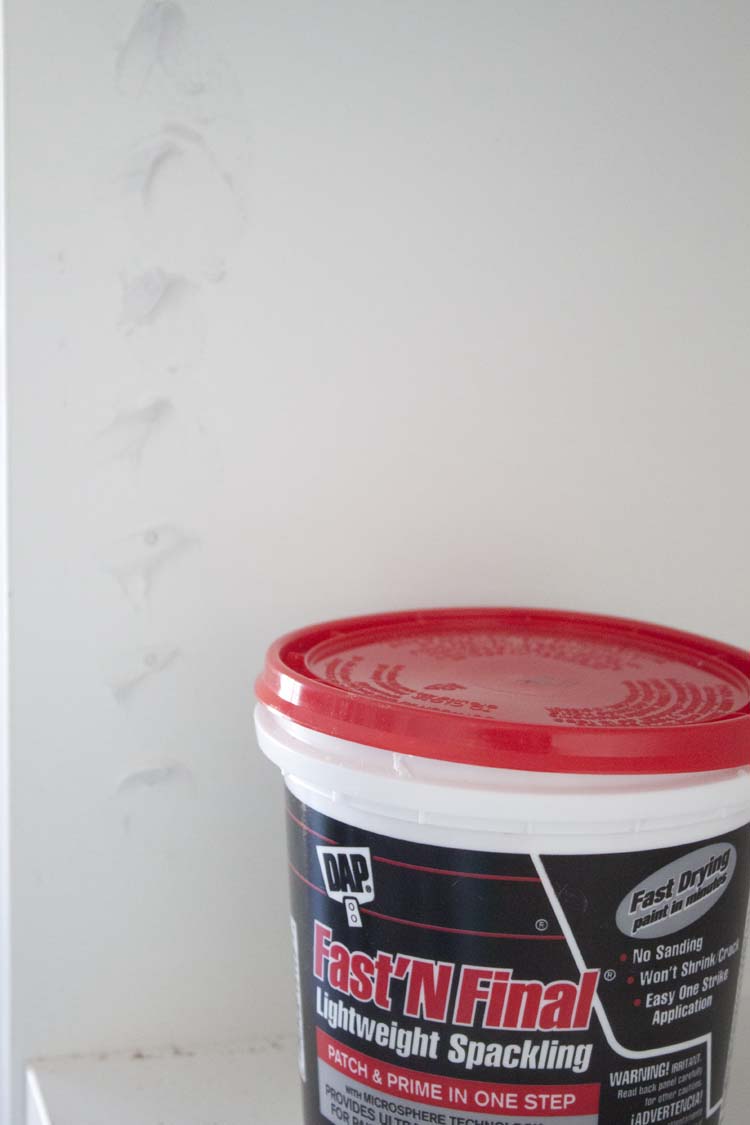
I used Dap Fast N Final Lightweigh Spackling to cover the extra holes in the bookshelves that we did not use. This does two things: 1) It’s not completely permanent so you could always use the holes later if for any reason you needed or wanted to and 2) By covering the holes it makes them less obvious and immediately hides those tale tale pre-fab signs and gives everything a more cohesive look.
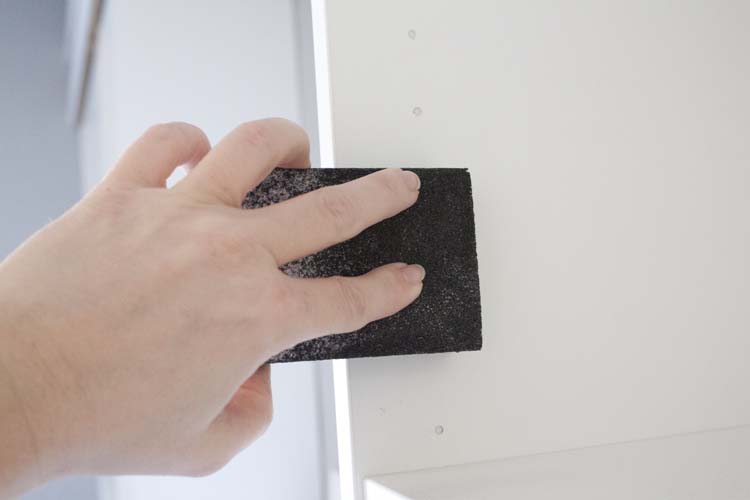
I did NOT paint over this but I did do a light sanding with a lightly damp fine sanding block.
I have to tell you, as much as love it in its useful phase I think I will always love it most in all its white, minimalistic glory…. {sigh}
Remember, Part 3 – the remote control lights, outlets, is next followed by the final installment, Part 4 – an itemized cost breakdown and where to get the look will be posted soon.
And, in case you missed it, the Reveal is here: IKEA Billy Hack Office Makeover – The Reveal
Other Posts in this Series:
-
IKEA Hack Office Makeover – The Reveal
-
Part 1 Building in Billy
-
Part 2 Building in Billy
-
Part 3 Remote Control Lights & New Outlets
-
Part 4 Shop the Look – COMING SOON
-
Giant Framed Postcard – COMING SOON
-
Affordable Library Lighting
-
Office Ceiling Light Fixture
-
$20 File Cabinet Makeover
-
Turning a Photo in a Giant Watercolor Wallprint


Hello Jamie!
I love this post about using the IKEA bookcases. What a great idea and so affordable! I may look into doing this in my dining room which we really do not use very much. Thanks so much for always giving us affordable and smart ideas! Love your blog! Your Statesboro friend!
Hi friend! Thank you so much! You’ll have to send me some pics if you decide to do that. We don’t use our dining room much either. Thanks for stopping by and for your sweet comments.
Your project is beautiful! We are currently installing Billys in our living room to convert it to a library. We are using the black-brown ones with doors so we are staining instead of painting, but very similar. I would love to have lights like yours on ours. Could you give a little info about how you did them and what you used? It would be greatly appreciated! Thank you for sharing!
Thank you! You can find the link to the lights I used here: https://www.southernrevivals.com/2015/02/finding-affordable-library-lighting-office-makeover.html and there’s more info coming about how we installed them in an upcoming post, this week. Thanks again!
Just wanted to give you a link to this post that I just finished up on how we installed the lights in case it would still be helpful: https://www.southernrevivals.com/2016/04/how-we-added-remote-control-lights.html
I’m working on this project for my own office — I’m just trying to understand how you handled the power needs for the computer. I am not big on cords, so trying to figure out the best way to power the monitor (I will have double monitors in my set up, I’m just trying to figure out how to plug them in.
I don’t see where you have any cords draped.
Hi Blake,
I know how you feel about cords. For my setup, I now have an all-in-one which I knew I would upgrade to when we planned this office. So I have a hole in the desk where the cord drops down to the floor and then goes into a hole on the side of one of the shelves where there’s a plug-in. It’s not exactly a cord-free solution but it isn’t an eyesore either. I’m not sure how many cords you’ll be working with but it could be worth it to have an electrician come in and give you a better solution.
I love this and I am currently partway doing it in my new office! I’m a handy person but don’t have the experience you do and I’m stumped on one thing. The upper MDF panel that you have spanning the gap between the two book shelves on either side of your desk, how did you affix that there? I am working around a window, not a desk area, but I want to do the same thing and can’t figure out how you did it without any evidence showing. It looks like a floating shelf!
Thank you for your advice!
Hi Ginny! Thanks so much! Do you mean the gaps at the top of the bookshelves or the gaps between the bookshelves? All the MDF at the top is screwed into the 2x4s braces/form at the tops (as seen in the pics prior to our installing the MDF panels). The MDF between the bookshelves is screwed directing into the bookshelves. Please let me know if this doesn’t answer your question. Thanks again!
Thank you but I’m talking about another piece. It’s a little hard to explain in writing I think! It’s the shelf you are talking about when you say “We also used an MDF panel for a shelf above the desk to help tie it into the bookshelves.”
We want to do the same thing above a window but I can’t figure out how you attached it with no evidence.
Hi Ginny,
I think I understand what you’re asking. We used 2x4s all along the tops of the bookshelves, including between the bookshelves to bridge the gaps. We simply attached a long piece of MDF onto those 2x4s so that when you looked up you didn’t see the 2x4s. Then we attached MDF to the 2x4s all along the front.
So, in other words, if I were doing this over a window I would use two 2x4s to bridge the gap over the window and then box those 2x4s out using the MDF. I hope that makes sense. This will look great over a window!
EDITED TO ANSWER QUESTION ABOUT SHELF ABOVE DESK: So here it is, the simplicity will blow your mind. Before installing the pre-fab shelves in the bookcase we installed the one above the desk (made from MDF) by screwing it in from INSIDE the bookcases on either side. Then, once we put in the the pre-fab shelves inside the bookcases, they hides the holes! Obviously you don’t use the holes for the pre-fab shelves (you have to drill your own) but that’s all there is to it!
Fantastic post! We are doing the same thing in our living room and I have the same question as Ginny, but I don’t think you answered it here. There’s a shelf above your desk that appears to be just a floating board, I don’t see any brackets or anything! It’s the one where you said, “We also used an MDF panel for a shelf above the desk to help tie it into the bookshelves.” It’s the 13th pic down from the top of the post. ;-D Not the MDF attached to 2x4s at the very top of the shelves, the piece of MDF sort of floating below that piece. Thank you SO MUCH in advance!
OMG! I am just realizing that I DIDN’T completely answer Ginny’s question, did I?! I’m so sorry!
So here it is, the simplicity will blow your mind. Before installing the pre-fab shelves in the bookcase we installed the one above the desk (made from MDF) by screwing it in from INSIDE the bookcases on either side. Then, once we put in the the pre-fab shelves inside the bookcases, they hides the holes! Obviously you don’t use the holes for the pre-fab shelves (you have to drill your own) but that’s all there is to it!
Thank you SO MUCH! I wondered if that was it but was skeptical. I’m guessing a shelf of that length supported with only screws won’t hold much heavy stuff, then? Ours is 49 inches and will be more to blend the two sides, also. I really appreciate your time!
Hi Ali! You’re correct. You wouldn’t want to put too much weight on a shelf like this, although MDF is pretty sturdy. However, you could always hide a couple of L-brackets underneath if what you planned to put there was heavier than you’d be comfortable placing on the shelf. And you are so welcome! Thanks for stopping by!
Again, thank you SO much! It’s really kind of you to take the time on all these comments. I’ll risk one more question but if you don’t have time no worries! Do you have to predrill into the MDF? Did you use long wood screws–like 3 inch– or just normal-ish size?
Absolutely! You’re so very welcome. Generally speaking you don’t have to pre-drill MDF since it doesn’t split like wood. However, since you’re drilling into the thin side on that shelf it’s a good idea to pre-drill. To be honest, I can’t remember what length screws we used but the longer the screw I’m using the more likely I am to pre-drill, even with MDF. Hope that’s helpful. I hope you’ll share your completed project! 😉
I am also doing this in my office right now, and I can’t figure out how you dealt with the gap between the baseboard moulding and bookshelves? There is a very slight recess between the bookshelf walls and the actual bottom shelf. When I put my baseboard against them there is a gap big enough to stick my finger in. What did you do to overcome this?
Hi Eric We removed our baseboards where we placed the bookshelves. You can see that process in the Part 1 post here: https://www.southernrevivals.com/2015/03/office-makeover-part-1-building-in-billy-ikea-hack.html
Jamie,
I am getting ready to implement your idea turning my dining room into a much needed office. I went to Ikea and checked out the white Billy bookcases and didn’t realize, from looking at your pics, that they are laminated. Then I re-read your post and you said you paint-matched the shelf and then painted the 2x4s, MDF and beadboard. Bottom line, you did not paint your shelves after building installing them, correct?
I love this look and it was the inspiration I needed to finalize my plan for a long awaited office (3 years I’ve been waiting for the right idea). I appreciate your response to my question.
Dona
That is correct, Dona. I did not paint the bookshelves only the molding etc. to match. I believe the Billys also come in an unfinished version but if memory serves those are like $30+ more (each) if they’re still available. Good luck with your project!
Was the paint rolled on or sprayed on? If it was sprayed did you mask the billy cabs before spraying then?
Hi Victor! The MDF panels and other trim were handpainted with a brush. I did tape off certain areas to keep from contaminating the cabinets with paint. I would not suggest painting the pre-finished Billy cabinets as getting paint to stick would be super tricky.
I am currently re-doing our office to accommodate me and my husband. Your post is extremely helpful. I have studied it countless times. Here are the questions I have:
1. How and when did you cut the hold for the outlets in the Billy shelving back walls? It’s not a very sturdy piece so did you do it before you installed or after the unit was against the wall? What tool did you use?
2. We have baseboard and a chair rail, I can’t figure out how to cut them to remove just the sections I need without damaging the wall or other pieces. How did you do this? I’m thinking it is similar to where your desk is located and you left the baseboard in place in that area. If I don’t remove the chair rail or baseboard, couldn’t I just remove the quarter round toe kick and then a small trim piece on the side to cover the gap?
3. What kind of glue gun did you use? I love this idea because it gives it a nice smooth look with out nail hole and no chance of missing you mark when nailing.
Thanks for the link for the lighting in your 3 reveal, I ordered the remote control so we can do the same thing with our lights.
We cut the backs prior to securing them to the wall. We use a hole saw to make a round hole and then a jigsaw to cut it to the outlet shape.
We used a multi-tool (with semi-circle blade attachment) to cut away just the baseboards where we needed to make room for the bookcases. You can see it in action in this post: https://www.southernrevivals.com/2015/03/office-makeover-part-1-building-in-billy-ikea-hack.html
If you don’t have this tool or don’t want to go to the trouble, I think hiding the gap with molding would work.
I’m confused by your 3rd question, are you referring to the beadboard? There isn’t really anything I can think of that we didn’t nail. Maybe this post will offer more insight. If not, feel free to reach out again: https://www.southernrevivals.com/2016/02/office-makeover-part-2-building-billy-ikea-hack.html
You are going to love those remotes! Thanks so much for stopping by!
Hi Jamie,
Thank you so much for your awesome post! We are slowly planning on getting this project going in the next couple weeks and i was just wondering if you ever got around doing Part 4-Shop the Look? Also, how long did the whole project take to build? (sorry if you already mentioned it in the above post…I blame my mom brain!) Thanks so much!
Hi Sarah,
I did not do a follow up, Shop the Look. There didn’t seem to be much interest for it. We completed the project in just a little over a month, 4 – 6 weeks and for under $2k including decor. Hope that’s helpful!
Awesome! Thanks so much!
Hey, first of all. This office is beautiful. I came across your posts when I was looking at cost-effective renos for my cookie-cutter house and this hit the mark as a simple option to really make our office better!
I have two questions I hope you can help with!
1. How did you attach the shelf above the desk?
2. What type of spacking do you suggest for filling the nail holes in the MDF?
Hi Jess,
Thanks so much! We attached the shelf above the desk from the opposite side using the existing holes in the bookshelf. The screws are then hidden and the screws and shelf brackets share the same hole. I used DAP Fast N Final to fill the holes in our bookshelves and MDF with the exception of using caulk between the baseboards (that we added to the bottom of the bookcases) and the bookcases themselves.
How has the desk held up? I’m primarily concerned about relying on the billy bookshelves to hold the weight of the desk top as I rest my arms on it and such.
Hi L.J.,
The desk has held up just fine. It’s also supported in the back underneath the desk. Plus, it’s pretty small work area so there’s not much room for elbows, just your normal hand support when using the keyboard. I also have another desk behind me that I use for everything besides my computer work. Hope that’s helpful!
Love, love your work and thank you for sharing. I was wondering if you had any idea what your final cost was for this office and I understand if you prefer not to share that info. Thank you!
Hi Carolyn
I don’t mind sharing! I had actually considered a cost breakdown post. While I can’t tell you that off the top of my head I can say we spent around $2,000 for everything. The only thing that cost doesn’t include is the computer, gray wall color since it was already in place, and the carpet. Hope that’s somewhat helpful. Thank you!
Hi I love your office and built ins SO much. I have been thinking about this for a while, and considered using a kallax shelf as my bench ( I currently use it alone, for a dining area). I wondered why you chose to build your own? Want to make sure I’m not missing important informatio. Thank you so much!
Hi Suzanne,
Thanks so much! Once we had the Billys in place we had very specific dimensions to work with for a bench so building a custom one made the most sense for us. If we’d gotten lucky and the exact dimensions had worked for a pre-built, I would have absolutely gone in that direction! Thanks so much and best of luck on your project. I would love to see once it’s done!
Good Day,
I was wondering about the thickness of the MDF you used between the bookcases. I was also curious about how you finished out the electrical plugs that you cut out in the bookcases.
Rob
Hi Rob,
The MDF we used is 3/4″ in thickness. Af for the outlets, we just loosened the existing boxes from the wall, moved them forward a bit, and then treated the back of the bookshelves as if they were a wall. We removed the baseboards behind the bookshelves so that the bookshelves are almost flush with the wall. So it wasn’t much of a shift.
Wonderfully done! Thank you for the great inspiration
Thank you, Melinda!
Did you install the bookcases directly over the carpet or did you pull back the carpet and reinstall up to the bookcases? Thanks!
We installed over the carpet and have since gone back and installed laminate flooring. The carpet is still under there! 😉
Wow! Realy beautiful! I did tons of research for bookcase ideas and you win hands down!
A few questions if possible
Why did you use MDF vs Thin paneling etc?
I notice you covered the desk with plywood, but not the Bench, is the reason because you covered it with a pillow?
When installing the MDF between the bookcases, did you have any issues with the bookcases cracking from the nails?
How noticeable is the difference between the paint color vs the Bookcases?
Thank You
Hi! And thank you! I used MDF because I wanted something sturdy and easy to paint that would have a smooth texture. We used plywood for the desk mostly so we wouldn’t have to go out and buy another sheet of MDF. In other words, we used what we had. You could absolutely use MDF for the desk. We screwed the MDf panels into the braces BETWEEN the bookshelves, not the bookshelves themselves, so no cracking. You cannot tell the difference between the paint color and the bookcases, I had the color of the bookcases matched and was also careful to use the same sheen. I hope that’s helpful. Thanks again!
HI, I love this project! Looking at doing something similar in our office, but I’m constrained by window and doorway locations. Can I ask how deep the bookcases are once you add the MDF panels? I’m assuming it doesn’t add much depth, and it still ends up being less than 12″ deep?
Hi Kara,
I’m assuming you’re referring to the back panels that came with the bookcases? If so, those are only about 1/8″ to 1/4″ inch thick so hardly a perceptible difference. The only MDF panels we added were to the tops and the front to cover gaps. If those are the panels you’re referring to, that’s an extra 3/4″ added to the fronts. But if you’re just trying to think about how much depth you have room for between your windows and doors, the most our bookcases stick out is at the top with the MDF panels and molding added. The most our bookcases extend out from the wall is about 12 3/4″. Hope this is helpful!