
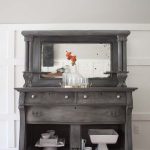
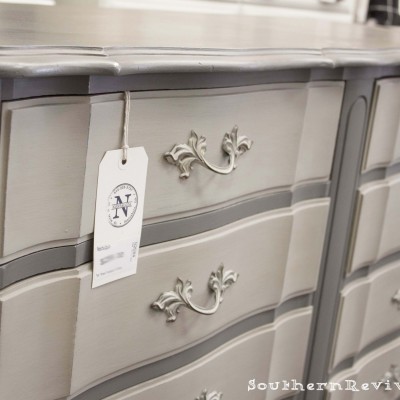
I have two obsessions. One is French Provincial furniture. The other is Gray. This dresser, painted with Maison Blanche’s Vintage Furniture Paint in Confederate Gray and Franciscan Gray, brings my two loves together all in one delicious dresser redo!

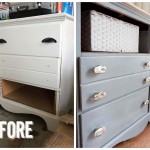
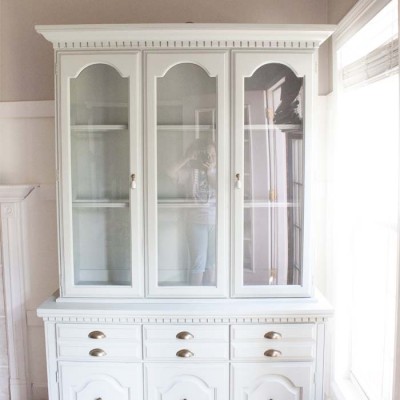
Here she is in her original form serving as a buffet in one my Milk Paint classes. See those handles. See how they look kind of golden. That’s dirt.

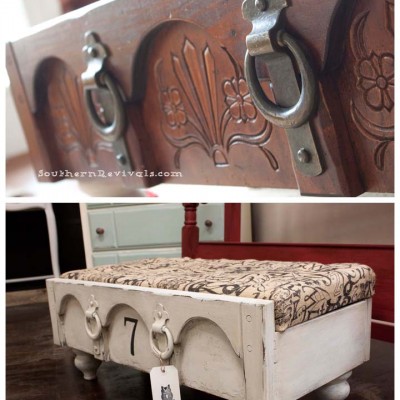
I soaked them overnight and was amazed at how completely different they looked what with all the gunk cleaned away. They were the perfect compliment for these two-toned grays.

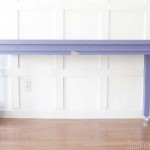
Sometimes I wish my own legs were as gorgeous as the legs on furniture.

Check out that curl on the feet. Lucky girl!

I just can’t get enough of gray these days. How about you?

Hi Jamie- I love this piece. I am currently redoing the exact same dresser and night stand and am having a rough time getting that top, thick, shiny cost off the original… Do you have any tips? I tried a paint and varnish stripper that didn’t even touch it..then sanded and still having little to no luck. Were you able to strip it down to the wood or did you just paint on it? I would like to stain the top if I get it down to wood but am having a hard time, any tips would be appreciated!
Hi Jen,
Actually, I just painted over it. No stripping or priming. Also, my dresser had a laminate top, no real wood to sand down and stain under there. Are you sure there’s solid wood under there? There may not be. That could be why you’re having difficulties.
Thanks Jamie. Yes you’re right I think there might be a laminate top. I think it was difficult to tell since the curved portion wood and paint strips easily. Thank you!
Yes, likely it is a laminate top with would molding around the edge. It’ll look great painted though. You could always paint the top in a dark brown to mimic stain. A friend of mine did that once and it looked great!
I’m so glad I found this. I just picked up this exact dresser at a consignment store (for a steal!!) and want to refinish it for my nursery. As my son gets older, I’m sure this dresser will take quite a beating. Did you poly yours when you were done? Do you recommend I poly mine? I’m excited to hear that you didn’t sand or prime it before you painted…has it held up well? I’ve never used milk paint before…
Hi Leslie,
First I wanted to be sure to let you know that this dresser was done in a chalk based paint but you could totally use a milk paint, too. Second, I did prime the top as it was laminate and I always do a light sanding as an insurance policy. To seal I used a furniture wax. I try to stay away from poly as it can yellow. If you choose a durable, good quality paint you should be fine. Sometimes, as the case with a stained table top I use a poly, hemp or tung oil instead of wax (especially if it will be exposed to moisture) for added durability.
Top coat* typo sorry 🙂
I love your dresser! I have one that is super similar that I would like to create something similar to yours for my baby girl’s nursery. The only thing is I asked my brother to paint it white while I was pregnant and he made a mess of it. He used a sander and did not use the same tension so it looks crazy. It’s hard to explain but I could send you a picture.Do you have any suggestions? I would appreciate any help since it came from my grandparent’s house and I would love to have it in their great grand-daughter’s room. THANKS!!
Hi Diana,
From your description it sounds as though the dresser will need to be sanded down again. If the sander left marks that’s really the only way to get rid of them. If they are showing through the paint now they will likely show through the paint still even if you paint over it again. You are welcome to send me a picture! 😉
Hi Jamie, I’m so glad I found this post because I have the same styled french provincial dressers I am wanting to paint. I am considering buying the same maison blanche paint because it seems like it’s the least hassle. I was wondering how much of it took to cover one dresser. I am painting three and trying to decide how much I will need to order. Thanks!
Are you painting 3 of the same size? If so, you may need to go with 2 quarts to be on the safe side but a little bit goes a long way! Have fun!
Could not be more in love with your refinish! Do you mind if I ask what color the darker grey is?
Not at all! The two colors I used are from the Maison Blanche Paint Co and are Confederate Gray (dark) and Franciscan Gray (light).
What did you soak them in?
Just a degreaser! Really, any kind will work. Dawn or TSP, anything made to remove grease.
I am also redoing the same type of furniture but I am not sure how to get the handles off. They have some round type of hole, no screws like the top round pulls have on my dresser? I’m sure it’s so easy and I’m just not thinking!
They make a special bit for these types of screws. When I started doing furniture it was one of the firs things I had to get. I got a whole set (diff sizes) and I use them fairly often. You should be able to find them at any home improvement store.
Absolutely beautiful job! Love it! I currently own a dresser very similar to this. I also have a headboard, footboard, mirror and two nightstands. I inherited this from a Great Aunt and believe it is circa 1940s from Bassett Furniture. I want to attempt to paint my furniture to match what you have done here. Painting furniture is brand new territory for me and I have a few questions: By painting, am I ruining an antique? Is the top of the dresser painted with the Confederate or Franciscan gray? And, what did you use to apply the paint? It looks so smooth and there are no brush marks. Do you have any suggestions or advice for me so that I don’t ruin my furniture? It holds alot of sentimental value. Thanks for answering my questions.
Hi Brenda,
To answer the your easier questions first, the top is the darker, Confederate gray like the shell. I do use a brush to paint it just takes practice to get a smooth finish. I would absolutely practice on some smaller things before I painted anything of value. The harder question, am I ruining it?, is partly up to you. The first thing you can find out is how much it’s worth. I always get a little testy when people say things like you ruined an antique because really unless you are planning on selling it then what it’s worth is really only relevant to you. Having said that, if it’s a priceless or expensive antique you obviously wouldn’t want to paint it. Most people don’t own those kinds of pieces. Unless it is in pristine condition it would need restoration anyway, if you decided to go that route. That also devalues the piece. Not as much as paint would, but still. Anyway, the point is you really have to ask yourself (once you’ve determined what the furniture would be worth as is) what it’s worth to you. Would you be more like to enjoy it now, as is, or are you more likely to enjoy and appreciate it once it fits in better with you decor? Paint can always be removed and a piece can always be restored to it’s originally glory if desired. Hope this helps!
Hi Jamie,
Your answers are great. They really helped. I am going to be practicing my painting. I really want to keep the set and it definitely does not fit into our current decor. I can’t wait to get started but I will practice first as you recommended. Thanks so very much for your answers!
You are very welcome!
I have this same dresser. I lightly sanded it and then painted it. The paint looked like it had holes in it. The best way I can describe this is that if you had flour on the counter and you sprinkled water in it. Those holes are what they look like.
What kind of paint did you use?
I did it two years ago, but I believe it was water based latex.
I do not recommend latex for painting furniture for this very reason. It isn’t breathable. It’s likely something (moisture, oils, etc) was trapped under your paint and you are seeing that “bubbling” to the surface. Either way, painting with latex, over a previously finished surface, can be very tricky. I always recommend a furniture paint since it is specifically designed to be applied over a previously finished surface.
Thank You
Hi, I have the same exact dresser and wanted to paint it. I bought it previously from a thrift shop and the previous owner had spray painted (American Accents Stone Creations spray paint) so I had to sand it down because it was the textured type of paint. I wanted to paint it a dark gray, like you do and does it need to be oil based? I am so happy to find out that the top can be painted because I didn’t think it could!
Hi Kathy, I never used an oil based finish unless I am going for super glossy. To pull off a look like the one I did for this post I’d use a chalky finish paint then top off with a wax finish. Two paints that I love are DecoArts Americana Decor Chalky Finish available Micheals and Home Depot or Fusion Mineral paint (fusionmineralpaint.com). If you’ve sanded the top lightly to remove some of the sheen you may not even need to prime it first with these two paints. Test first to be sure!
Thanks so much! I am going to try that!
Simply gorgeous my dear! 😀
Thank you!
Hi! I’m doing this project next week with my childhood French provincial bedroom suite, the paints and colors you suggested. Did you do any prep to the furniture prior to paint? Any top coat to seal once dried? Did you soak the handles in just soapy water? Thanks! 🙂
Hi Becky, it really depends on the furniture. Some of it is solid wood and some of it isn’t. I always do prep work but when painting something that isn’t solid wood, prep work is even more necessary. Assuming you’re working with solid wood, I’d do a light sanding and clean any oils with a vinegar solution. And depending on what I’m using the furniture for, I use a wax or top coat. Warm, soapy water works for the handles will work and you could toss in a little vinegar, too. Happy painting!
HI Jamie, I’m new to chalk painting but have 3 pieces in this French Provincial that I want to paint and I love your color combinations. I might have to “steal” them. 🙂 Quick question about the drawer handles; did you also paint these after cleaning them?
Thanks in advance for your help.
Wanda
Hi Wanda!
Welcome to the wonderful world of chalk paint! I did not paint these handles but I have done so in the past. As long as they are very well cleaned and free of any oil, dirt or polish, the paint will adhere. Hope this helps!
I am going to attempt to do this project this summer. Great job, Jamie!! I recently redid a baby high chair that is 50 plus years old and when I took off the hardware, there was caked on 50 year old food in there! Yikes! I soaked all of the hardware in a very thick paste of baking soda and water. I scrubbed them clean after letting soak for about 12 to 18 hours, then lightly spray painted them. It worked like a charm!