DIY Floating Shelves – This post contains Amazon affiliate links. Please see my full disclosure policy for more info.
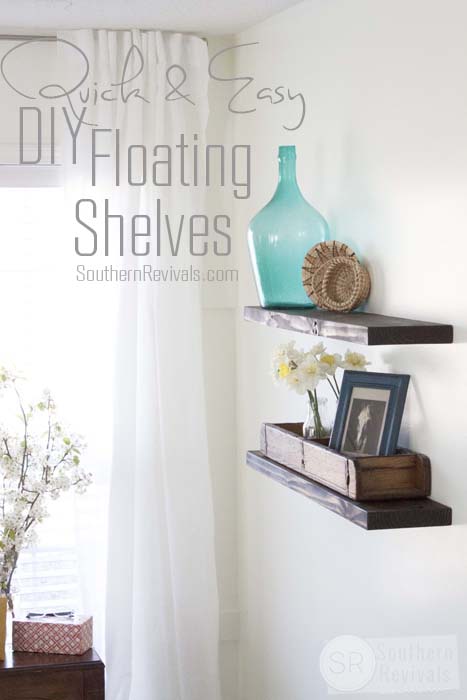
What is it about those gravity defying planks of perfection, commonly known as floating shelves, that have us wanting to cover all vertical surfaces with several of them? Is it their modern clean lines, their sophisticated simplicity or the fact that they look like they could fall of the wall any minute.
But don’t.
And that’s cool.
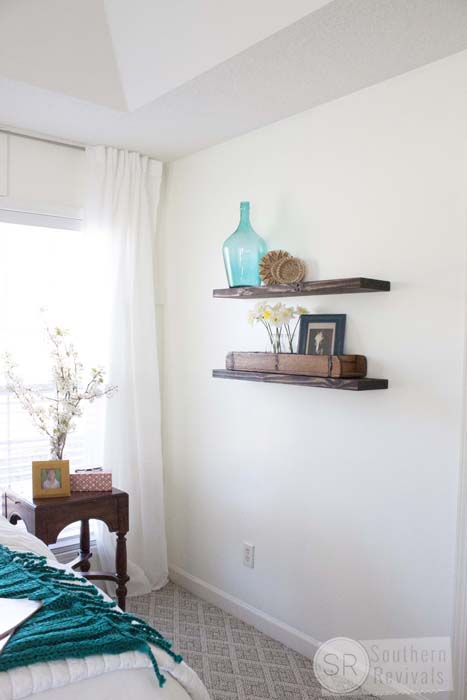
Ever since I posted my Under $500 Bedroom Makeover where we managed to pull off a pretty amazing {even if I do say so myself} makeover for just $485 bucks, many of you have said – Yeah, but what about those shelves?
Well, here goes and, by the way, there’s no building required!
The boards we used in the bedroom makeover were 2x10x10’s. I chose the 10″ deep boards because it’s what looked best for that particular wall and because it would be deep enough to accommodate what I wanted to put on them once complete. I have done these shelves in two rooms in the house now and the depth and length varied both times depending on the needs of the space {more on why in a minute}. But one thing remains the same and that is the 2″ thickness of the board and that’s not just because I like the look of a chunky board but also because it allows you to do this technique without having to worry about splitting your boards, the weight it can carry, etc. I wouldn’t recommend this technique with a thinner board.
{EDIT: Please keep in mind that when a board is labeled as 2″ in the store it is ACTUALLY 1 1/2″ thick. The boards I used here were labeled 2″ but their actual thickness is 1 1/2″.)
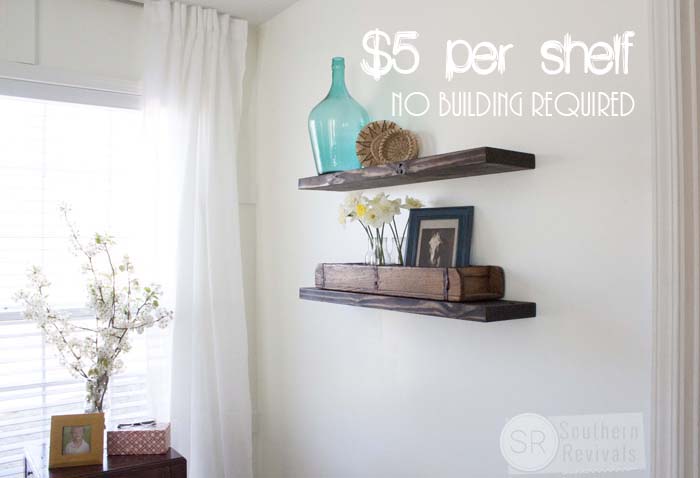
There are many variations of floating shelves out there. I like to think of these as the purist version – no brackets, no cleats – just shelves seemingly suspended in mid-air. Here’s how we did ours.
You Will Need:
- 2x10s (length depends on number and size of shelves)
- 4″ screws (we did not use pocket hole screws but longer wood screws to grab more of the stud)
- Drill
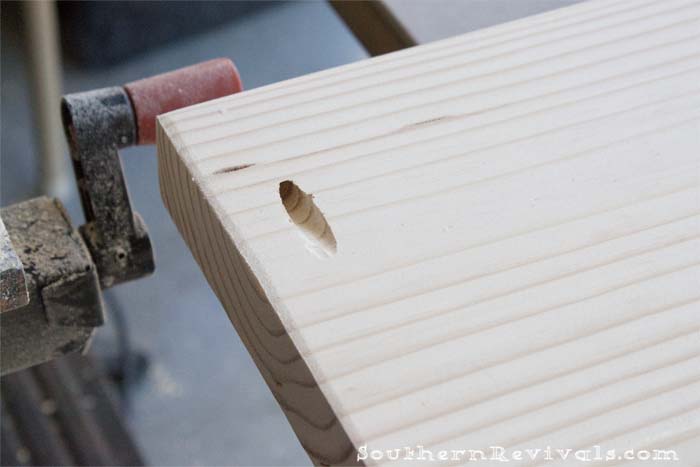
- Kreg Jig Pocket Hole System
- Saw
- Sand paper
- Stain
- Sealer
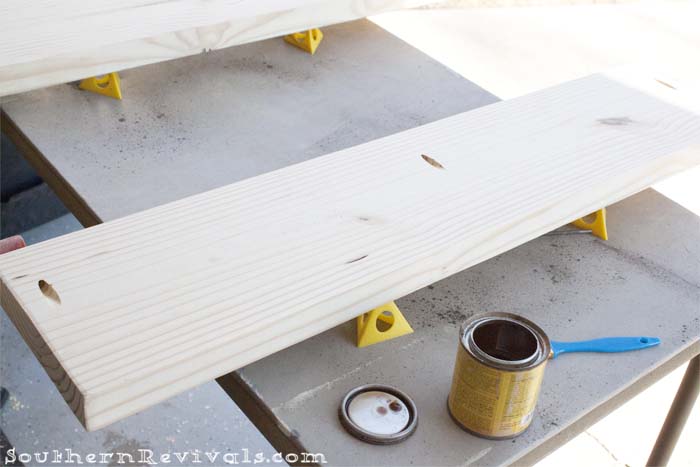
First, a note on choosing the length. I’ve explained why I chose the depth, and that’s pretty relative to your space, what you want to place on the shelves and is basically a personal choice, and choosing the 2″ thickness gives you the best looking and most sturdy shelves (Remember, that means your shelves will actually be 1 1/2″ thick). But there’s a pretty basic reason for choosing your shelf ‘s length and that is, so it’ll line up with the studs in your wall.
We made our shelves approx 3ft wide because this way we could get 3 pocket holes per shelf and each one would line up with a stud. When we screwed them in, they’d have the extra security of being in a stud. Honestly, I wouldn’t recommend doing this version unless you can get at least one of your screws in a stud. Just for added security.
If, as was the case in our guest bath where we also added floating shelves, you cannot line each of the shelf’s pocket holes up with a stud, you can use a toggle bolt for added security. I must mention though that while we couldn’t line up all of the holes with a stud in our bathroom remodel, we were able to get a least one to screw into a stud. If not, I wouldn’t recommend floating shelves for that area. If you have any questions on using a toggle bolt when necessary please don’t hesitate to leave your questions in the comment section below!
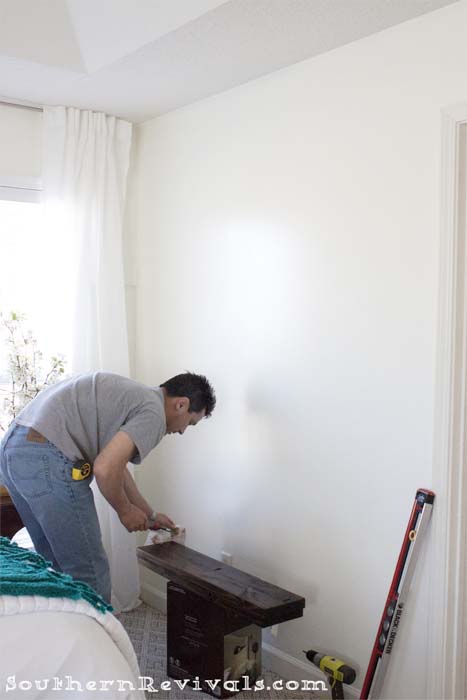
The first thing we did was find our studs in the wall, that helped us to decide how long we wanted the shelves, then we drilled our pocket holes using our Kreg Jig. So measure the distance between your studs first, this helps to decide your shelf length. Mark on your board where the studs are and drill your pocket holes there.
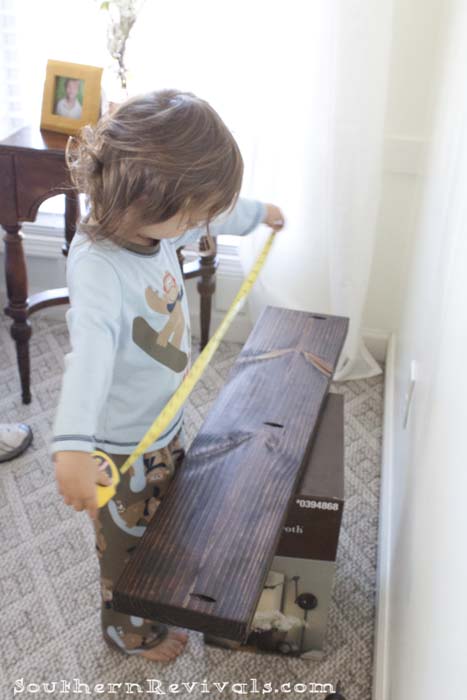
I have the cutest little helper in the world and he has known how to properly operate a tape measure since he learned to walk!
Our pocket holes now lined up with the studs in our wall so that all 3 screws are secured into a stud. We used 4″ wood screws, not pocket hole screws. We felt the pocket hole screws didn’t come in a long enough length and we really wanted to get a much screw into the stud to make the shelves as sturdy as possible.
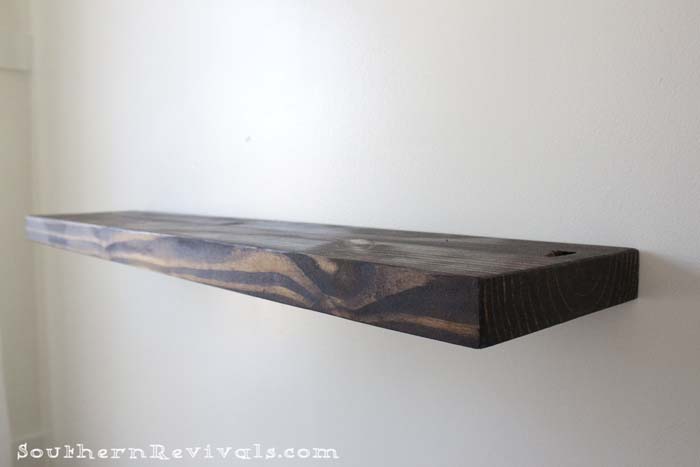
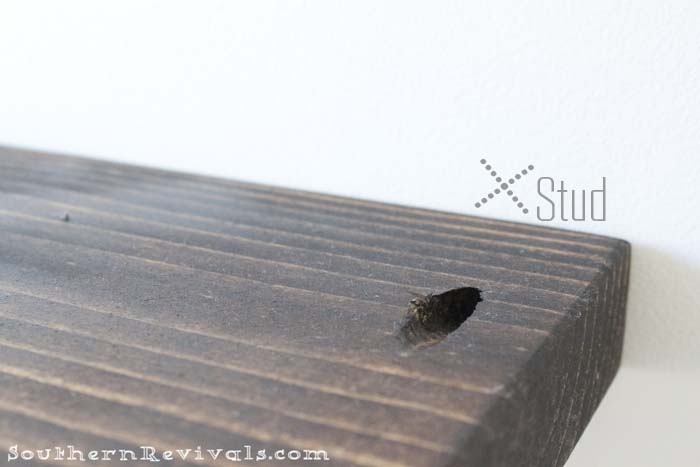
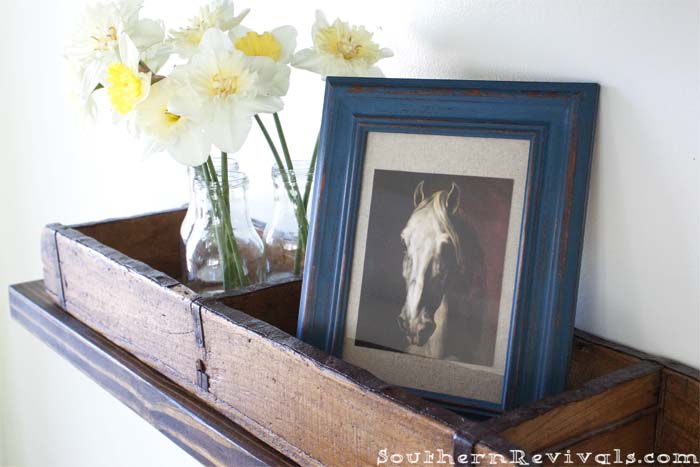
Floating on air, right? And because the shelves are high enough that you can’t see the tops, there’s no need to fill those holes with anything other than stain to match the rest of the shelf. That way they’re easy to remove later on if you ever needed or wanted to. No one would ever notice the holes once all the decorations are in place anyway.
These shelves are done in just one coat of Dark Walnut stain with Hemp Oil to seal.
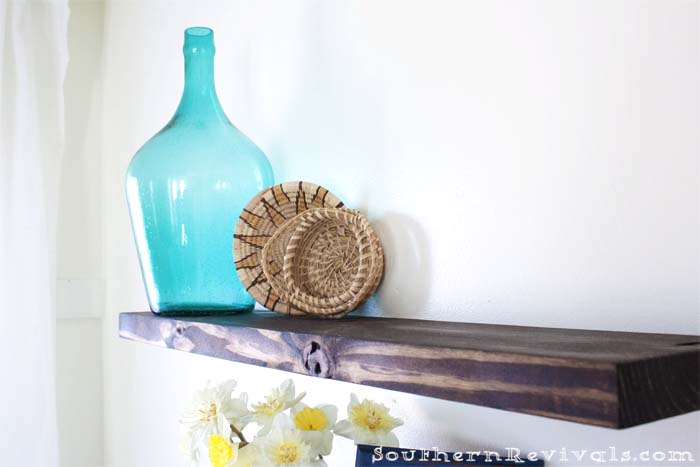
They have such a natural and earthy beauty. Not to mention gravity defying good looks!
And my favorite part is I can change them up any ol’ time I want!
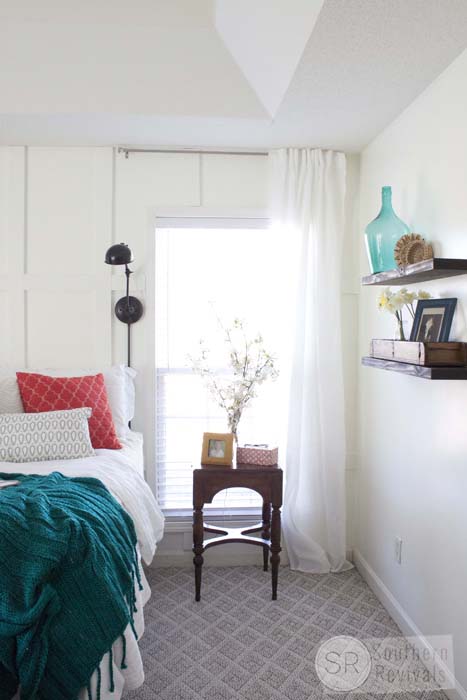
For now though, I love them just the way they are!
These shelves cost just $3 – 5 each to make depending on the supplies you already have on hand, i.e. Stain, paint brushes, screws, etc. That’s a bargain, especially for such a great look.
Are you considering floating shelves now that you know how easy and cheap {but definitely not cheap looking!} they are?
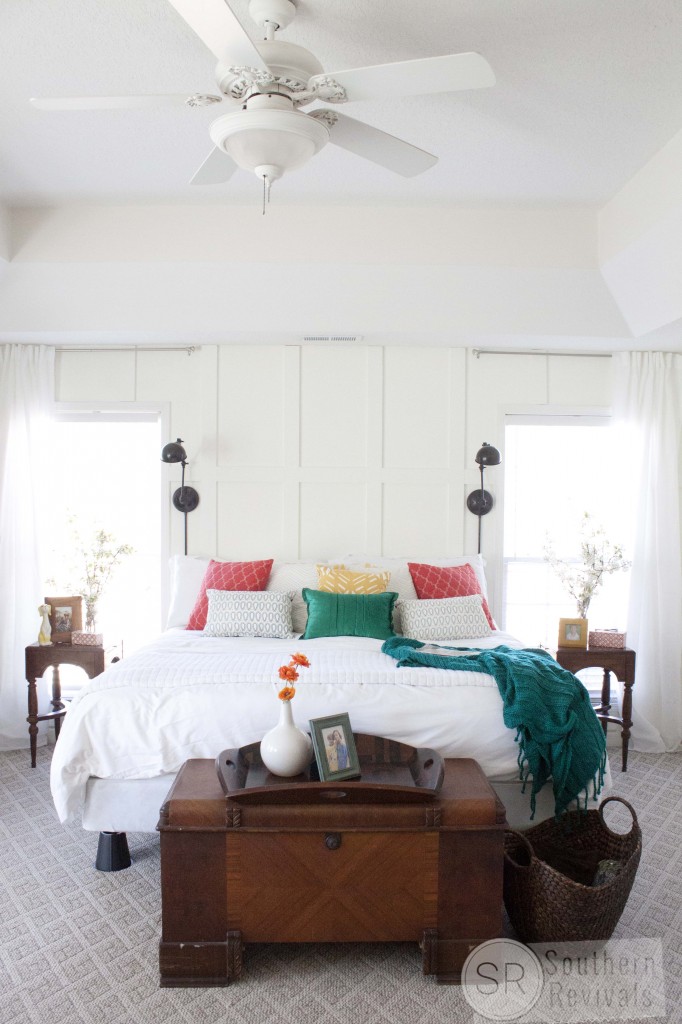 Click here to see the entire Bedroom Makeover
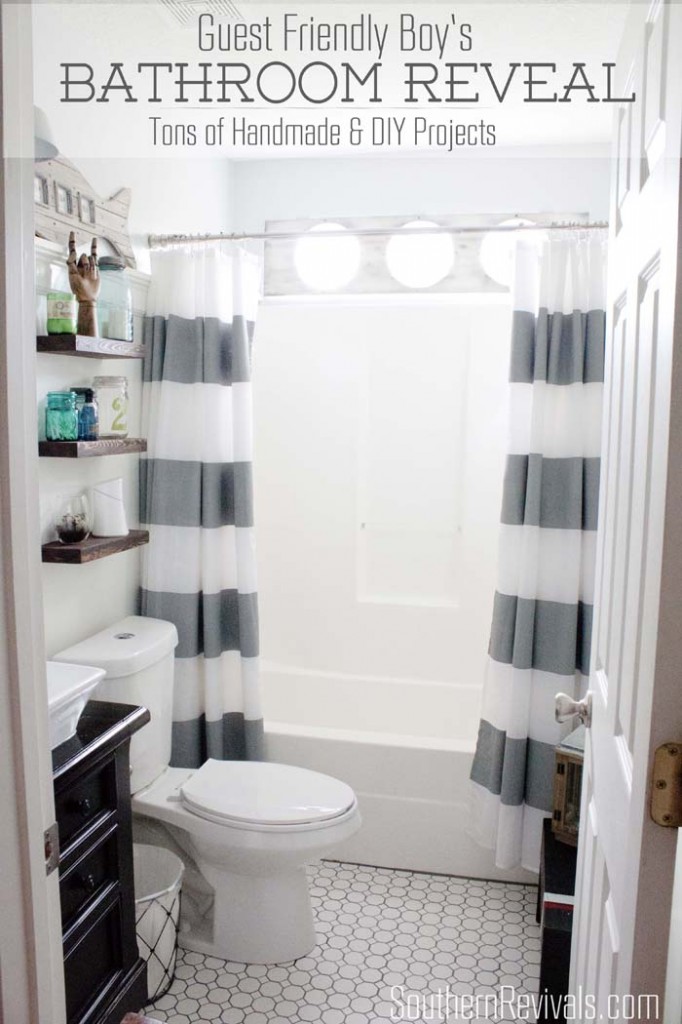 Click here to see how we also installed these shelves in our Bathroom Remodel


I love the floating shelves! I have been searching for some for a DIY for my bathroom. But what would you do if you didn’t have a Kreg Jig? I can’t imagine the holes would be the same angle,so leveling the shelves would be challenging.
Your bedroom revel is amazing!
It is easiest to do with a jig. If you do many DIY projects purchasing one is totally worth it. You can get a a Mini Kreg Jig for $20. Otherwise you can drill pocket holes without one but I find that the easiest and most convenient way is with a jig. Thank you so much!
Thanks! that little mini Jig looks like a handy tool. My husband just said “oh no….I’min trouble!”
Found this tutorial while looking at your bathroom makeover (which is gorgeous, BTW) — just curious how strong these shelves are? I was wanting to put them over my toilet, not putting anything super heavy but my husband isn’t convinced they won’t sag after awhile. Have you had any trouble with this?
We have these shelves both in our master (with large glass containers on them!) and in our bathroom. The kreg joints give them strength, we used good, strong screws and they’re in studs. We’re pretty confident about them. It sounds like you won’t be putting anything too heavy on them so you should be fine.
What length screws did you use?
We used a 3″ screw.
My above comment is incorrect, we used a 4″ wood screw as indicated in the post. I wanted to update to hopefully avoid any confusion. I apologize for any inconvenience.
in a lower shelf, would it work putting the screws underneath the shelf, rather than on top?
thanks
I think it could work. It won’t be a sturdy but you’re just planning on putting little thing on there it’s worth a try. You could always turn it over the other way if it didn’t work out!
My wife loves these shelves. She wants me to build her 6. My only question is: Where did you find a board 2″ thick? A 2″x10″ is actually 1 1/2″x9 1/4″. I can order a nominal 2″x10″ but it is going to cost me $8.50 a linear foot. Thanks. Paul
Hi Paul,
Don’t spend the extra money for a true 2″ thick board. Mine are, as you mentioned, in actuality only 1 1/2″ thick. As I said in the post I wouldn’t recommend any thinner board and I should have clarified that by telling folks the board’s actual thickness. I shouldn’t have taken for granted folks would know that. I will be updating my post with that info. That being said, you should be able to knock these shelves out pretty cheaply. Thanks!
Thanks sooo much for the tutorial! I will adding to my bedroom as well! Thanks again and I always look forward to your posts!
That is so great to hear! Thank you!
This is awesome!! I am looking at using this idea for some cat shelves- both smaller (1ft) and longer (6ft). Do you think it would stay sturdy with a 12lb cat on it? traditional diy floating shelves are just so much work!
I think that would depend on how many studs you can anchor it to. I’d try to get at least two ends in a stud, which wouldn’t work for the 1 ft shelves but should for the bigger ones. Studs are usually 16″ apart so I wouldn’t make any shelves shorter than that that would be required to hold very much weight.
I wonder…would this work for a 2×12 at 8 feet? This is assuming of course that I use one pocket screw per stud. At approximately 16 inches apart, that should give at least 6, maybe even 7 points of contact with the studs. Plus, I’m thinking of using the Kreg HD which using larger diameter screws (#14 to be exact) and is expressly designed for larger cuts of lumber. I don’t intend to put a lot of heavy items on these shelves, but I do have two small kids…one is currently and infant. I could see her trying to using the lowest shelf as a rail to aid in her standing and walking…not to mention the chance that one (or both!) of the kids might decide it’s a great idea to climb the shelves.
And lastly, you mentioned in a response to post #8 that attachment points on the underside might not be as sturdy as if they were on top. Is there any specific reason for this? What makes the pocket holes on the top stronger?
Thanks!!
Hi there!
Thanks so much for your comment. To address the question of sturdiness with the pock holes from the underside, think of it like this. Because of the angle of the screw and the weight of the board the head of the screw pulls and keeps the top edge of the board snug against the wall, if attached from the top. With the screw attached from the bottom it will keep the bottom of the board snug to the wall but doesn’t keep the top of the board snug to the wall. Add gravity and things placed on the shelving and this compounds the problem.
As far as children go, I have a small child, too and none of our shelves are low enough he can reach. I don’t think I would risk it if I thought there was a chance he’d hang, hold on or climb them. You know your children better than I do, of course, and I wouldn’t dream of trying to tell you what to do. But I think it’s only fair to tell you.
For the rest of it, it sounds like combined with the Kreg HD and the fact that your shelving will be placed in studs at several points, I think they’ll be quite sturdy and stunning to look at. Good luck!
Can’t wait to put these up! What kind of screws did you use? I know you said 3″, but drywall or wood? Will I need some kind of long screw bit to be able to drive the screw in enough?
You would use wood screws for this project. And yes, you will need an elongated bit for the screws. If you have or purchase a Kreg Jig it will come with the bit that you need.
Were these 3″ kreg pocket screws? The longest I can find are 2.5″.
You’re right, Kreg doesn’t make a longer one. We didn’t use Kreg screws. We wanted something longer so that it would really bite into the studs. We use a 4″ wood screw instead.
The studs should be 2×4’s … so with 4″ screws…you are probably run the risk of going through the stud significantly and maybe even hitting wires or other objects in the walls… just IMO (im not a pro)
Once the screw enters the wall (sheetrock is 1/2″ thick) and through the shelf itself, there isn’t enough of it to go through the 2×4 stud. The way a 2×4 stud is turned in the wall you get 3.5″ of stud to drill into. Factoring in the sheetrock and the shelf itself, the screw never comes out the other side.
Built these shelves this week. They were so easy to make and install. I made one that even fit into a corner. I mitered the 2×10, used the Kreg Jig to screw the corner together. Filled all the holes, seams, knots with wood filler. Then painted it. In the corner I placed the Kreg Jig hole on the miter to angle it into the corner stud. It all worked beautifully. I also discovered that I could use the B and C slot of the Kreg Jig and get two screws into the stud. I did that on the farthest end since my shelf was so long (23″to corner than 48″). The smaller shelf I made may should have had longer screws than just 3in since the warp of the board and the wall made a gap of 1/4 inch, but it still seems pretty secure.
Thank You so much for this common since, easy DIY.
common sense 🙂
They sound amazing! I’d love to see pics! Thank you so much for sharing with me.
OH thank you! I was looking for an easier way to do floating shelves and this might just fit the bill!!!! YAY!
Great! Glad it was helpful!
What is the bolt thing you mentioned? I want to put these about the toilet in the bathroom and I don’t think I can get more that one stud
They are called toggle bolts. They’re thick and strong and will give you some added stability. Careful what you place on the shelves though when you’re only able to anchor to one stud.
I have been attempting to hang these type of shelves with a screw in one stud and toggle bolts for the other screw however I can’t get the screw to go into the actual metal part of the toggle bolt as the screws are at an angle. I also tried using toggle bolts that screw onto the end of the screw prior to inserting into the wall however the screws with the small enough head to fit in the pre-drilled hole in the wood are too short to use. Help and Thank you!
We used 3″ toggle bolts, unfortunately I don’t remember the size (diameter) of bolt. We got ours from Lowes.
Hi Jamie,
Great work on the shelves. I am in a similar situation like Alissa. I am curious to know how you managed to fit the toggle bolts into the wall through a pocket hole given the screws has to go through the drywall at the angle of the pocket screw. Was the toggle bolt installed at the same angle?
Any advice would be helpful.
Thank you, Dan
Hi Dan,
First, you’ll drill your pocket holes into your shelf. After you drill your pocket holes, take a 3/8″ drill bit and drill through the pocket holes so you can get your toggle bolts through. The reason you’ll need to do this is that the pocket hole drill bit is designed for use with a screw, not a toggle bolt. The tip of that bit won’t be long enough to go all the way through. This doesn’t matter when you’re using screws but since you’ll be using a toggle bolt you’ll need to make sure that hole is big enough.
Once your pocket holes are predrilled, drill holes into your sheetrock just big enough to get the folded wings of the toggle bolts through. Stick the bolts through the shelf then screw the wings onto the end of your toggle bolts. Then push the wings through the holes in your sheetrock. Tighten bolts. Once they’re snug, check they’re level before tightening.
I love this! So much nicer than those Ikea floating shelves that everyone has.
We’re trying to decorate our apartment on a budget, so we might just give it a try.
Btw your bedroom is absolutely gorgeous, very inviting 🙂
Thanks so much!
LOVE the tutorial. We have a ton of 2x10s in the basement from the previous owner and I can’t wait to get started! I always wondered why the boards were never quite what they posted as the measurements at the store also. Found this explanation on wisegeek: “Indeed, at one point in the milling process, two by fours actually do measure 2 inches by 4 inches. This is the measurement of the planks just before they are run through a machine called a planer. A planer uses sharp blades to shave off all of the imperfect edges left behind by the rough sawing process. Commercial lumber mills may have to plane off as much as 0.5 inch (1.27 cm) of length and width from two by fours to provide a quality product for carpenters, roofers, and homeowners.”
Great share! Thank you!
We have a 3 ft long shelf that has 2 studs to drill into however it is still wobbly once installed (following the above direction). We are trying to use a toggle bolt however the screw head is too big to fit through the hole made by the Kreg jig. How were you able to use your toggle bolts? Thank you!
Your toggle bolts are too big. You’ll need to find a toggle bolt small enough so that the head of the bolt will fit in the hole and the wing (nut) will fit into the wall. Hope that helps!
Do you think this would work for books?
These are really awesome. Do you think these would take the weight of books?
It depends on the amount of anchors you can get into studs and the weight of the books, how many books, etc. I definitely think you could put books on these but unless you are anchoring most of the board into studs with heavy duty bolts I wouldn’t suggest them as an alternative to bookshelves.
Thank you for sharing this project, it’s genius! I am hoping to make a floating shelf a little over 6′ long. I would aim to hit a minimum of 4 studs but hopefully 5 studs. Do you feel this would be sturdy enough to hold a plant (5-10lbs.)?
I think that would depend on how many studs you’re able to hit and also the placement of the plant so that the weight is evenly distributed. If you can get it into 4 and you’re using a thick study board I would think so. If you won’t centering it on the shelf then I would definitely keep an eye on it. It sounds like you’ll have a pretty sturdy shelf. Just keep in mind that the weight of the shelf itself needs to be factored into to how much weight the bolts/studs can handle.
Awesome shelves. What kind/color stain did you use and how many coats? Thank you!
Hi Jeff & thanks! They are done in one coat Minwax Dark Walnut and sealed with hemp oil.
HI, I love the shelves! What kind of wood did you use though? Is it pine, fir?
Thank you! And yes, it is pine.
My husband and I did 36″ shelves with 3 pocket holes for each shelf. We used 3″ wood screws that went into 3 studs; however, the front of the shelf sags a bit. Any advice? Thanks!
Make sure the top of the back of the board is touching the wall. It sounds like your screws need to be tightened. Hold the board up from the front and push toward the wall while screwing in the screws. If the top back of the board isn’t touching the wall you’ll get sag. Also, I’m saying all of this assuming your screw holes are on the top of the board, correct?
Hi Jamie, what is your suggestion to make a 10 inch square floating shelf with this technique ….with one center screw in the stud and 2 side one in the dry wall. I want to scatter these shelves on a wide open wall to display pottery which can be 1 – 2 lbs.
Appreciate your suggestion and advice.
I don’t think a square shelf will work using this technique, especially since you’d only have one screw in a stud. The problem with a square it that it doesn’t evenly distribute weight, there isn’t enough support at the front of the shelf. You won’t have the stability you’d need to hold the pottery. I know it isn’t the same thing but you could do something similar to the shoe rack I did here: https://www.southernrevivals.com/2015/08/man-closet-makeover.html
Using this alternate technique you’d need two 2x4s along the back to screw the shelves to. This could work.
Thanks so much for the quick response !! I will stay with the longer length
You are quite welcome! I’d love to see pics once you’re done. Good luck!
I know my comment well after you posted this, but I’m wondering if drywall anchors would work for these? I want to center two shelves above the toilet in our guest bathroom. My guess is I could get into one stud and use two drywall anchors for 24 inch shelves.
Hi Anna,
I did this in our bathroom. One stud for each shelf (center) and two drywall anchors on either end. Our shelves are also above our toilet. This can definitely work, just be mindful of how much weight you place on these shelves and check them periodically to make sure they’re still secure. Hope that helps!
Hi! Great shelves, thanks for writing the post and sharing your idea. I have a similar project in mind, but there is no stud where I want to install the shelves. Do you think a toggle bolt could be substituted for the wood screw/stud? The very helpful man at the hardware store did not think a toggle would work if installed at an angle, I don’t see why it couldn’t. Thanks!
We used toggle bolts with those expanding nuts in our bathroom where there were not studs and they work great. Of course we don’t put anything too weighty on those. Hope this helps!
Hi! I love your tutorial so am attempting to create my own shelves.
I had a question about the screws you used. Everything I was reading about pocket holes was that the shoulder of the screw head had to be flat to get a tight fit and it was mentioned that wood screws could cause the wood to split.
Did you have any concern with splitting happening? Did you use a small washer to create the flat shoulder with the wood screw, or just went straight 3″ wood screws in the pocket holes you made? If you did just use the plain wood screws does the shelf ever loosen from the wall?
The shelves I’m wanting to make are 5ft long and from a 2×8 board, with 4 studs to drill into.
If you can use pocket hole screws then those are always your best bet when working with pocket holes, especially when creating joints (as with building furniture). However, in this case, we needed longer screws so that we could hit our studs and pocket hole screws just don’t come in long enough lengths, also we weren’t creating any joints, so we went with flat-head wood screws. We did not use washers. We were able to get them to sit fairly flat in the pocket hole. As when placing any screw into a pre-made hole always take it slow and listen to your wood. If it starts to make noises indicative of splitting, stop. Hope this helps! Have fun with your project!
Love this approach! I’ve got a 12 foot span with a perpendicular wall at each end. If I screw into each stud along the back and the studs in the perpendicular wall do you think this would work?
I think your shelves will be the sturdiest of them all and I bet they’ll look great, too. Good luck!
You said you dont recommend this with thinner boards. I am trying to attempt this wtih a 1″(3/4″) board that is 9.5′. I will be hitting about 6 studs( pretty sure whoever built the wall didnt follow standards). I will only be putting small collectible figures on it, nothing heavy. Do you think using this thin of a board will be a problem? I mean worst case scenario is the shelves fall and id have to redo with a thicker board, correct? I didnt want to use a thicker board because i felt it was overkill and would add to the weight of the load. Also, i am using 8″ deep boards. Thoughts?
You could always try and see how it works! While a thicker board does add to the weight of the load it also gives strength to the pocket holes. If you try it, let me know how it turns out!
I am staining the boards as we speak. Probably wont get them up until monday. Ill reply with how they feel once they are up.
Awesome! Have fun!
Thank you for sharing this wonderful idea !
We are trying to do these floating shelves in out bathroom with 2X8 board. The shelf is 35″ wide and we have found two studs.
[Sorry for these dumb questions, we are very new to the DIY world 🙂 ]
1. What kind of driver did you use to drive the screw into the stud? Did you drill a pilot hole first through the pocket hole into the wall?
2. We were thinking to use slot B and C of the Kreg jig and drill two pocket holes for each stud. Do you think that will work? or is it an overkill?
Thanks,
Hi! Not dumb questions! We used a drill and the extended bit that comes with the Kreg jig to drive in the screws. Two pockets holes for each stud couldn’t hurt. I don’t know that it’s strictly necessary but it is a pretty heavy and deep board you’re using so I definitely think it won’t hurt. Good luck!
Thanks for the tutorial! Looking at doing this and curious how your shelves are holding up currently? Thanks 🙂
We’ve had these shelves in our boys’ bath and in our bedroom and our shelves are as sturdy as the day we first installed. Enjoy!
Hello, so my daughter wanted floating shelves for her books. We came across this option and she liked it better than the other way (so do I). This looks cleaner and I really do not want anything thicker than 2″ (actual 1.5″). So we bought the wood, stain, poly and we have just finished. Color is amazing and she picked this out all herself (wife loves it too and now wants to start building other items). The wood was 2×12 (actual 1.5×11.5) and I stripped it down to 10″ so we actually have 1.5″ x 10″ x 36″. We are able to hit 2 studs, evenly spaced and am hoping that would be sufficient for the weight and have bought 2 sets of 4″ screws and cannot seem to get them to fit (head to big for the pocket hole). 1 set used hex the other was t30 bit. After reading the comments, it appears you bought basic 4″ wood (cross-head) screws, is this correct? Also after further reading, you recommend the screws be placed on top. I was planning on placing 2 shelves with screws underneath to hide them but you are recommending the be placed on the top for stronger hold, is this also correct? How much difference is there in support / weight when screwing the shelves on the top vs underneath? Thank you for your help and the idea!
Hi John!
I’m so glad you guys like the look! Yes, we used regular Phillips head screws, as we often do when we need longer lengths than pocket hole screws come in.
There is no clear evidence that placing the holes on top offers a stronger hold, just a supposition on our part. It seems to us that having the majority of the wood hanging ‘from’ the screws as opposed to the weight of the wood sitting ‘on top’ of the screws offers more support. Having said that, our shelves are up high so this also keeps the pocket holes from showing.
I wish you guys the best of luck and would love it if you shared a pic when you’re done. Happy DIYing!
Hello Jamie
So after getting the screws, i tried both ways as we originally planned on having one with the screws on the bottom and one with them on top. both times were unsuccessful. ;o(
I pre-drilled holes into the studs but could not get the screws to sink in and the shelf were leaning forward. 1st attempt I was able to use SpeedOut to get the stripped screws out. 2nd attempt the screws got stuck and had to sawsall the board off the wall with the screw still within the pocket hole. Double :o( :o(
So now I am trying to figure out an alternative to get the shelves up and welcome any ideas.
They did look great despite them leaning forward and 1/4″ off the wall.
Oh no! So it sounds like the problem might be that your bit wasn’t long enough. You know how the Kreg jig comes with a really long bit? That’s to allow your drill to get down in those pocket holes. If your bit isn’t long enough your drill will bump into the wood, especially since those screws go into those pocket holes at an angle, and that causes it to lose tension on the screw. Then the screw strips out. If you don’t have a longer bit, you can drill your screws in most of the way and then use a long screwdriver to continue to tighten. That should close your gap without stripping out your screw. There’s really no need to predrill into the studs so if you want to try it again, I’d just move the shelves up (or down) slightly to cover the holes you already made and try it all again. Good luck!
I am using a 6″ Phillips drill bit since I am using #10 x 3.5″ Philip pan head screws and not the square head screw that came with the Kreg Jig Kit. I notice you have 3 screws holding yours while I am using only 2 and am wondering if this is too much weight for a 36″ board. I think I will re-drill new pockets to accommodate 3 screws.
Hi John,
Did you get it to work out?
Can I get more details on the 4″ wood screws used in the pocket holes?
Hi Bob,
So we just used a 4″ screw with a coarse thread. It doesn’t have to be a wood screw. It can even be an exterior screw, anything with a coarse thread. Hope that helps!
How do you think this would do holding up cookbooks. We would hit at least 3 studs.
Hi Matt,
I would say that might depend on the how big/heavy the cookbooks are and how many are on a shelf. It’s good that you’re hitting 3 studs but there will still be weight on those screws. If it were me, I’d try it and if they started to sag I’d have a backup plan for braces underneath each shelf. Good luck!
This looks fantastic, just one question. Apologies if it’s already been asked. I’m looking to do some cat shelves, if I install 3 foot shelves and am able to get the screws into studs at either end, and possibly in the middle, would these be strong enough to hold a 12 lb cat? Thanks again.
Thank you! That’s a good question! I’m not sure and I’d hate for your cat to get injured. If you try it, just be sure to keep an eye out for sagging or support issues.
I am thinking of using this technique to install some shelves in 2 nooks next to our fireplace, mainly to display small photos, decor stuff and maybe a few books. The shelves will span around 5′ so should be able to tie into at least a few studs. Just curious if you pre-drilled any pilot holes into the studs…or will the wood screws draw the shelf flush to the wall alone w/o pilot holes? Thanks so much, looking forward to giving this a shot!
Hi Jason,
We didn’t drill any pilot holes and our shelves are nice and tight. Our bit wasn’t long enough to drill the shelves all the way in so we use a screwdriver for the final tightening. Good luck!